Your coupon for will be reflected when you check out!
✖
Your coupon for
✖
Hello!
You're visiting the PartSelect site in U.S.
Would you like to shop on the Canadian site?
Stay on this site
Go to Canadian site
✖
Model Number Locations
1Select Category Type
Select Category Type
2Select Product Type
Select Product Type
3Select {MODEL} Type
Select {MODEL} Type
Sample Model Number Tags
Model numbers can be made up of numbers (1005400, for example) or a combination of letters and numbers (LAT1000AAE). The model number will most likely appear on either a paper sticker or a metal plate. Your appliance's model number tag may look similar to the sample model number tags shown here (model number highlighted in yellow):
Model has been saved to My Models. If you're not signed in, your lists are available on this device and will expire within 30 days.
Model has been saved to My Models.
The temperature sensor, also known as the oven temperature sensor assembly is usually found in the back of the oven. The function of the oven temperature sensor assembly is to measure the temperature ...
This infinite control switch regulates the power delivered to a surface heating element, allowing precise temperature control during cooking. It functions by cycling power on and off based on user inp...
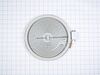
This dual radiant surface heating element is a genuine replacement component designed for select GE electric flat-top ranges, stoves, and cooktops. Commonly referred to as a "haliant" element, it feat...
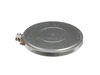
This is a dual ceramic surface burner for ranges. This burner, also known as a heating element, is used within electric ranges to act as a stovetop burner. This burner measures approximately 10 inches...
This window pack assembly, also known as inner door glass, is supplied directly by the manufacturer for use in range ovens. It has measurements of approximately 22 inches by 14 inches. The inner door ...
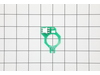
This part provides a way of connecting individual electrical wires and offers protection of the device from electrical surges (voltages and/or currents).
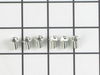
This part is a replacement screw for your oven. It is made of black metal and is sold individually. This screw is approximately 1/4 inch in diameter and about 1/2 inch in length. It is designed to con...
This surface element is designed to deliver heat to a specific cooking zone on the top of an electric range, providing consistent and efficient performance for everyday meal preparation. Located benea...
Is your refrigerator messy and unorganized? The Whirlpool Snack Pan Assembly could be just what you need. This original and reliable manufacturer's part gives you a practical way to neatly store a var...
$35.80
In Stock
Order now and your part arrives by Apr 23
Questions And Answers for JS760SL1SS
Ask our experts a question about this model and we'll get back to you as soon as possible!
3 questions answered by our experts.
Sort by:
< Prev
1
Next >
Search filter:
Clear Filter
Your search term must have 3 or more characters.
Keep searches simple. Use keywords, e.g. "leaking", "pump", "broken" or "fit".
Sorry, we couldn't find any existing answers that matched.Try using some different or simpler keywords, or submit your new question by using the "Ask a Question" button above!
Fred
December 27, 2022
Door won't close to normal position. Pops out from fully closed position approx 1-1/2 inches. Appreciate any suggestions to identify damaged or worn parts to be replaced.
For model number JS760SL1SS
Hello Fred, thank you for your question. It sounds like the springs in the Hinges have sprung. The Hinge is part PS1017148, and is sold separately and the same part will work on either side. We look forward to hearing from you.
Bad line bad outlet after power outage. Checked voltage at plug and appliance and all was deemed OK by electrician. Tried turning off circuit multiple times. Allowing up to hour to reset. No luck. Appliance less than 5 years old. What control board ?
For model number JS760SL1SS
Hi Dan, thank you for reaching out. According to our research, the issue is probably with the control board assembly, part number PS12722626. Before replacing the control board, we would recommend checking the terminal block kit, part number PS953027. We hope this sorts out your problem!
The oven won't turn off! The cooktop is fine and the oven will pre-heat well, but when I hit the "Off" button, the oven remains at whatever temperature it pre-heated to.
This happening even if I turn it off at the breaker and then turn it back on- It immediately kicks into heating to whatever the last pre-heat was. Any idea what might be wrong?
For model number JS760SL1SS
Hi Scott, Thank you for the question. This sounds like an issue with the temperature sensor, part number PS10059162. The function of the oven temperature sensor assembly is to measure the temperature inside your oven while it is on and send the temperature back up to the electronic control, which adjusts as necessary. We hope this helps.
Removed six 1/4" hex nuts on rear of oven. Then through front/inside removed a single 1/4" hex nut to actually remove sensor. Unplug sensor connector, remove. Reversed steps, push oven back in place and plugged in. Tested oven function.
The existing terminal block on my Ge oven/Range had melted due to a loose wire causing sparking and starting the plastic casing of the terminal block on fire and melting it, Part select made the part easy to find and had it at my house in 2 days. All I had to do was remove six screws to take the back sheet metal cover off of the oven. U
... Read morenscrew the terminal connections remove two mounting screws that held the terminal on to the oven body. This was a little trickier than it should have been because the melted plastic had reformed making it very hard to access the mounting screws. i then mounted the new piece and plugged the oven in, it took 15 minutes and was very easy. definitely saved me at-least a $100 for the service call i would have made if finding the part wasn't so convenient
Unplugged appliance and removed 5 screws on back of stove/oven and removed plate. Disconnected the sensor and unscrewed it on the inside of the oven. Pulled the cord through and replaced with new sensor. Replaced all parts and plugged in the appliance and tested. Worked great.