Your coupon for will be reflected when you check out!
✖
Your coupon for
✖
Hello!
You're visiting the PartSelect site in U.S.
Would you like to shop on the Canadian site?
Stay on this site
Go to Canadian site
✖
Model Number Locations
1Select Category Type
Select Category Type
2Select Product Type
Select Product Type
3Select {MODEL} Type
Select {MODEL} Type
Sample Model Number Tags
Model numbers can be made up of numbers (1005400, for example) or a combination of letters and numbers (LAT1000AAE). The model number will most likely appear on either a paper sticker or a metal plate. Your appliance's model number tag may look similar to the sample model number tags shown here (model number highlighted in yellow):
Model has been saved to My Models. If you're not signed in, your lists are available on this device and will expire within 30 days.
Model has been saved to My Models.
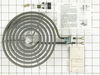
This surface element kit includes an 8 inch element, two wire, 2350 watt surface element, and a terminal block with all three-wire units. These high rise elements do not come with an attached trim ring.
This tilt lock hinge mounted surface element kit includes a 6 inch, three wire, 1350 watt surface element, and a terminal block with all three-wire units. These high rise elements do not come with an attached trim ring.
this repair is simple. Just unscrew the existing connection and attach the new heating element. You may have to break the existing ceramic element, but a new one comes with the new heat element.
I removed the screw holding the tilt-lock hinge, then removed the insulator brackets and unscrewed the wire terminals. Units come with new insulators, brackets, terminal screws & hinge screw. This is a very straightforward operation.
I removed the screw holding the tilt mechanism to the range top. Removed the clips holding the block together. Disconnected the two power leads on the old burner and replaced with the new burner. Closed the block around the leads. Screwed the tilt mechanism back to the range top and that was it!