


JP389 General Electric - Overview
Models starting with JP389
Click on the best match to narrow your results.
- JP389 General Electric Range (GE Range/Stove/Oven Model JP389 Parts)
- JP389 9T1WH General Electric Cooktop
- JP3899R1WH General Electric Cooktop (Gas)
- JP3899S1WH General Electric Cooktop (Electric)
- JP3899T1WH General Electric Cooktop (Electric)
- JP3899T1WHC General Electric Range
- JP389BD1BB General Electric Cooktop (Electric)
- JP389BD1BBC General Electric Cooktop
- JP389BJ1BB General Electric Cooktop
- JP389BV1BB General Electric Range (GE Range/Stove/Oven Model JP389BV1BB Parts)
- JP389BV1BBC General Electric Range
- JP389BV1WW General Electric Range (GE Range/Stove/Oven Model JP389BV1WW Parts)
- JP389BV2BBC General Electric Range
- JP389WD1WW General Electric Cooktop (Electric)
- JP389WD1WWC General Electric Cooktop
- JP389WJ1WW General Electric Cooktop
- JP389WV1WW General Electric Range (GE Range/Stove/Oven Model JP389WV1WW Parts)
- JP389WV1WWC General Electric Range
- JP389WV2WWC General Electric Range
Keep searches simple, eg. "belt" or "pump".

Burner Bowl - 6 Inch
PartSelect #: PS244398
Manufacturer #: WB31T10014
This burner bowl is also known as a burner drip bowl or burner drip pan, and is designed for use with your cooktop or range. It is black in color and is approximately 6 inches in diameter. It can be f...
$18.22
In Stock

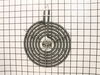
Surface Element - 8 Inch - 2350W
PartSelect #: PS243868
Manufacturer #: WB30M2
The surface element, also known as the coil surface element, transfers heat to the area on top of range. The element is 8 inches in diameter. If your surface element does not heat, over heats, or heat...
$58.42
In Stock

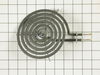
Surface Element - 6 Inch - 240V
PartSelect #: PS243867
Manufacturer #: WB30M1
If you notice that your surface element will not heat properly, you may need to replace it. This surface element is 6 inches in diameter and 240V. It is a Y-frame surface burner element with five turn...
$51.61
In Stock


Grease Filter
PartSelect #: PS243130
Manufacturer #: WB2X8422
Used with a 30" range hood. Sold individually.
No Longer Available

Double Burner Grate in Grey
PartSelect #: PS12073902
Manufacturer #: WB31X28386
Introducing the Double Burner Grate in Grey from the reliable brand, GE. Ideal for your cooktop, this burner grate set presents a stable surface for your cookware, enhancing the functionality of your ...
$235.68
In Stock


Knob
PartSelect #: PS226813
Manufacturer #: WB03X10089
This knob takes a D-shaped shaft.
No Longer Available

Knob
PartSelect #: PS226815
Manufacturer #: WB03X10091
This white knob is sold individually and accepts a D-shaped shaft.
No Longer Available

Element Disc
PartSelect #: PS244021
Manufacturer #: WB30X260
This is an element disk but may also be known as a surface element and it is a part for your range. The function of this disk is to give heat to the cooking area on top of the range. This disk is for ...
No Longer Available

Infinite Burner Switch
PartSelect #: PS236434
Manufacturer #: WB23X10009
Sold Individually. Order quantity required.
No Longer Available

Blower Switch - 3 Speed
PartSelect #: PS237021
Manufacturer #: WB24X10055
Struggling with an unstable or worn-out oven rack? We have the simple solution to get your oven back to perfect working order - the robust Frigidaire Oven Rack. This dependable part offers a sturdy pl...
$88.55
In Stock
Common Symptoms of models starting with JP389
[Viewing 2 of 2]Element will not heat
Fixed by
these parts
these parts

Show All
Little to no heat when broiling
Fixed by
these parts
these parts
Show All


Keep searches simple. Use keywords, e.g. "leaking", "pump", "broken" or "fit".
Replacement of Coils
Removed by slightly wiggling out of the coupling. No tools needed, seriously, (and I'm a contractor). Basically, pull out and snap back in.
Parts Used:
-
Joseph from South Plainfield, NJ
-
Difficulty Level:Really Easy
-
Total Repair Time:Less than 15 mins
35 of 42 people
found this instruction helpful.
Was this instruction helpful to you?
Thank you for voting!
Knob-shaft on element switch broke
***** Unplug the stove *****
1. Removed all knobs, including knobs for other elements and exhaust fan. Because there was years of oil build-up, I used a screwdriver to gently pry off the knobs from the shaft.
2. Remove lock nut from all switches using pliers to first loosen the nuts. Once loosened, I used my fingers to remove th ... Read more e nuts.
3. Remove the rubber gaskets from the element switches, NOT the exhaust fan switch. The exhaust knob gasket is part of the larger glass cover-plate gasket.
4. Remove the glass cover plate to expose the switches. There were two phillips screws to secure the switch plate to the electrical box. Took those off to access the switch.
5. Made a quick sketch of the electrical connections.
6. Removed the damaged switch and the electrical connections.
7. Connected electrical wires to new switch and installed new switch.
8. Took the opportunity to thoroughly clean the glass cover plate and gaskets.
9. Screwed the switch plate back onto the electrical box.
10. Put back glass plate and reinserted the knob gaskets.
11. Put back the lock nuts. Used fingers to tighten then used pliers to give it another quarter turn, making sure not to over tighten.
12. Replaced knobs.
13. Plugged in stove and tested.
Start to finish, it took about 15-20 minutes (mostly due to the cleaning).
Read less
Parts Used:
-
Jack from Steamboat Springs, CO
-
Difficulty Level:Easy
-
Total Repair Time:15 - 30 mins
-
Tools:Pliers, Screw drivers
21 of 23 people
found this instruction helpful.
Was this instruction helpful to you?
Thank you for voting!
Large burner very slow heating
Downdraft stove is over 20 years old, but everything else works fine and it would be a real pain to replace it.
This quick-heat back burner is part of a two burner plug- in unit which takes up half of the top of the stove.
I removed the top from the rest of the unit easily removing five screws. Because of the age an ... Read more d long use it was tough getting the old nut off which holds on the disc, but with the help of some spray lubricant it came off. The old wire ends were also rusted, and to get them off I bent up the old holder, which was going to be discarded anyhow. It was a simple matter to plug in the new unit, tighten the nut, clean up the lubricant with a paper towel, and reassemble the unit, which I cleaned inside since it was dusty. After plugging in the unit I turned on the burner...it works like new and has saved me a very costly replacement. I like it so much that even though the front element works perfectly I am considering buying that disc too just so they will match. Finding your company was absolutely great, and I would recommend you to anyone looking for parts. I still have the manual for this stove so I would feel confident in replacing pretty much any part needed....not bad for a 72 year old woman, (My Dad taught me to do my own work and I am a passable carpenter and plumber; a little more wary when it's something electrical !
Read less
Parts Used:
-
Drusilla from Bloomfield, NY
-
Difficulty Level:Really Easy
-
Total Repair Time:Less than 15 mins
-
Tools:Pliers, Screw drivers
19 of 23 people
found this instruction helpful.
Was this instruction helpful to you?
Thank you for voting!