


JMP28GV1WH General Electric Range - Overview
Sections of the JMP28GV1WH
[Viewing 3 of 3]


Keep searches simple, eg. "belt" or "pump".

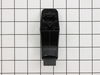
Door Handle End Cap
PartSelect #: PS256613
Manufacturer #: WB7X7183
This oven door handle end cap is used on both the left and right hand sides. Sold individually.
$34.75
Special Order

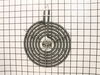
Surface Element - 8 Inch - 2350W
PartSelect #: PS243868
Manufacturer #: WB30M2
The surface element, also known as the coil surface element, transfers heat to the area on top of range. The element is 8 inches in diameter. If your surface element does not heat, over heats, or heat...
$58.42
In Stock

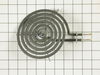
Surface Element - 6 Inch - 240V
PartSelect #: PS243867
Manufacturer #: WB30M1
If you notice that your surface element will not heat properly, you may need to replace it. This surface element is 6 inches in diameter and 240V. It is a Y-frame surface burner element with five turn...
$51.61
In Stock

Bake Element
PartSelect #: PS249249
Manufacturer #: WB44K5013
This bake element is used in ranges and located at the bottom of the oven. The bake element supplies heat for baking. If your symptoms include: your oven is not heating evenly, not starting, or the he...
$75.16
In Stock

Broil Element - 240V
PartSelect #: PS249244
Manufacturer #: WB44K5009
This OEM-sourced broil element with push-on terminals is located on the roof of your oven cavity, providing heat from above to cook and heat your food. It requires a 240-volt power supply to function ...
$78.92
In Stock

Surface Burner Terminal Block Kit
PartSelect #: PS232606
Manufacturer #: WB17X210
This is a surface burner terminal block kit, also known as range surface element receptacle, for an oven, range, or stove. The kit comes with the terminal block, mounting clip, and wires. This surface...
$74.79
In Stock

Screw
PartSelect #: PS271689
Manufacturer #: WH2X930
This screw is sold individually.
$16.05
In Stock

Light Cover
PartSelect #: PS247415
Manufacturer #: WB36X192
This light bulb lens covers the interior light bulb in an oven, range, or stove. No tools are necessary to replace this part. Simply slide off the wire bracket to remove the existing light bulb lens. ...
$26.39
In Stock

Broiler Pan - Large
PartSelect #: PS1517612
Manufacturer #: WB48X10056
This large broiler pan is found in the bottom of your oven and is used to catch drippings from broiling foods. This part includes the grate and bottom pan and is made of porcelain. The grate measures ...
$43.18
In Stock


Screw
PartSelect #: PS234226
Manufacturer #: WB1K5157
This screw is black in color and sold individually.
$15.00
In Stock

Door Handle
PartSelect #: PS231849
Manufacturer #: WB15K5068
This handle comes with the endcaps.
No Longer Available
Questions And Answers for JMP28GV1WH
We're sorry, but our Q&A experts are temporarily unavailable.
Please check back later if you still haven't found the answer you need.
Common Symptoms of the JMP28GV1WH
[Viewing 6 of 6]Element will not heat
Fixed by
these parts
these parts

Show All
Little to no heat when baking
Fixed by
these parts
these parts


Show All
Little to no heat when broiling
Fixed by
these parts
these parts
Show All
Oven not heating evenly
Fixed by
these parts
these parts
Show All
Door won’t close
Fixed by
these parts
these parts
Show All
Oven is too hot
Fixed by
these parts
these parts
Show All


Keep searches simple. Use keywords, e.g. "leaking", "pump", "broken" or "fit".
bake element shorted out, sparking like a sparkler
first, made sure circuit breaker was off
second, used nut driver to remove 2 screws on old element, pulled it from the back of the oven
third, removed 2 wires from old element (spade connectors)
fourth, connected new element and pushed back into oven.
fifth, reinstalled 2 screws securing new element
this was ... Read more all done by my 15 yr old son under my supervision.
Read less
Parts Used:
-
Carl from Wynnewood, PA
-
Difficulty Level:Really Easy
-
Total Repair Time:Less than 15 mins
-
Tools:Nutdriver
89 of 99 people
found this instruction helpful.
Was this instruction helpful to you?
Thank you for voting!
The broiler element caught fire and burned out while I was broiling a steak.
First I removed the two screws that hold the element in place. I then pulled the element out about 3 inches, but I had not turned off the power.
So, I shorted out one of the wires. Then I turned off the power but was afraid to go any farther.
An appliance repairman was at my house that day fixing my dryer seal. He was able to pu ... Read more ll the wires through the insulation successfully and install the broiler element. He did not charge me any extra for this little extra job. But I learned my lesson. Cut the power before you begin! He told me that I could have wound up with a much bigger repair if the short had been in the wire that is connected to the control panel of the oven. I was very lucky!
Read less
Parts Used:
-
Dianne from Rockville, MD
-
Difficulty Level:Easy
-
Total Repair Time:Less than 15 mins
-
Tools:Nutdriver
67 of 75 people
found this instruction helpful.
Was this instruction helpful to you?
Thank you for voting!
There was no heat on the coils.
I opened the lid, and found that the terminal blocks were burnt, the wires were melted. I ordered one set of terminal block to replace the burnt one, and it worked. Before I started, I shut off the electricity in the whole house to be safe.
Parts Used:
-
Shaohui from East Lansing, MI
-
Difficulty Level:Easy
-
Total Repair Time:15 - 30 mins
-
Tools:Pliers
48 of 52 people
found this instruction helpful.
Was this instruction helpful to you?
Thank you for voting!