Your coupon for will be reflected when you check out!
✖
Your coupon for
✖
Hello!
You're visiting the PartSelect site in U.S.
Would you like to shop on the Canadian site?
Stay on this site
Go to Canadian site
✖
Model Number Locations
1Select Category Type
Select Category Type
2Select Product Type
Select Product Type
3Select {MODEL} Type
Select {MODEL} Type
Sample Model Number Tags
Model numbers can be made up of numbers (1005400, for example) or a combination of letters and numbers (LAT1000AAE). The model number will most likely appear on either a paper sticker or a metal plate. Your appliance's model number tag may look similar to the sample model number tags shown here (model number highlighted in yellow):
Model has been saved to My Models. If you're not signed in, your lists are available on this device and will expire within 30 days.
Model has been saved to My Models.
This tray rotates in your microwave ensuring more even temperatures. It is used to hold containers and plates of food or beverages that you heat up inside of the appliance. If you notice that the tray...
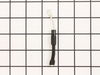
This microwave fuse is just over an inch in length. It has a white ceramic center, and metal on either end. This is a twenty amp 250-volt fuse, and is used to power your microwave. If your microwave w...
In your microwave, the diode allows current to flow one-way only, converting alternating current to direct current. If you notice that your microwave does not heat properly, you may need to replace th...
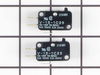
This part is a genuine manufacturer door interlock switch kit, also known as primary micro switch or microwave switch kit, for a microwave. The function of this part is to sense when the door of the m...
The high-voltage capacitor is an electronic device that holds a charge of electricity in the high-voltage circuit of the microwave. The capacitor stores electricity similar to how a battery does, but ...
Ask our experts a question about this model and we'll get back to you as soon as possible!
4 questions answered by our experts.
Sort by:
< Prev
1
Next >
Search filter:
Clear Filter
Your search term must have 3 or more characters.
Keep searches simple. Use keywords, e.g. "leaking", "pump", "broken" or "fit".
Sorry, we couldn't find any existing answers that matched.Try using some different or simpler keywords, or submit your new question by using the "Ask a Question" button above!
Walt
January 24, 2020
How do i open the display board JMC8127DDS
To put the circuit board that i bought from partselect in.
For model number JMC8127DDS
Hello and thank you for writing.
To replace the touchpad and control panel assembly in
your microwave oven first unplug the power cord now use a Phillip's head
screwdriver to unthread the screws securing the grill pull the grill
forward from the top to remove open the oven door and remove the mounting screws securing the control panel lift the
control panel up to detach note the orientation of the wires connected to
the control board then depress the locking tabs if necessary to disconnect
the wires free the hinge tab from the front panel
and remove the screw and washer securing the grounding wire release the ribbon connector remove the two screws securing
the main control board and housing to the control panel depress the retaining tabs and pull the housing out
prepare the new touchpad and control panel assembly for installation by
removing all of the protective coverings now align the control board housing in the new panel and snap it into place thread the screws to secure connect the ribbon connector secured the grounding wire with the screw and washer insert the hinge tab into the front panel and reconnect the
remaining wires to the appropriate terminals on the board insert the control panel tabs into the front panel slots and push the panel down replace the mounting screw to secure realign the grille and snap it into place then rethread the screws to secure with the repair completed plug the power cord back in and your microwave oven should be ready for use. We hope this helps. Please contact us anytime if you require further assistance.
1 person found this helpful.
Did this question help you?
Thank you for voting!
Cheryl
July 21, 2021
When i heat my oatmeal for 2 minuets then close the door, after about 2 minuets i hear the microwave running again for 2 minuets. It starts up by itself, with nothing inside.Thanks so much for any advise.
cheryl
For model number JMC8127DDS
Hi Cheryl,
Thank you for your question. If your microwave is starting by itself, then there is an issue with one of the door switches and it will need to be replaced. Check to see that the switches are positioned correctly inside the microwave and that the door is completely shut. If the switches are in the correct position and the door is shutting correctly, you will need to test the door switches with a multimeter to see if they have continuity. Before removing the door switches and testing them, unplug the microwave from the electrical outlet. Set your multimeter to the Rx1 setting and ensure that the button is depressed. Touch the terminals with the meter’s probes. You should receive a reading of zero or nearly zero, indicating that there is continuity. Next, with the probes still touching the terminals, ensure the button is not pushed in, this test should indicate that there isn’t continuity.
If your test results differ from those above, you will need a replacement door interlock switch. We hope this helps! If you have any questions, please let us know.
How do I get to between outer and inner glass to clean the inside of the inner and outer glass surfaces.
For model number JMC8127DDS
Hi Eugene,
Thank you for your question. Here is some information on how to repair a microwave door latch that you may reference that may help help you access the glass, so you can clean it. Before you begin this repair, unplug the microwave from the electrical outlet and use a Phillips head screwdriver to unthread the mounting screws securing the grill. Use a putty knife to pry the vent off. With the vent removed, you can lift off the door. Place it down on a towel or blanket. Use a putty knife to help detach the inner door trim. unthread the four screws securing the inner door assembly. Use a large flat screwdriver to separate the inner door assembly from the outer door panel. Then use needle nose pliers to remove the door latch spring. Then slide the old door latch up to remove. Install the new door latch by inserting the latch tabs into the slots in the inner door assembly. Reinstall the spring and realign the inner door assembly with the outer door panel and snap it into position. Rethread the screws then align and snap the trim into place. Thread the 2 screws to secure it. Reinstall the door assembly by inserting the hinge pins into the holes in the hinges. Reinstall the front vent by aligning the top edge first and then press the bottom edge into place. Thread the 2 screws to secure. Plug the microwave back in and the repair is complete. If you have any questions, please let us know.
Did this question help you?
Thank you for voting!
Vern
March 5, 2020
How to replace fuse
For model number JMC8127DDS
Hello Vern, Thank you for the question. You need to use a tamper proof torx bit to remove the screws and the outer cover to access and replace the fuse in the unit. We hope this helps.
After shopping all over town trying to find a new tray I discovered PartSelect.com, I called and ordered the tray and received it the next afternoon. It couldn't have gone smoother.
1. I went to the internet to find the service manual for the Maytag microwave. 2. I opened up the oven and started measuring the resistance of the diode, capacitor, transformer, and magnetron between terminals and then to ground. The transformer and magnetron were well within the resistance limits. The diode was shorted in both direc
... Read moretions(+-). The capacitor was fully open in both directions -- high resistance. 3. I ordered the 2 parts, installed them, and ran the oven. Worked perfect first time. 4. Reinstalled oven and worked ever since (1 week so far). 5. The secret was that the transformer had a load hum. I figured the transformer was OK. The magnetron had no short between filaments and ground to filaments. The only two left were the diode and capacitor. The first two are about $200 -- almost the value of a new microwave. The $70 repair was well worth it. If the first two were still bad, then tempted to buy a new oven.


.gif "SUPPLEMENTAL INFORMATION Diagram and Parts List for Jenn-Air Microwave")