Your coupon for will be reflected when you check out!
✖
Your coupon for
✖
Hello!
You're visiting the PartSelect site in U.S.
Would you like to shop on the Canadian site?
Stay on this site
Go to Canadian site
✖
Model Number Locations
1Select Category Type
Select Category Type
2Select Product Type
Select Product Type
3Select {MODEL} Type
Select {MODEL} Type
Sample Model Number Tags
Model numbers can be made up of numbers (1005400, for example) or a combination of letters and numbers (LAT1000AAE). The model number will most likely appear on either a paper sticker or a metal plate. Your appliance's model number tag may look similar to the sample model number tags shown here (model number highlighted in yellow):
Model has been saved to My Models. If you're not signed in, your lists are available on this device and will expire within 30 days.
Model has been saved to My Models.
This 40-Watt light bulb is sold individually.
It is specially designed to withstand extreme temperatures, so this bulb is compatible with a variety of appliance types including refrigerators, ranges,...
The oven rack is sold individually. It is chrome in color and measures approximately 24 inches wide by 17-1/2 inches deep. The rack is used to hold cookware in the oven and slides back and forth for e...
This double burner pan works with your range to catch grease and debris during the cooking process. It is designed to fit under a small and large burner. Your range will have two double burner pans, o...
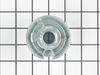
This burner head, or surface burner, is used in ranges and ovens. The burner sends gas through the holes and slots to create an equal flame across the cooking area. If the gas igniter glows but will n...
This large surface burner head is designed for use with gas cooktops and ranges, delivering consistent heat output for everyday cooking. Rated at 12,000 BTUs, it distributes gas evenly through precisi...
This genuine small burner is an original replacement part from GE, designed for use with a wide range of gas ranges. Positioned between the rangetop and bracket assembly and the burner cap, it plays a...
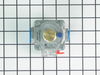
This Genuine OEM GE Electrode Clip is a precision-engineered component designed for use across a wide range of gas ranges. Constructed from durable metal, the clip plays a critical role in securing th...
This part is the replacement double burner pan for your range. It is made of metal and is black in color. The entire part is approximately 17 inches by 8 inches and contains two burner openings. The b...
This is a replacement cooktop mounting screw, used to secure the burner. If you are missing that screw on your range, this is the part to replace it. This screw is about a half an inch in length and i...
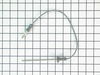
Having trouble with your MTD snowblower? If so, the MTD Left Hand Wheel Assembly is exactly what you need to fix the problem and get your snowblower back to top-notch condition. This is much more than...
$56.73
In Stock
Order now and your part arrives by Apr 23
Questions And Answers for JGB910BEC2BB
Ask our experts a question about this model and we'll get back to you as soon as possible!
1 question answered by our experts.
Sort by:
< Prev
1
Next >
Search filter:
Clear Filter
Your search term must have 3 or more characters.
Keep searches simple. Use keywords, e.g. "leaking", "pump", "broken" or "fit".
Sorry, we couldn't find any existing answers that matched.Try using some different or simpler keywords, or submit your new question by using the "Ask a Question" button above!
Dan
December 10, 2021
Slow to pre-heat. Eventually gets to temperature and remains at target temperature.
For model number JGB910BEC2BB
Hi Dan,
Thank you for contacting us. If the oven is not heating correctly, the issue may be with the oven sensor. The oven temperature sensor is the part that monitors the oven temperature and signals the electronic control board to turn the elements on and off. Before removing this part from the oven and testing it with a multimeter for continuity, unplug the oven from the electrical outlet. To test the sensor, you will need to reference your owner’s manual to determine what the correct reading should be for your model, as this varies from model to model. To test it for continuity, use a multimeter on the Rx1 setting and touch the terminals with the probes. This test needs to be done with the sensor at room temperature to produce accurate results. If your test results do not meet the manufacturer’s guidelines, you need a replacement temperature sensor. If the sensor is fine, you will need to check the igniters, the electronic control board and the wiring between the parts to see which one is causing the issue. We hope this helps! If you have any questions, please let us know.
The black replacement parts give the stove a whole new and fresh look; and go well with other counter top appliances that are black too. The original color was Taupe Those parts became discolored from repeated cleaning. The constant heat of cooking also discolored the parts. The new black replacement parts are perfect and give a whole new
... Read more look to the stove. No tools were needed.
The first step was to determine whether the problem was with the fan itself or the switch. I did this by opening the back cover and using a Volt meter to verify that the fan was not getting power. (I could have skipped this step.)
Next, I unplugged the range, closed up the back cover and lifted the range hood by removing two he
... Read morex head screws that are just inside and on either side of the top of the opening in the range door. Propping the hood open, I removed the connector leading to the switch, then pushed the switch out the front. Inspection showed that the switch was damaged so I closed up the range and ordered the part from Part Select. Once the part arrived, it was a 15 minute job to unplug the range, lift the top, install the new switch, and close up the unit.
Caution. On starting to install the switch, I failed to unplug the range and my finger brushed one of the hot contacts leading to the switch. Thankfully, I was not injured. Do not repeat my mistake on this issue. Unplug the range even if you're only installing this simple switch.
While i was inserting the new lp,gas orriface to the right rear burner tube I dropped the oriface.Without looking i popped the top of the burner unit, like most older type stoves, and thats when i ran into my problem. I realized the burner tube assemblies are attached by 3 screws to the top cover.Not attached to the cabinet as the older m
... Read moreodels, Basically cracked both front aluminum tubes trying to retrieve the dropped oriface. so i had to replace the burner tube units, which involved removing 3 screws, and loosing up and removal of the nut to the main gas tube. extremely easy repair, next time i`ll try to remember look before i leap,total time to (r+r)burner tubes about 20 minutes.Parts select pulled me out of the fire on this one, great staff and service, with quick delivery.