Your coupon for will be reflected when you check out!
✖
Your coupon for
✖
Hello!
You're visiting the PartSelect site in U.S.
Would you like to shop on the Canadian site?
Stay on this site
Go to Canadian site
✖
Model Number Locations
1Select Category Type
Select Category Type
2Select Product Type
Select Product Type
3Select {MODEL} Type
Select {MODEL} Type
Sample Model Number Tags
Model numbers can be made up of numbers (1005400, for example) or a combination of letters and numbers (LAT1000AAE). The model number will most likely appear on either a paper sticker or a metal plate. Your appliance's model number tag may look similar to the sample model number tags shown here (model number highlighted in yellow):
Model has been saved to My Models. If you're not signed in, your lists are available on this device and will expire within 30 days.
Model has been saved to My Models.
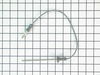
The function of the oven sensor is to detect the temperature within the oven cavity. If you notice that the oven is too hot or too cold, or it is not heating evenly, you may need to replace the oven s...
This large broiler pan is found in the bottom of your oven and is used to catch drippings from broiling foods. This part includes the grate and bottom pan and is made of porcelain. The grate measures ...
The GE Oven Door Window Pack Assembly is a genuine OEM part that fits select GE ranges and ovens. It includes a heat-resistant inner glass panel, frame, and seals, providing insulation and clear visib...
This chrome oven rack is a genuine OEM replacement part for your oven. It measures 24 inches wide by 14 inches deep. This rack serves as a great replacement if your current rack is rusted, broken, or ...
This part is a replacement screw for your oven. It is made of black metal and is sold individually. This screw is approximately 1/4 inch in diameter and about 1/2 inch in length. It is designed to con...
Meet the authentic GE Fan Blade?a dependable and top-notch replacement part for your room air conditioner. This critical component plays a key role when it comes to air circulation within your unit's ...
Introducing the GE False Bottom Oven Panel, an essential element in preserving the functionality and efficiency of your range. Acting as a heat barrier, this panel is positioned between the bake burne...
$261.11
Special Order
Questions And Answers for JCT915BF7BB
Be the first to ask our experts a question about this model!
✖
Ask a Question
Ask our experts a question on this model and we'll respond as soon as we can.
I had to remove the oven from the wall because the sensor plug connction is behind the unit. Two screws hold the sensor inside the oven and then I disconnected the lead and pulled the sensor out from the front. I installed the new sensor, tightened the two screws holding it in and connected the lead. Then reinstalled the oven into the wal
... Read morel. Overall, a very easy repair once you get the oven out.
After turning off the breaker to cut power to the oven, I opened the oven door and, using the PartSelect exploded diagram as a guide, I removed 3 screws from the underside of the control panel - I was then able to slide the panel up and out to remove it. Leaving all of the control wires (especially the ribbon) connected to control panel,
... Read moreI saw the fan assembly mounted to the rear of the control box.
I noted the position of the two attached wires - black on top (or left), white on bottom (or right). Using a nutdriver with an extension bar, I unscrewed 4 screws holding the assembly in place. I removed the old fan and installed the new fan in its place. It was necessary to bend the new fan's legs out a bit to get them to line up with the holes. I reconnected the wires as mentioned above, then reinstalled the control panel.
I tested the oven by turning the breaker back on and letting the oven heat up to 450 degrees. The fan turned on as expected. After the oven cooled off, I reinstalled the 3 screws to secure the control panel.
It was much easier than trying to remove the bonded aluminum foil from the false bottom/drip pan. Simply lift and remove oven front door, (see your manual), slide out false bottom and slide in new. For me it did take longer than 15 minutes, but that's because I was doing a thorough oven cleaning. The part was in the $50 range and well wor
... Read moreth it. Why didn't anyone ever tell me that you can no longer line the bottom of your oven with aluminum foil?