Your coupon for will be reflected when you check out!
✖
Your coupon for
✖
Hello!
You're visiting the PartSelect site in U.S.
Would you like to shop on the Canadian site?
Stay on this site
Go to Canadian site
✖
Model Number Locations
1Select Category Type
Select Category Type
2Select Product Type
Select Product Type
3Select {MODEL} Type
Select {MODEL} Type
Sample Model Number Tags
Model numbers can be made up of numbers (1005400, for example) or a combination of letters and numbers (LAT1000AAE). The model number will most likely appear on either a paper sticker or a metal plate. Your appliance's model number tag may look similar to the sample model number tags shown here (model number highlighted in yellow):
Model has been saved to My Models. If you're not signed in, your lists are available on this device and will expire within 30 days.
Model has been saved to My Models.
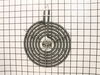
The surface element, also known as the coil surface element, transfers heat to the area on top of range. The element is 8 inches in diameter. If your surface element does not heat, over heats, or heat...
This 40-Watt light bulb is sold individually.
It is specially designed to withstand extreme temperatures, so this bulb is compatible with a variety of appliance types including refrigerators, ranges,...
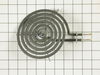
If you notice that your surface element will not heat properly, you may need to replace it. This surface element is 6 inches in diameter and 240V. It is a Y-frame surface burner element with five turn...
This part is the replacement light socket for your oven. The oven light socket provides power to the light, and at the same time holds the light bulb in place.
This large broiler pan is found in the bottom of your oven and is used to catch drippings from broiling foods. This part includes the grate and bottom pan and is made of porcelain. The grate measures ...
There are about 12 wires behind the panel...and this was the second time I've replaced the electronic clock in the past four years. I replaced the analog clock four years ago with the digital version because the analog was no longer available, so I knew what I was in for. There are four screw (top of the frame and lower frame) to remove b
... Read moreefore the frame holding the clock will come out. First DISCONNECT the power! You've have to remove the clock control knobs, and the plastic lever on the self cleaning handle. The first time I ordered this replacement part from PartsSelect there was a diagram included on which wire goes where. This time there wasn't! So it gets a little complicated. Make sure you label all the wired before you disconnect the old clock panel. Anyway, remove the four nuts holding the old clock in place; put the new clock panel in; replace the four nuts. I'll be glad to talk anyone through the rest and I have photos of the whole repair.
I removed old 8" surface element and terminal block. Some of old wiring had to be cut off because of harding/cracking of old wiring. Stove was 23 years old and this burner was the most frequently used one. I soldered the new and remaining old wires together. I used the shirnk wrap that came with the terminal block to cover the solder join
... Read moret. I screwed the new terminal block (one screw holds it in place - used same screw from old terminal block that was removed). I finished by inserting the new surface element. Everything works fine. In the next week or two after we use it a while, I will check wiring again to make sure there are no changes. You need to be very careful as it gets very hot under the burner.