JBP48AA1 General Electric Range - Overview
Sections of the JBP48AA1
[Viewing 3 of 3]Keep searches simple, eg. "belt" or "pump".
Surface Element - 8 Inch - 2350W
PartSelect #: PS243868
Manufacturer #: WB30M2
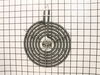
The surface element, also known as the coil surface element, transfers heat to the area on top of range. The element is 8 inches in diameter. If your surface element does not heat, over heats, or heat...
$58.42
In Stock
Light Bulb - 40W
PartSelect #: PS217532
Manufacturer #: 40A15
This 40-Watt light bulb is sold individually.
It is specially designed to withstand extreme temperatures, so this bulb is compatible with a variety of appliance types including refrigerators, ranges,...
$21.95
In Stock
Surface Element - 6 Inch - 240V
PartSelect #: PS243867
Manufacturer #: WB30M1
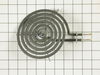
If you notice that your surface element will not heat properly, you may need to replace it. This surface element is 6 inches in diameter and 240V. It is a Y-frame surface burner element with five turn...
$51.61
In Stock
Range Infinite Heat Switch Kit
PartSelect #: PS16216966
Manufacturer #: WB21X36771
The infinite switch controls the stove top surface burner. This switch will work with most of the electrical range models with coil burner elements.
$53.20
In Stock
Light Cover
PartSelect #: PS247415
Manufacturer #: WB36X192
This light bulb lens covers the interior light bulb in an oven, range, or stove. No tools are necessary to replace this part. Simply slide off the wire bracket to remove the existing light bulb lens. ...
$26.39
In Stock
Broiler Pan - Large
PartSelect #: PS1517612
Manufacturer #: WB48X10056
This large broiler pan is found in the bottom of your oven and is used to catch drippings from broiling foods. This part includes the grate and bottom pan and is made of porcelain. The grate measures ...
$43.18
In Stock
Temperature Sensor Kit
PartSelect #: PS236490
Manufacturer #: WB23X5340
This kit includes the sensor as well as the connectors. NOTE This sensor is 2" long.
$140.74
In Stock
Inner Door Glass
PartSelect #: PS247548
Manufacturer #: WB36X5712
This inner door glass is sold individually.
No Longer Available
Element Center Medallion
PartSelect #: PS244486
Manufacturer #: WB31X5021
This medallion is located in the middle of the surface burner.
No Longer Available
Power Terminal Block Kit
PartSelect #: PS232636
Manufacturer #: WB17X5095
This kit comes with the terminal block, nuts and wires.
$77.75
Special Order
Questions And Answers for JBP48AA1
Be the first to ask our experts a question about this model!
✖
Ask a Question
Ask our experts a question on this model and we'll respond as soon as we can.
Sorry, we couldn't find a match for "".
Here's a guide for finding your model number.
Something went wrong. Please try again later.
Your Question Has Been Submitted!
Our experts will send you an email as soon as your question has been answered.
Common Symptoms of the JBP48AA1
[Viewing 5 of 5]Element will not heat
Fixed by
these parts
these parts
Show All
Little to no heat when baking
Fixed by
these parts
these parts
Show All
Oven not heating evenly
Fixed by
these parts
these parts
Show All
Oven is too hot
Fixed by
these parts
these parts
Show All
Little to no heat when broiling
Fixed by
these parts
these parts
Show All
Keep searches simple. Use keywords, e.g. "leaking", "pump", "broken" or "fit".
Oven sensor was not holding temperature range.
-
CHARLA from NEW BRAUNFELS, TX
-
Difficulty Level:Really Easy
-
Total Repair Time:Less than 15 mins
-
Tools:Nutdriver
48 of 81 people
found this instruction helpful.
Was this instruction helpful to you?
Thank you for voting!
Replacement of Coils
Removed by slightly wiggling out of the coupling. No tools needed, seriously, (and I'm a contractor). Basically, pull out and snap back in.
Parts Used:
-
Joseph from South Plainfield, NJ
-
Difficulty Level:Really Easy
-
Total Repair Time:Less than 15 mins
35 of 42 people
found this instruction helpful.
Was this instruction helpful to you?
Thank you for voting!
Large burner would operate on high setting only.
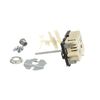
1. Removed the back panel.
2. Disconnected the wires from the old switch while connecting wires to the new switch one at a time.
3. Installed the new switch and broke off the excess metal on the post which fits into the burner knob on front of the range.
4. Replaced the burner knob and replaced the back panel.
2. Disconnected the wires from the old switch while connecting wires to the new switch one at a time.
3. Installed the new switch and broke off the excess metal on the post which fits into the burner knob on front of the range.
4. Replaced the burner knob and replaced the back panel.
Parts Used:
-
Ernest from Bellevue, NE
-
Difficulty Level:Really Easy
-
Total Repair Time:15 - 30 mins
-
Tools:Pliers, Socket set
22 of 28 people
found this instruction helpful.
Was this instruction helpful to you?
Thank you for voting!