Your coupon for will be reflected when you check out!
✖
Your coupon for
✖
Hello!
You're visiting the PartSelect site in U.S.
Would you like to shop on the Canadian site?
Stay on this site
Go to Canadian site
✖
Model Number Locations
1Select Category Type
Select Category Type
2Select Product Type
Select Product Type
3Select {MODEL} Type
Select {MODEL} Type
Sample Model Number Tags
Model numbers can be made up of numbers (1005400, for example) or a combination of letters and numbers (LAT1000AAE). The model number will most likely appear on either a paper sticker or a metal plate. Your appliance's model number tag may look similar to the sample model number tags shown here (model number highlighted in yellow):
Model has been saved to My Models. If you're not signed in, your lists are available on this device and will expire within 30 days.
Model has been saved to My Models.
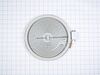
The temperature sensor, also known as the oven temperature sensor assembly is usually found in the back of the oven. The function of the oven temperature sensor assembly is to measure the temperature ...
This 40-Watt light bulb is sold individually.
It is specially designed to withstand extreme temperatures, so this bulb is compatible with a variety of appliance types including refrigerators, ranges,...
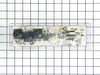
This electronic control board is the central component of your wall oven, managing functions such as temperature regulation and heating elements. The manufacturer has modified the wiring on this part,...
This genuine GE drawer support is an original replacement part sourced from the manufacturer and is designed for use with electric ranges. Made of durable plastic, it attaches to the rear of the drawe...
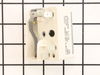
This infinite control switch regulates the power delivered to a surface heating element, allowing precise temperature control during cooking. It functions by cycling power on and off based on user inp...
This surface element control switch, also known as an infinite switch, regulates the power supplied to a 6-inch, 1560-watt heating element on electric ranges. It allows for precise adjustment of heat ...
This is a dual ceramic surface burner for ranges. This burner, also known as a heating element, is used within electric ranges to act as a stovetop burner. This burner measures approximately 10 inches...
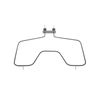
This is an authentic GE oven rack, sourced directly from the manufacturer. It is made of metal, and provides a stable surface for cookware inside the oven. If your current oven rack is damaged or miss...
This part is the replacement bake element for your range. It is in an M shape, and is approximately 18 inches wide and 18 inches long.This is an OEM part and is sold individually.
This part is the replacement light socket for your oven. The oven light socket provides power to the light, and at the same time holds the light bulb in place.
$16.47
In Stock
Order now and your part arrives by Jun 29
Questions And Answers for JB645RK4SS
Ask our experts a question about this model and we'll get back to you as soon as possible!
7 questions answered by our experts.
Sort by:
< Prev
1
2
Next >
Search filter:
Clear Filter
Your search term must have 3 or more characters.
Keep searches simple. Use keywords, e.g. "leaking", "pump", "broken" or "fit".
Sorry, we couldn't find any existing answers that matched.Try using some different or simpler keywords, or submit your new question by using the "Ask a Question" button above!
Joseph
May 13, 2024
pre heat feature goes off before oven reaches set temp
For model number JB645RK4SS
Hello Joseph, thank you for contacting us. Based on our understanding of the issue, we would suggest checking the temperature sensor, part number PS10059162, to solve the problem. It measures the oven temperature. Glad to be of assistance!
The oven does not come to the preheat temperature set in the display even though the oven beeps that it is ready. I have tried boosting the temperature according to the book but it over shoots the preheat temperature. It takes several minutes before it settles at the preheat temperature. Any suggestions?
For model number JB645RK4SS
Hello Carl, Thank you for the question. We suggest testing the Temperature Sensor. Testing the temperature sensor probe on your oven is easy. With the sensor at room temperature, measure the resistance between the two prongs at the end of the sensor connector. The resistance of the sensor should read approximately 1080 – 1090 ohms at room temperature. We hope this helps!
Hello Blaine, thank you for contacting us. It looks like your control panel is locked. Pressing and holding the + and – pads for three seconds unlocks the control panel. We hope this information helps!
Did this question help you?
Thank you for voting!
Elaine
April 4, 2024
Our broiler unit shorted out and we do not know which unit to replace it with.
For model number JB645RK4SS
Hi Elaine, thank you for reaching out. Oven broil element assembly for your model is part number PS11766901. If you need help placing an order, customer service is open 7 days a week!
Hello Ann, thank you for getting in touch. The glass top assembly for your model is part number PS11762851. Please reach out to customer service if you need help placing an order!
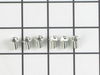
Removed six 1/4" hex nuts on rear of oven. Then through front/inside removed a single 1/4" hex nut to actually remove sensor. Unplug sensor connector, remove. Reversed steps, push oven back in place and plugged in. Tested oven function.
After removing the back of the range the oven control board was visible and accessible by removing four nuts. There was some resistance removing the leads from the oven coils and light-bulb mechanisms but with some leverage and pliers they came loose. The only challenge was the face plate of the unit is attached using adhesive and neede
... Read mored to be carefully peeled off and added to the new oven control board. Getting this right was just a matter of taking time and lining up the components correctly. After applying the face, the new control board went right in. I reattached the back, plugged the unit back in, and the over has worked great for the past week. Part select being able to identify the part numbers listed from the component likely saved me at least $100 of having a GE certified repair technician come in.
The existing terminal block on my Ge oven/Range had melted due to a loose wire causing sparking and starting the plastic casing of the terminal block on fire and melting it, Part select made the part easy to find and had it at my house in 2 days. All I had to do was remove six screws to take the back sheet metal cover off of the oven. U
... Read morenscrew the terminal connections remove two mounting screws that held the terminal on to the oven body. This was a little trickier than it should have been because the melted plastic had reformed making it very hard to access the mounting screws. i then mounted the new piece and plugged the oven in, it took 15 minutes and was very easy. definitely saved me at-least a $100 for the service call i would have made if finding the part wasn't so convenient