Your coupon for will be reflected when you check out!
✖
Your coupon for
✖
Hello!
You're visiting the PartSelect site in U.S.
Would you like to shop on the Canadian site?
Stay on this site
Go to Canadian site
✖
Model Number Locations
1Select Category Type
Select Category Type
2Select Product Type
Select Product Type
3Select {MODEL} Type
Select {MODEL} Type
Sample Model Number Tags
Model numbers can be made up of numbers (1005400, for example) or a combination of letters and numbers (LAT1000AAE). The model number will most likely appear on either a paper sticker or a metal plate. Your appliance's model number tag may look similar to the sample model number tags shown here (model number highlighted in yellow):
Model has been saved to My Models. If you're not signed in, your lists are available on this device and will expire within 30 days.
Model has been saved to My Models.
This 6-inch stove surface element features a durable coil design that delivers steady, reliable heat for everyday cooking. It’s an ideal replacement when a burner no longer heats properly or warms une...
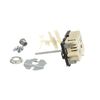
1. Removed the back panel. 2. Disconnected the wires from the old switch while connecting wires to the new switch one at a time. 3. Installed the new switch and broke off the excess metal on the post which fits into the burner knob on front of the range. 4. Replaced the burner knob and replaced the back panel.
In order to determine what was wrong with the oven I used a voltage meter to determine if power was coming to the element in the first place. Be careful to set your meter at least 500 ACV, as the oven is operating at 240V. Remove the two screws that hold the element in place and carefully pull it out of the side of the oven. Turn on t
... Read morehe bake element in the upper oven and place your test leads to either side of the connection leads. If you get a reading of 240Volts plus or minus you will know for sure the element is bad. Turn off the oven, or even better turn off the circuit breaker to your stove. There are two leads to the element that are held in place by self taping screws. If you have the same luck I have they will be corroded together. Carefully use long nose pliers to hold steady while gently applying pressure. If necessary use liquid wrench. When separated put together in the reverse order as how you took it apart.
Ever the optimist, I'd replaced the burner on this relic of another time to no effect. That left the switch. You guys should know that when a burner element goes bad it can take out the switch. I should have put a meter on it. Wehn I looked for a replacement a few months ago there were still factory parts available, but they were $80 or s
... Read moreo and I wasn't inclined to risk that on a 40 year old range. I offered to replace the raange for my daughter as a Christmas present but she like this old thing. It was an unusual size with a pan storage compartment on the left. I went on line and found this universal replacement for about $25 delivered. What the heck. I ordered it and it arrived within a week. I pulled the stove out, killed the breaker, pulled the knob off, used a nut driver to take ther rear panel off, two phillips screws under the knob hold the switch in. The terminals on the old switch are in a slightly different order but are clearly marked L1, L2, H1, H2 and P. The P is the power and has a smaller terminal so you can't put it on the wrong one. Just examine the old switch ( it was marked the same way) take off the L1 and put in on the L1 of the new switch and so on, make sure you use the correct knob adapter to fit your old knob and break the switch stem to the correct length. It will break easilly if you hold it with one pliers and break it with another. Screw the new switch in place with he old screws. At this point, I closed the breakers and tested it. It worked fine. I turned the breakers off again. Buttoned it up and slid the stove back into place. 20 minutes tops. Great product. Good for another forty years.