Your coupon for will be reflected when you check out!
✖
Your coupon for
✖
Hello!
You're visiting the PartSelect site in U.S.
Would you like to shop on the Canadian site?
Stay on this site
Go to Canadian site
✖
Model Number Locations
1Select Category Type
Select Category Type
2Select Product Type
Select Product Type
3Select {MODEL} Type
Select {MODEL} Type
Sample Model Number Tags
Model numbers can be made up of numbers (1005400, for example) or a combination of letters and numbers (LAT1000AAE). The model number will most likely appear on either a paper sticker or a metal plate. Your appliance's model number tag may look similar to the sample model number tags shown here (model number highlighted in yellow):
Model has been saved to My Models. If you're not signed in, your lists are available on this device and will expire within 30 days.
Model has been saved to My Models.
This an authentic OEM 40-Watt replacement light bulb, used in a number of household appliances. It is specially designed to withstand extreme temperatures, which is why these replacement bulbs are mos...
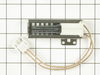
This broil igniter assembly comes with its own metallic mounting bracket and a 7-inch-long dual wire lead with a plastic plug. This part will need to be repaired if your oven element is giving off no ...
The temperature sensor on your oven detects the temperature within the oven cavity. If you notice your oven is too hot, not hot enough, or does not heat evenly, the short oven sensor kit may need repl...
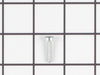
This is a replacement screw and washer for your oven/range. It is a Phillips-head screw approximately half an inch long, and the washer is approximately 1 inch in diameter. The screw attaches the oven...
The oven door gasket on your range functions as a seal between the warm interior of your oven, and the outside. It prevents heat from fleeing your oven when the door is closed. Before making any repai...
This touch-up paint can be used on a wide variety of household appliances. It is most often used on washers, dryer, refrigerators, dishwashers, ranges, freezers, trash compactors, or microwaves. It is...
This bottle of non-abrasive cooktop cleaner breaks down and gets rid of the hardest baked-on stains and residue without causing any harm to your appliance. The bottle is 10 oz and does not require a l...
Appliance spray paint is a great way to cover up any chips and scratches that have appeared on your appliances. Instead of replacing the part entirely, this is an easy fix. This is also a great way to...
This insulation is also known as oven wrap insulation, and is used in conjunction with your range. Its purpose is to be installed in between the oven and the cabinets that surround it. This will help ...
Ask our experts a question about this model and we'll get back to you as soon as possible!
1 question answered by our experts.
Sort by:
< Prev
1
Next >
Search filter:
Clear Filter
Your search term must have 3 or more characters.
Keep searches simple. Use keywords, e.g. "leaking", "pump", "broken" or "fit".
Sorry, we couldn't find any existing answers that matched.Try using some different or simpler keywords, or submit your new question by using the "Ask a Question" button above!
Penny
October 2, 2023
Oven takes 1/2 hour to get to 350. Sometimes the temp goes down as you are using it. Not convinced it is keeping the set temperature on the inside. Repair guy said probably bottom burner. Thoughts ?
For model number ISG650WS00
Hi Penny, thank you for contacting us. We believe your range is having this problem due to a faulty temperature sensor, part number PS2003225, which may need to be replaced. We hope this helps, good luck with the repair!
My oven has two igniters so I needed to determine which one was the problem.
Using the amp/multi meter I tested the connection between the igniters and the valve, with the oven turned on, to find the bad igniter. Depending on the model of stove you have, the amp reading you need for a properly functioning igniter will vary. My
... Read more lower igniter read 2.7 amps with a rated amp between 3.3 and 3.6. So that was the culprit.
Replacing the igniter was easy. Two screws and a wire connected with a plug. I was able to do the diagnosis and unplug the wire without pulling the oven out. I pulled the drawer out and removed the two screws in a cover behind where the drawer was. You may not be so lucky…I have long arms.
I found removing the oven door made it easier to reach the igniter itself. To remove the door just open it slightly and pull up, it should come off easy…and replace in opposite manner.
Keep track of your screws and put it back together the way you found it except for the igniter that is.
Anyone with moderate technical skill could easily do this repair. The diagnosis is the hard part. I estimate I saved about $200 doing it myself.
Repair tech checked oven and said the control panel was bad and needed to be replaced. The new control panel would cost over $450.00! I found that the oven sensor was bad and replaced it for $30.00. The old oven sensor had failed following a self cleaning cycle. I found that the wires coming out of it were burnt.
Replacing
... Read morethe oven sensor was very easy. I removed the back panels 6 screws to gain access to the sensor's connection. I then removed the 2 screw that hold the sensor in place inside the oven and pulled the old sensor out through the oven. I reversed this process to place the new sensor in the oven.
I numbered every part. ex: 1 L., for first part removed left side. I used a magic marker to circle the holes and wrote the number of screws used on the part, set the srews in a separete place, so that I new where these screws went to. The cleanup was pretty time consuming, but I was able to keep my stove, when every repairman I called to
... Read more fix my stove told me I was better off buying a new stove. ($600.00 stove 2 years old)Please Note: The insulation blanket needed for the entire stove is two pieces, the sides and top are one part # and the bottom and back, are another part #. I did not know this. I just purchased the top and sides. I got lucky, the back and bottom were still in good shape. So I guess I should have read the description of the part more carefully to see what it covers, before I ordered it. It took two people two hours to do the work, it was really nice to have an extra set of eyes, to remember what direction pieces of metal from the stove went. I would do it all over in a heart beat instead of buying a new stove.


 Diagram and Parts List for Whirlpool Range")