Your coupon for will be reflected when you check out!
✖
Your coupon for
✖
Hello!
You're visiting the PartSelect site in U.S.
Would you like to shop on the Canadian site?
Stay on this site
Go to Canadian site
✖
Model Number Locations
1Select Category Type
Select Category Type
2Select Product Type
Select Product Type
3Select {MODEL} Type
Select {MODEL} Type
Sample Model Number Tags
Model numbers can be made up of numbers (1005400, for example) or a combination of letters and numbers (LAT1000AAE). The model number will most likely appear on either a paper sticker or a metal plate. Your appliance's model number tag may look similar to the sample model number tags shown here (model number highlighted in yellow):
Model has been saved to My Models. If you're not signed in, your lists are available on this device and will expire within 30 days.
Model has been saved to My Models.
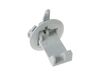
This lid lock, also known as a door lock, is a genuine OEM replacement part for your washing machine. The lid lock keeps your washer lid closed during the washing cycle. If this part is broken, your w...
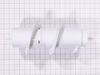
This drain pump assembly is for washers. Drain pump assembly removes water from the washer during the drain portion of the cycle. The assembly may include multiple parts; refer to your parts diagram f...
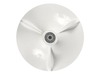
This auger is an authentic OEM replacement part specially designed for washing machines. It is a white, spiral-shaped agitator located in the center of the wash basket. During the wash cycle the auger...
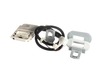
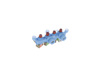
This is an inlet valve for models of compatible washing machines. Inlet valves are electrically controlled solenoid valves that open and close as needed during the washing cycle, to allow water into t...
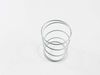
Introducing the GE Spring Clutch, a crucial component for your washer. This intricate item applies steadfast pressure against the shifter hub, dutifully holding it in place for uninterrupted operation...
Presenting the GE SCR 1/4-20, 2A SINULOC Screw, a key component for ensuring the optimal functioning of your washers. This robust piece, designed with precision by GE, assures a safe and snug fit to m...
Introducing the GE LID LOCK STRIKER, an essential component for your washing machine. Created by trusted brand GE, this lid striker ensures optimal performance for your washer by activating the lid sw...
Perfect for your GE washer, the Nut Hub is designed to secure the washer hub to the gear case shaft with precision. It plays a crucial part in ensuring the appliance runs smoothly and efficiently. The...
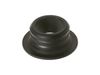
This GE DRAIN PUMP SEAL is an essential component for your washer, ensuring a leak-free connection between the drain hose and the washer drain pump. For the assurance of a dry, well-functioning laundr...
$16.28
In Stock
Order now and your part arrives by Jun 27
Questions And Answers for GTW725BPN0DG
Ask our experts a question about this model and we'll get back to you as soon as possible!
6 questions answered by our experts.
Sort by:
< Prev
1
2
Next >
Search filter:
Clear Filter
Your search term must have 3 or more characters.
Keep searches simple. Use keywords, e.g. "leaking", "pump", "broken" or "fit".
Sorry, we couldn't find any existing answers that matched.Try using some different or simpler keywords, or submit your new question by using the "Ask a Question" button above!
Don
November 2, 2021
Will not start. Electricity is hot but machine will not start up.What can i check to find out any parts i'll need to order?
is there any advice or troubleshooting information online?
For model number GTW725BPN0DG
Hello Don, Thank you for your inquiry. We do have symptom based repair advice listed under your model number or through our instant repairman. If your washer will not start, we recommend checking the lid switch assembly, the lid lock harness, the power cord and the control board. We hope this helps.
Thank you Richard for your question. We have a video that shows potential issues and possible solutions for you to watch. We hope this helps. If you need help placing an order, customer service is open 7 days a week. Please feel free to give us a call. We look forward to hearing from you.
The Agitator doesn’t spin while washing. When nothing is in the machine you can spin it freely. Clothes are not getting washed because they aren’t moving around in the water.
For model number GTW725BPN0DG
Hello Samantha, thank you for reaching out. We have found that the issue is due to the lid lock, part number PS16554755. We hope this helps!
Hi thank you for reaching out to PartSelect. If your washing machine detects that its door is open, it will not spin. We would recommend checking the lid switch assembly, part number PS16554755, to get to the root of the problem. Good luck with the repair!
Hello David, thank you for your question. Remove the fabric softener align the raised bump with the opening on the augur. Use the screwdriver to puncture through the inner shaft of the augur. Then twist clockwise until the augur releases and lift it out. This will be difficult be sure to hold the basket from rotating. Unthread the 11 mm bolt lift out the base. To install the new augur, base align the base with the spline shaft and set it into the appliance. Rethread the 11 mm bolt to secure set the augur over the tabs and twist counterclockwise to lock it in place. Align the dispenser to the grooves of the augur and press firmly to secure in. Place and your washer and should be ready to go. We hope this helps.
Did this question help you?
Thank you for voting!
< Prev
1
2
Next >
✖
Ask a Question
Ask our experts a question on this model and we'll respond as soon as we can.
Drain all the water out of the tub with a shop vac Remove rear drain hose and drained rest of water into a bucket Remove small rear panel (bottom left hand corner) where the drain hose connects Tipped washer up about 45 degrees to get underneath it - Supported it with a few paint cans Remove internal drain hose/clamps
... Read morefrom pump - w/ pliers Remove belt cover (gray plastic) with socket - 3 bolts Remove wire assembly plug from socket Remove old drain pump with socket - 3 bolts Install new drain pump - 3 bolts - plug wire assembly into socket Reinstall belt cover - 3 bolts Reinstall hose to drain pump (note panel will be inside washer) Feed drain hose panel through hole and reinstall - 1 nut Re attached drain hose to exterior drain plug You are done !
Very simple to repair. Be sure to drain the tub outside or into the sump pump then lay the washer on its side. The pump is right there on the bottom of the basket with 3 bolts. You will also need to remove the belt cover to get to the plug. So simple and saves you hundreds off repair man prices.
Removed the control panel back plate cover. Removed the 3 screws that held the water control valve in place. I then unplugged each solenoid one at a time and plugged it into the new control valve. Once all wires were transferred, I pulled the old valve up and put the new valve on. Then reinstalled the screws that held it down and reinstal
... Read moreled the cover plate. Very simple job !


 – Part Number: WH08X24179")