Your coupon for will be reflected when you check out!
✖
Your coupon for
✖
Hello!
You're visiting the PartSelect site in U.S.
Would you like to shop on the Canadian site?
Stay on this site
Go to Canadian site
✖
Model Number Locations
1Select Category Type
Select Category Type
2Select Product Type
Select Product Type
3Select {MODEL} Type
Select {MODEL} Type
Sample Model Number Tags
Model numbers can be made up of numbers (1005400, for example) or a combination of letters and numbers (LAT1000AAE). The model number will most likely appear on either a paper sticker or a metal plate. Your appliance's model number tag may look similar to the sample model number tags shown here (model number highlighted in yellow):
Model has been saved to My Models. If you're not signed in, your lists are available on this device and will expire within 30 days.
Model has been saved to My Models.
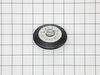
This dryer drum support roller wheel kit is engineered to stabilize and support the drum during rotation, ensuring smooth and efficient operation throughout the drying cycle. The assembly typically in...
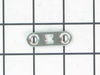
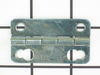
This dryer door strike plate helps secure the door in the closed position by properly engaging with the door latch during operation. Designed for reliable alignment and durability, it is commonly repl...
This fuse is a replacement safety component designed to protect electrical circuits from overloads by interrupting power when necessary. It is commonly replaced after a power surge or electrical fault.
Keep your GE dryer functioning optimally with this filter assembly replacement. This authentic GE lint screen is designed to effectively trap lint and debris from your dryer's exhaust air, ensuring a ...
This gas igniter assembly is essential for a dryer’s heating function, as it ignites the gas burner to produce heat during the drying cycle. The igniter heats to a bright glow, triggering the burner f...
The end repair was very simple and took minimal effort. The time and difficulty was all in the testing. I disassembled the dryer and removed the drum and then hard wired each thermo-fuse to determine where the fault was. After test all of those I was stumped. When I opened the door the light would not come on so I assumed it was a pow
... Read moreer fault closer to the source. However after all of my testing I couldn't find anything wrong. I then removed the light bulb and realized it was burned out which led me to the door switch being the fault. I removed the switch and soldered the three wire together and the dryer started right up! All I had to do was order a new $15 part, unsolder the wires and plug them in. Would have been so much simpler if that light bulb hadn't of been burned out causing me to over think my diagnosis. This was my first major appliance repair and I did it with only the help of the parts diagram provided on the website.
First unplug dryer to prevent electrical shock. To remove the front of the dryer, open the door in top left and top right corners is a machine screw. They can be removed with a Phillips screw driver. Lift the top slightly and let front fall forward about 6 inches, lift slightly. Two wire will be connected to the switch in the door. remove
... Read more the wires and squeeze the tabs on both sides of the switch and push it out. Push new switch in to replace old switch and reassemble.