Your coupon for will be reflected when you check out!
✖
Your coupon for
✖
Hello!
You're visiting the PartSelect site in U.S.
Would you like to shop on the Canadian site?
Stay on this site
Go to Canadian site
✖
Model Number Locations
1Select Category Type
Select Category Type
2Select Product Type
Select Product Type
3Select {MODEL} Type
Select {MODEL} Type
Sample Model Number Tags
Model numbers can be made up of numbers (1005400, for example) or a combination of letters and numbers (LAT1000AAE). The model number will most likely appear on either a paper sticker or a metal plate. Your appliance's model number tag may look similar to the sample model number tags shown here (model number highlighted in yellow):
Model has been saved to My Models. If you're not signed in, your lists are available on this device and will expire within 30 days.
Model has been saved to My Models.
This authentic, white Drum Bearing Slide, also known as the bearing drum slide, glide, or pad, is a plastic, easy-to-install part for your dryer. It replaces the dryer's front drum slide to allow for ...
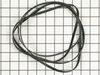
This Drive Belt is 89.5" long and comes in black, featuring four ribs on the inside for a better grip. This is a long belt that wraps all the way around the dryer drum, around a tension pulley, and th...
This is a duct felt seal for a dryer. The duct felt seal allows the front-load dryer drum to glide smoothly on the front panel. Your dryer will not function properly if the drum felt seal is compromis...
This is a lint filter screen that is used for many dryers. It has a metal screen with a white plastic frame, and is approximately 13 inches wide. This part is sold individually. The lint filter traps ...
This light bulb, also known as a drum lamp, illuminates and lights up the dryer drum when the door is open. If the light bulb in the dryer is burnt out or lighting is inconsistent, replacing it can so...
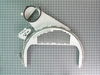
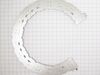
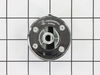
This rear drum bearing kit includes a shaft, ground strap, bearing, seven screws, and installation instructions. The bearing plate comes with a slot in it for the ground strap. This part helps keep yo...
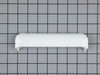
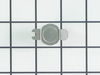
This knob accepts a D shaped shaft. Sold individually. This control knob is for dryers.
Control knob lets you control cycle settings.
Remove the knob by pulling it straight off its post.
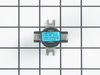
Restore reliable operation to your GE dryer with this genuine OEM push-to-start switch, designed specifically for use with a range of GE dryer models. This switch activates the dryer when you press an...
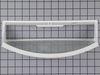
This lint chute assembly is a genuine replacement component designed for GE and Hotpoint dryers. It plays a critical role in directing exhaust airflow from the dryer drum to the blower wheel, ensuring...
This is a timer for various models of dryer. The timer within your dryer is responsible for the length of the drying cycle. If your current dryer timer does not turn or rotate well, or if its positio...
This door latch is designed for your dryer, and is mounted to the dryer frame. The door latch holds the door of your dryer closed while the machine is operating. If your dryer door is not catching on ...
Ask our experts a question about this model and we'll get back to you as soon as possible!
5 questions answered by our experts.
Sort by:
< Prev
1
Next >
Search filter:
Clear Filter
Your search term must have 3 or more characters.
Keep searches simple. Use keywords, e.g. "leaking", "pump", "broken" or "fit".
Sorry, we couldn't find any existing answers that matched.Try using some different or simpler keywords, or submit your new question by using the "Ask a Question" button above!
Lucy
November 3, 2023
What size drum belts do ineed?
For model number GTDP490ED2WS
Hi Lucy,
Thank you for your question. The part number for the belt is PS16542496. It measures 89.5 inches long. We hope this helps!
1 person found this helpful.
Did this question help you?
Thank you for voting!
Ed
July 8, 2021
Dryer makes high squeaky noise exspecially heavy load
For model number GTDP490ED2WS
Hi Ed,
Thank you for your question. If your dryer makes a squeaking noise when you have a heavy load, there are some parts that you will need to check to see which one is causing the issue. You will need to check the drum bearing slides, the rear drum bearing, the idler pulley and the drive motor and pulley. We hope this helps! Good luck with the repair!
Does a stem come with the dryer knob to dry clothes the setting I was using pliers to turn that little knob and that came off as well like the rubber piece came out and I don't know if the knob would fit in without having that
For model number GTDP490ED2WS
Hello Rhonda, thank you for reaching out. The timer, part number PS3654187, and the knob, part number PS8769914, will need to be replaced. The shaft that protrudes from the back of the panel is part of the timer assembly and is not sold or made separate from the timer switch. Good luck with the repair!
Hello Lucy, thank you for getting in touch. The part you are looking for is the push to start switch, part number PS3487190. It can not be repaired, you may need to replace it. If you need help placing an order, customer service is open 7 days a week!
Hello Fred, Thank you for asking. Yes, the Control Knob PartSelect Number PS8769914 accepts a D Shape Shaft. Thank you for the inquiry, good luck with the repair!
Removed the front Dryer panel. Left drum in place and lifted it up slightly to get access to motor drive. Slipped belt in place and put panel back on. This was a first attempt ever at fixing an appliance and it was no big deal.
2 screws removed to remove top. 4 screws removed from inside to remove front panel w/ door. 4 screws removed from top of control panel, loosed and popped top right off. Flathead screwdriver to pop off old plastic panel. Removed old wire chas
... Read moree (plastic, approx 3” long). Removed built-up lint, wiped down area for new duct. Snapped new duct on. Dryer works like new!! Took about 35 minutes, most of time spent cleaning up inside of dryer from lint due to broken duct.
One problem was that salesperson sold me on a new felt strip to go with new duct. That felt comes already installed on the new duct so I did not need it. Cost me a few extra dollars I did not need to spend.
Other than that, easy ordering, fast shipment, and parts are as close to original as possible.
It was actually my father, he doesn't use the internet. He thought that because the dyer got real hot and then shut off he thought the thermostat wasn't working and the high temp shutoff was okay. He went through the manual and found the part and took it out. He called the service number but they wanted $50 dollars plus shipping. I saw it
... Read more was a Thermo-disc part so I tried the manufacture's website but I couldn't match the numbers on the back to their part numbers. I tried several other sites and your site was the cheapest. It was real easy to use the web site and diagrams to find the right schematic and part. I ordered it online and it was delivered in 2 days with the regular shipping. When he first put it in the dyer didn't turn on. He found no power coming out of the timer so he cleaned the contacts and it worked. Thanks for making the ordering so easy.