Your coupon for will be reflected when you check out!
✖
Your coupon for
✖
Hello!
You're visiting the PartSelect site in U.S.
Would you like to shop on the Canadian site?
Stay on this site
Go to Canadian site
✖
Model Number Locations
1Select Category Type
Select Category Type
2Select Product Type
Select Product Type
3Select {MODEL} Type
Select {MODEL} Type
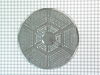
Sample Model Number Tags
Model numbers can be made up of numbers (1005400, for example) or a combination of letters and numbers (LAT1000AAE). The model number will most likely appear on either a paper sticker or a metal plate. Your appliance's model number tag may look similar to the sample model number tags shown here (model number highlighted in yellow):
Model has been saved to My Models. If you're not signed in, your lists are available on this device and will expire within 30 days.
Model has been saved to My Models.
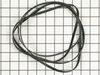
This Drive Belt is 89.5" long and comes in black, featuring four ribs on the inside for a better grip. This is a long belt that wraps all the way around the dryer drum, around a tension pulley, and th...
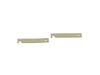
This is a duct felt seal for a dryer. The duct felt seal allows the front-load dryer drum to glide smoothly on the front panel. Your dryer will not function properly if the drum felt seal is compromis...
This lint filter is a genuine OEM component designed for use in both electric and gas clothes dryers. It plays a critical role in maintaining proper airflow by capturing lint and debris during drying ...
This OEM replacement dryer slide bearing is white in color, and approximately 3 inches long. The slide bearings are supportive linings for your dryer. If they have eroded, or are damaged, the drums wi...
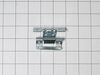
The interlock switch may also be referred to as a belt switch. This part is a simple on/off mechanism that prohibits the appliance from operating when the door is open. This is a part for your dryer. ...
Experience the seamless functionality of your dryer with the GE Door Hinge. This dryer component plays a crucial role in the operation of your machine, supporting the dryer door on its front panel. It...
This gas dryer igniter is a critical ignition component designed to safely and reliably light the burner during the drying cycle. Positioned near the burner assembly, it generates the necessary heat t...
This dryer door latch is designed to securely fasten the door to the cabinet, ensuring safe and reliable operation during each cycle. Made from durable gray materials, it engages with the door strike ...
This GE drum support shaft and bracket assembly provides solid support for the drum at the back wall of your dryer. The design ensures smooth rotation of the drum whilst it performs its drying functio...
This upper front drum support bearing and slide kit is designed to restore smooth drum rotation and proper alignment within your dryer. Located near the front interior opening, it supports the drum as...
Enhance the performance of your dryer with the GE High Limit Thermostat. This essential replacement part is specifically designed to prevent your dryer from overheating by promptly shutting off the he...
$16.84
In Stock
Order now and your part arrives by Apr 23
Questions And Answers for GTD75GCSL1WS
Be the first to ask our experts a question about this model!
✖
Ask a Question
Ask our experts a question on this model and we'll respond as soon as we can.
Removed the front Dryer panel. Left drum in place and lifted it up slightly to get access to motor drive. Slipped belt in place and put panel back on. This was a first attempt ever at fixing an appliance and it was no big deal.
I had to take most of the dryer apart because there is no rear access to the motor. It turned out to be easy to dissasembel the dryer. The only problem that I had was that I could not figure out how to route the belt around the motor and the idol pullies. I could not find anywhere that gave instructions on how to properly tension the belt
... Read more. I finally figured out that the idoler pulley needs to be locked in place on the right side of the engie mount. Then the belt needs to be routed over idoler pulley and under the motor pulley. Finally release the idoler pully from the locked postion to put tension on the belt. It really turned out to be pretty easy.
Pryed off the top with a flat head screwdriver and removed the 2 screws holding the front panel to the sides. Then lifted the front panel off of the bottom brackets. Belt fit perfectly and followed the provided instructions to loop it around the motor and pulley. PartSelect got the part to me within a couple of days and the repair was a
... Read moresnap.


 – Part Number: WE03X37320")


")


