Your coupon for will be reflected when you check out!
✖
Your coupon for
✖
Hello!
You're visiting the PartSelect site in U.S.
Would you like to shop on the Canadian site?
Stay on this site
Go to Canadian site
✖
Model Number Locations
1Select Category Type
Select Category Type
2Select Product Type
Select Product Type
3Select {MODEL} Type
Select {MODEL} Type
Sample Model Number Tags
Model numbers can be made up of numbers (1005400, for example) or a combination of letters and numbers (LAT1000AAE). The model number will most likely appear on either a paper sticker or a metal plate. Your appliance's model number tag may look similar to the sample model number tags shown here (model number highlighted in yellow):
GSC3400G00BB General Electric Dishwasher - Overview
Save your modelModel Saved!
Save your model for later to make things easier.
Model has been saved to My Models. If you're not signed in, your lists are available on this device and will expire within 30 days.
Model has been saved to My Models.
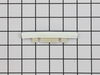
The gasket insert is connected to the gasket in the bottom of your dishwasher door. It is a small piece of white plastic that measures approximately 4 inches by 1 inch, and is sold individually. The g...
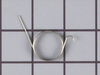
The hinge link on your dishwasher connects the spring to the dishwasher door hinge. If the hinge link becomes cracked or damaged, you may not be able to shut or lock your dishwasher door properly. In ...
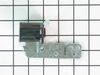
This is a pump and motor kit for your dishwasher. This assembly replaces many old-style pump and motor kits that were manufactured since 1970. The instructions are included with this kit in to assist ...
This is the replacement detergent cup release arm for your dishwasher. It is made of black plastic and is sold individually. The detergent cup release arm is found on the inside of the dishwasher door...
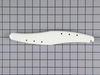
Water is forced through this spray arm by the unit's pump and motor assembly. The force of the water propels the spray arms, spraying water and detergent onto the dishes on the dishrack. This spray ar...
Ask our experts a question about this model and we'll get back to you as soon as possible!
1 question answered by our experts.
Sort by:
< Prev
1
Next >
Search filter:
Clear Filter
Your search term must have 3 or more characters.
Keep searches simple. Use keywords, e.g. "leaking", "pump", "broken" or "fit".
Sorry, we couldn't find any existing answers that matched.Try using some different or simpler keywords, or submit your new question by using the "Ask a Question" button above!
Ann
December 28, 2023
The liquid detergent does not dissolve & remain on the door and bottom leaving spots and detergent all over dishes & glasses
For model number GSC3400G00BB
Hello Ann, thank you for the question. If your detergent is not dissolving, you may want to check your settings to make sure the temperature gets between 40-65°C (120-150°F). It will need to be this hot for the tablet to dissolve. You may also want to check that the spring on the detergent dispenser door/clip is working. If it is fine, then water is not getting to the dispenser. Make sure you are not blocking the dispenser area. Put nothing in the front of the dispenser. No bowls, big plates, cups, or anything else. Then clean all the wash arm holes below the top basket and the bottom basket using a toothpick to make sure water can spray out of the arms properly. Next, run a test cycle with no dishes inside to see if the detergent dissolves. If not, then something is going on with either your wash arms still being clogged or possibly the circulation pump is getting weak and not spraying out the wash arms anymore, so the pump and motor assembly, part number PS260801, would have to be replaced. We hope this information helps!
I removed the four screws holding the screen and molded plastic cage inside the rear of the dishwasher to expose the check valve assembly. I then unscrewed the piston and nut assembly with my hand and replaced it with the new one. I found that the rubber cone shaped valve on the old piston and nut assembly was entirely disintegrated. T
... Read morehis easy repair solved the problem.
It is a simple process to replace the drain solenoid on these dishwashers, having replaced several in the past few months.
After removing the front bottom panels, I removed the 2 screws holding the old solenoid, unplugged the wire harness, and then switched over the springs to the new solenoid. Assembly was installing 2 scre
... Read morews, and plugging in the wire harness.
I work on a 260 + unit property, as well as working for a property management company who rents single family homes.
PartSelect.com is an excellent source of parts, shipping in a quick manner, allowing the repairs to be completed in a timely manner. Thank you.
The most difficult part was removing the dishwasher from below the counter. Once that was complete, I simply turned the washer onto it's front surface to access the pump easier. Simply disconnected the electrical connectors, loosened the three hose clamps holding the hoses to the pump. Lastly removed a stiff arm bracket holding the pum
... Read morep. Reversed the order to install the new one using a longer bracket provided with the new unit. Hooked up the electrical connections last and slid the washer back in place. The washer runs like new now and is not making noise. The replacement part was a perfect match.