Your coupon for will be reflected when you check out!
✖
Your coupon for
✖
Hello!
You're visiting the PartSelect site in U.S.
Would you like to shop on the Canadian site?
Stay on this site
Go to Canadian site
✖
Model Number Locations
1Select Category Type
Select Category Type
2Select Product Type
Select Product Type
3Select {MODEL} Type
Select {MODEL} Type
Sample Model Number Tags
Model numbers can be made up of numbers (1005400, for example) or a combination of letters and numbers (LAT1000AAE). The model number will most likely appear on either a paper sticker or a metal plate. Your appliance's model number tag may look similar to the sample model number tags shown here (model number highlighted in yellow):
Model has been saved to My Models. If you're not signed in, your lists are available on this device and will expire within 30 days.
Model has been saved to My Models.
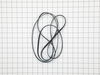
This drum belt, often referred to as a drive belt, is used in the assembly of dryers. It goes around the drum, the idler pulley, and the motor pulley. As the armature on the motor spins, this belt is ...
If your dryer does not tumble, will not start, is noisy, or is leaving marks on your clothing, you may need to replace the drum support bearing. The drum is supported at the rear by a bearing, which a...
This white drum glide is used in a clothes dryer to ensure the front of the dryer drum is supported as it does rotations. *Please note: these are sold individually, however there are two of these in y...
This kit contains two coils, one is a two-wire secondary coil and the other is a three-wire booster coil. Both coils in the ignition coil kit should be used together in the clothes dryer. Some of the ...
Located at the front of the dryer, this lint filter traps lint and debris from the exhaust air flowing out of the dryer drum. This part measures approximately 12 inches long x 7 inches high, has a pla...
This is a replacement screw for your washer or dryer. The screw is approximately half an inch in length and is a Phillips-head screw. It screws in from the outside of the drum, into the vane/baffle. T...
This part is the replacement door handle for your dryer. It is made of white plastic and measures about 2 ½ inches long and 4 inches wide. The door handle allows you to open and close the dryer door. ...
The top of the dryer was easily removed by prying the front up with a screwdriver then tipping it back and off of the mounting brackets. Then the front of the dryer was removed by unscrewing a single screw on each side that held the front to the side panels then pulling the front away from the dryer. Once the front was off, the coils we
... Read morere easily accessible on the bottom left side. A metal bracket held the coils on and was somewhat tough to get the two screws removed on it as they were stuck, but once they were removed the coils easily came out and I was able to replace them in minutes. The whole job took 15-20 minutes and I now have a dryer that heats through the entire drying cycle.
What the pictures do not show is the inner clamp spring that grips the selector switch shaft so it will not easily fall off. It is not shown or mentioned but in fact was installed in the knob.
1. Pry Dryer top up and off the clips. (Front of Dryer) 2. Remove 2 phillips screws on the inside of front panel. 3. Lift front panel up and set off to the side 4. Removed 2 phillips screws with short handled phillips driver that hold the gas valve coil bracket in place. 5. Unplugged and removed both coils, install
... Read moreed new coils and bracket. Re installed front panel, screws and top.