Your coupon for will be reflected when you check out!
✖
Your coupon for
✖
Hello!
You're visiting the PartSelect site in U.S.
Would you like to shop on the Canadian site?
Stay on this site
Go to Canadian site
✖
Model Number Locations
1Select Category Type
Select Category Type
2Select Product Type
Select Product Type
3Select {MODEL} Type
Select {MODEL} Type
Sample Model Number Tags
Model numbers can be made up of numbers (1005400, for example) or a combination of letters and numbers (LAT1000AAE). The model number will most likely appear on either a paper sticker or a metal plate. Your appliance's model number tag may look similar to the sample model number tags shown here (model number highlighted in yellow):
Model has been saved to My Models. If you're not signed in, your lists are available on this device and will expire within 30 days.
Model has been saved to My Models.
This rear drum bearing kit is designed for use with dryers. It supports the rear of the drum in your appliance as it tumbles your clothes during the drying cycle. If your drum will not tumble, or if i...
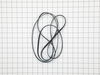
This drum belt, often referred to as a drive belt, is used in the assembly of dryers. It goes around the drum, the idler pulley, and the motor pulley. As the armature on the motor spins, this belt is ...
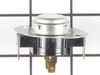
This selector knob, also be known as the laundry appliance control knob, is meant for your washer or dryer. This model is sold individually and takes a D-shaped shaft. The purpose of this part is to a...
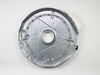
If your dryer does not tumble, will not start, is noisy, or is leaving marks on your clothing, you may need to replace the drum support bearing. The drum is supported at the rear by a bearing, which a...
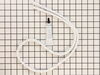
This white drum glide is used in a clothes dryer to ensure the front of the dryer drum is supported as it does rotations. *Please note: these are sold individually, however there are two of these in y...
This dryer heating element produces heat to dry clothes and is located in the rear of a dryer. If the heater element is burned, the dryer does not heat or over heats, or clothes are taking too long to...
The door catch on your dryer is an important part as it keeps your dryer door closed, in order to ensure no air or clothes can escape. This part works by holding the door strike, which allows the door...
The dryer thermal limiter, also known as a thermal fuse, blows the fuse to cut off power to the dryer when the dryer begins to overheat. Once the dryer reached 220 degrees Fahrenheit, the heat cuts ou...
The lower front felt seal with adhesive, also known as a drum felt seal, is used in dyers and allows the drum to easily glide on the front panel. For this repair project, you will need the following t...
Ask our experts a question about this model and we'll get back to you as soon as possible!
9 questions answered by our experts.
Sort by:
< Prev
1
2
Next >
Search filter:
Clear Filter
Your search term must have 3 or more characters.
Keep searches simple. Use keywords, e.g. "leaking", "pump", "broken" or "fit".
Sorry, we couldn't find any existing answers that matched.Try using some different or simpler keywords, or submit your new question by using the "Ask a Question" button above!
Tracy
February 4, 2020
Dryer makes a loud noise when it turns and now it wont turn with only a few clothes inside, sounds like something is lose. Don't know what part I need.
For model number GLER341AS2
Hello Tracy, Thank you for the question. We suggest checking the Belt, PartSelect Number PS1148434 to make sure it is not damaged or worn. You can also check the Rear Drum Bearing Kit PartSelect Number PS459829. We hope this helps.
The dry don’t get hot and it don’t shut off when there is wash in the dryer what parts do i need can you please send me some parts i need and how much. And i need a knob for the end cycle signal thank you
For model number GLER341AS2
Hello and thank you for writing.
There are several issues here.
No heat: possible faulty heating element PS418120 or thermal limiter PS419402
Won't shut off: faulty timer PS418620
Selector knob PS2330885
We hope this helps. Please contact us anytime if you require further assistance.
If you would like to place an order with our company or inquire about pricing, availability, and shipping, you will have to contact our customer service. You can do so one of two ways: online: www.partselect.com or telephone: 888-738-4871. Thank you.
The dryer makes a very loud noise grinding noise during the cycle and the clothes are not drying properly
For model number GLER341AS2
Hello Yakeita, thank you for getting in touch. Based on the description that you have provided, we would recommend checking the drum bearing kit, part number PS459829, to fix the issue. It helps the drum rotate smoothly and quietly. Glad to be of help!
I just replaced my start switch brand new.. and my door switch too... when i turn the start knob it makes a slight clicking and slight grinding after the click sound .... so what could it be i read if there's a safety fuse as well but where is that located.. please help me
For model number GLER341AS2
Hello Jason, thank you for your question. The issue is probably a Thermal Limiter - Limit 220
Part Number: 134120900. If the thermal fuse is defective, damaged, or blown up then the dryer wont start, especially since it cannot be reset. We would recommend testing that part. It is usually located at the back right corner of the inside of the unit. We have an installation video as well that you can find at the link below.
First thought the problem was a stretched drum belt or bad idler pulley. Ordered a new belt and idler assy plus spring. Replaced those items with relative ease following suggestions obtained at this site.However, problem persisted and I now suspected a bad drum bearing. Odered the bearing kit and replaced same using the following procedu
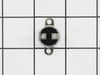
... Read morere. 1. Removed the cover from the back of the dryer (held in place via two phillip head screws) 2. Pushed down on the idler assy and removed the idler spring to release the drum belt. 3. Inserted flat tip screwdriver between the top panel and the dryer main body in the front of the dryer to pry the top loose from the two retaining clips. 4. used phillips screwdriver to remove the two retaining screws (one left, one right) that hold the front panel to the main body of the dryer. (about a foot down from the top of the dryer). 5. disconnected the wiring plug on the top right hand side at the top of the dryer. 6. lifted the front panel slightly removing it from the main body and placed it to the side. 7. lifted the rear of the drum to release it from the bearing bracket and removed the drum belt. 8. Pulled the drum through the front of the dryer body and moved it to an open work area. 9. Reached into the Dryer and loosened the two bearing bracket screws with a nut driver. Here's where another pair of hands would have come in handy. Holding the ground bar on the back of the drum with on hand, reached into the dryer and finished removing the bracket screws somehow managing not to drop the tiny grounding ball (size of a BB) Removed the badly damaged plastic bracket, grounding bar, and grounding ball and set them aside to be discarded later. 10. Used impact driver with phillips attachment to remove two of the three screws that hold the bearing to the back of the drum (these are on the inside) The third screw's head stripped out and I had a very difficult time removing it. Had it not been for that, the job would have taken less than an hour. 11. I had my wife hold the bearing in place while I started the three retaining screws. 12. My wife also got behing the dryer and held the grounding bar in place while I installed the new bearing bracket . (this kept me from loosing the grounding ball) I just reversed the rest of the procedures to install the drum belt, drum, front panel, etc. The dryer works like new now, doesn't squeal. Also replaced the on/off switch knob (just pulled the old one from the stem and slid the new one on.
1. Unplug dryer from outlet 2. Using Lg. flat screwdriver, pry under the front edge of the top and release two spring tabs 3. Lift up top and tilt back out of your way 4. Unscrew two phillips scews on inside of front panel 5. Lift up and out the front panel. Two spring clips at bottom. 6. Rlease tension on drum be
... Read morelt at the motor. Access panel at rear of dryer. 7.Unscrew 3 screws from inside, center rear of drum. 8. Remove drum through the front of the dryer. You may have to spread the sides apart a little bit for it to fit 9. Lift up on the rear drum bearing to remove it from the bearing retainer. ( U shaped plastic socket) 10. unsrew 2 screws and remove the bearing retainer, ground ball. Ball retainer is on outside of dryer. 11. Vacuum everything--duct, blower, lint trap, ect. 12. Intall new bearing retainer and grounding ball, an assistant is helpful at this time, one to hold ball retainer on rear of dryer, one to screw it in from the inside 13. reassemble remainder of parts in reverse order.