Your coupon for will be reflected when you check out!
✖
Your coupon for
✖
Hello!
You're visiting the PartSelect site in U.S.
Would you like to shop on the Canadian site?
Stay on this site
Go to Canadian site
✖
Model Number Locations
1Select Category Type
Select Category Type
2Select Product Type
Select Product Type
3Select {MODEL} Type
Select {MODEL} Type
Sample Model Number Tags
Model numbers can be made up of numbers (1005400, for example) or a combination of letters and numbers (LAT1000AAE). The model number will most likely appear on either a paper sticker or a metal plate. Your appliance's model number tag may look similar to the sample model number tags shown here (model number highlighted in yellow):
GIE18ETHPRBB General Electric Refrigerator - Overview
Save your modelModel Saved!
Save your model for later to make things easier.
Model has been saved to My Models. If you're not signed in, your lists are available on this device and will expire within 30 days.
Model has been saved to My Models.
This 115-volt 60Hz evaporator fan motor is located in the back of the freezer and circulates air over the refrigerator coils. These coils will convert the heat into cool air, which is then circulated....
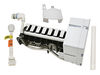
This 10 by 5 inch ice maker (Electromechanical Icemaker Kit, Ice Maker Assembly) produces ice. This particular model will produce seven crescent shaped cubes every cycle. It is constructed of plastic ...
The interior light of your refrigerator is controlled by a switch that is activated when the door is opened and closed. If your refrigerator light will not turn on, there could be an issue with the sw...
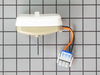
The lid bumper or evaporator fan motor bumper in your refrigerator prevents the fan motor from scraping against the side bracket. If your refrigerator/freezer is noisy, the bumper could be worn down o...
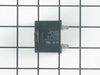
This part helps the compressor kick on and off while maintaining a constant temperature to keep things frozen in your freezer. This part has been updated by the manufacturer and may appear different t...
This defrost timer will cycle for 25 minutes after every six hours of run time. The timer itself is made of plastic, and its terminals are bent, the leads are internal, and the label is orange. If you...
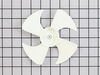
The condenser fan blade assembly helps to regulate the temperature in your refrigerator or freezer. This fan assembly has 4 blades, but other fans may have 3 blades, so be sure to check the number of ...
This is the replacement hinge washer for your refrigerator. The hinge washer is mounted on the top of the door hinge pin, and supports the refrigerator door, allowing it to open and close easily. The ...
This refrigerator vegetable pan cover serves as the frame above the crisper drawer, helping to maintain optimal conditions for produce storage. Made of durable white plastic, it measures approximately...
I removed two srews from the back panel inside fthe reezer compartment and the two that hold the air manifold/baffle? and pulled the baffle out. Then, I removed the two srews that hold the front part of the fan bracket behind the baffle and the back panel came out easily. Two more screws and one quick connect plug attached to the fan and
... Read moreI was done with removal. Insallation was even quicker, I slid the original fan right off the old motor and slid it on the new motor's shaft. Piece of cake! Thanks Partselect.
I applied some tips learned by reading other reviews. So before I started I grabbed my trusty vise grip pliers and a small screw driver. I locked onto the switch actuator, the part that the refrigerator door pushes in, with the vise grips and pulled on it just hard enough to get the screw driver inserted in the right side to push in the c
... Read moreatch clip so the switch could be pulled out further each time the catch clip was depressed to the next detent. Then I used the screw driver on the left site to encourage the switch past the detents on the left and very quickly the switch was out of the mount. The wires from the refrigerator pulled out with the old switch. I unplugged the old switch from the wires and plugged in the new switch and shoved the new switch back into the mount, wiggled it a couple of times to make sure it was secure and the job was done. Once I applied the vise gripes at first, the whole job took less than a minute.
My husband put on the defrost timer. At first I thought the part was not going to fix the problem. After about 5 hours my refrigerator was still warm. I went to work and when I got home that evening my refrigerator was cooling and down to 28 degrees. So if you replace this part wait at least 12-24 hours. Give it time to stablize.
... Read moreMy husband says it has to go through its cycle. It works on a 24 hour timer. My refrigerator is working fine and this has saved me alot of money. My husband says, once you put on the timer you may have to use a flat screwdriver and turn the small dial clockwise one click to start it. He removed the kick grill and replaced the part. Dont forget to shut breaker off to replace this part. Turn power back on and start the timer. We are so happy that we now have a working refrigerator.