Your coupon for will be reflected when you check out!
✖
Your coupon for
✖
Hello!
You're visiting the PartSelect site in U.S.
Would you like to shop on the Canadian site?
Stay on this site
Go to Canadian site
✖
Model Number Locations
1Select Category Type
Select Category Type
2Select Product Type
Select Product Type
3Select {MODEL} Type
Select {MODEL} Type
Sample Model Number Tags
Model numbers can be made up of numbers (1005400, for example) or a combination of letters and numbers (LAT1000AAE). The model number will most likely appear on either a paper sticker or a metal plate. Your appliance's model number tag may look similar to the sample model number tags shown here (model number highlighted in yellow):
Model has been saved to My Models. If you're not signed in, your lists are available on this device and will expire within 30 days.
Model has been saved to My Models.
This an authentic OEM 40-Watt replacement light bulb, used in a number of household appliances. It is specially designed to withstand extreme temperatures, which is why these replacement bulbs are mos...
This ice maker (Ice Maker Assembly, Refrigerator Ice Maker) produces ice cubes that are ejected into the storage bucket. It is located in the freezer section of your appliance, mounted on the freezer ...
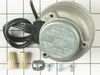
This condenser fan motor kit is designed for use with refrigerators. This fan draws air through the condenser coils and over the compressor. It does this with the goal of cooling the warm refrigerant ...
This door closing cam kit is intended for use on the bottom of your refrigerator and freezer door hinges. The cam helps close the doors and to lifts them slightly when opened. If your door will not op...
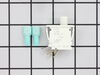
This part replaces two terminal switches in a dryer and prevents the dryer from running when the door is open. This includes two connectors. If your dryer will not shut off, start, or does not tumble,...
This refrigerator ice maker fill cup dispenses the water into the ice cube mold during the fill cycle. Replacing the water fill cup is a possible solution if you notice that the ice maker is leaking, ...
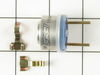
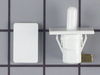
The purpose of the light switch in your refrigerator is to automatically turn on the light when the door is opened. If the light does not come on automatically when you open the door, the contacts ins...
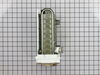
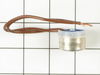
The ice maker thermostat, also known as the cycling thermostat, controls and regulates the ice maker ejection cycle by monitoring the temperature inside the freezer to determine when to release the ic...
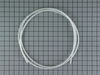
This part supplies water to refrigerator components that require water, such as the ice maker and water dispenser. If you notice a leak coming from your refrigerator, the plastic tubing that feeds you...
This is an ejector arm, and it is used in conjunction with your refrigerator. The function of this part is to act as a cube ejector inside your ice maker. The arm will rotate inside the ice maker to a...
$50.56
Special Order
Questions And Answers for GFS227/MN10
Be the first to ask our experts a question about this model!
✖
Ask a Question
Ask our experts a question on this model and we'll respond as soon as we can.
Interior surface of ice tray felt rough & flaky (coating deteriorated) so cubes would not release. Unplug appliance. Remove timer cover by hand pressure @ edge. Remove single attachment screw & bracket at lower front of icemaker. Disconnect wiring harness from socket @ rear of compartment. Tricky part was determin
... Read moreing what type of connection held the other two attachment points along the long edge of the icemaker. I did not have repair manual or useful drawing but looked @ PartsDirect pic of side brackets & used a small mirror to confirm that mine were also some sort of "snap in" attachment. Remove icemaker unit by pushing upward and outward on the unit. I takes a good bit of pressure and will pop loose, but be careful not to break attachment bracket from freezer wall. Scavenge shut off bar and wiring harness from old icemaker once you have it out & attach to new one before installing it back in freezer. Again, you might find a mirror useful to align those pesky snap-in brackets with the new unit. Since you probably kept your freezer running while waiting for the part, the plastic snap-ins will be cold and brittle. I warmed them up first by applying a dampened cloth heated in the microwave to make them a little more pliable. A good push of the new unit towards the snap-ins along with some upward force will get it stable. Reattach the metal screw in bracket & connect the wiring harness to rear plug... and don't forget to plug the whole thing back in. It will take awhile for the first batch of cubes dump as the timer may need to cycle completely around to get to the fill cycle... be patient. Dump the first couple of batches of cubes just to make sure you're free of any residue.
My ice maker has been shedding its non-stick coating for over a year. Within the last month of so, it started pouring water into the ice bucket below, turning it into a solid mass of ice. So I purchased a new ice maker assembly. I encountered two problems not mentioned in the 21 or so do-it-yourselfer repair stories that precede this on
... Read moree. First problem: one of the three screws that hold the ice maker to the refrigerator wall is hidden behind the large (black) end of the ice maker and is difficult to access. Before trying to replace the ice maker, make sure you have the physical dexterity to remove that screw. Second problem: it is not apparent how to remove the wire harness that plugs into the ice maker assembly. BEFORE you can remove the wire harness, you MUST remove the large white cap that covers the black end of the ice maker assembly and then push in a retaining tab to release the wire harness. If you don't do this, the wire harness will not release. Other than those two problems, it was relatively easy to remove three screws, unplug the wire harness, transfer three small, metal parts from the old ice maker to the new, plug in the new wire harness, mount the ice maker assembly so that the water tube is in the proper position, and then re-install the three screws. The ice maker works fine now. (P.S. I was told by an expert that the real problem might be a malfunctioning fill valve. I would have replaced the fill valve if replacing the ice maker assembly had not fixed the problem.)
Unplug the appliance. Removed the screws holding the back panel. Removed the fan blade. removed 3 screws holding the condenser fan. Remove the 3 metal brackets attached to the fan. (First note which studs the brackets are attached to. Attach the 3 metal brackets to the new fan. (New screws were supplied) Cut
... Read moreand strip the wire about two inches from the fan. Cut and strip the new wire. I cut the new wire in half (about 6 inches.) Connect the two wires, twist and used 2 wire nuts. Tie wrap the wire to the wire harness. Mount the new fan (three screws) Screw the back panel back on. Mount the new