Your coupon for will be reflected when you check out!
✖
Your coupon for
✖
Hello!
You're visiting the PartSelect site in U.S.
Would you like to shop on the Canadian site?
Stay on this site
Go to Canadian site
✖
Model Number Locations
1Select Category Type
Select Category Type
2Select Product Type
Select Product Type
3Select {MODEL} Type
Select {MODEL} Type
Sample Model Number Tags
Model numbers can be made up of numbers (1005400, for example) or a combination of letters and numbers (LAT1000AAE). The model number will most likely appear on either a paper sticker or a metal plate. Your appliance's model number tag may look similar to the sample model number tags shown here (model number highlighted in yellow):
GDT665SSN5SS General Electric Dishwasher - Overview
Save your modelModel Saved!
Save your model for later to make things easier.
Model has been saved to My Models. If you're not signed in, your lists are available on this device and will expire within 30 days.
Model has been saved to My Models.
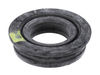
This lower rack roller is a genuine replacement component designed to support the smooth and stable movement of the dishwasher’s bottom rack. Measuring approximately 1.5 inches in diameter and finishe...
Please be informed that this OEM-verified part that DOES NOT come with the heatshield, as per GE directly and are no longer required. This lower spray arm assembly is an essential component of your di...
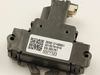
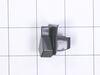
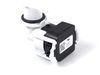
This dishwasher door latch is designed to secure the door during operation by connecting to the door strike and ensuring a tight seal. Mounted to the tub frame, it plays a critical role in enabling th...
- Includes: 4 brackets, 4 roller wheel brackets, and 8 wheels part # WD12X26146
Dishwasher Lower Dishrack Carrier and Roller Kit (Set of 4). This kit will replace all four one piece roller carriers w...
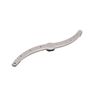
This mounting bracket is manufactured to secure your dishwasher to your countertop. Mounting brackets should be installed so the dishwasher doesn’t tip forward. You can fit the bracket to either the c...
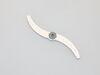
This OEM mid spray or center wash arm assembly distributes water and detergent in your dishwasher during the wash cycle. It has small nozzles that spray water onto your dishes and is located between t...
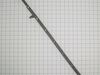
This OEM-compatible screw is designed for use with many GE dishwashers. Measuring 8-16 HXW and 1/2" in length, this stainless steel screw secures the middle spray arm hub to the upper rack assembly, e...
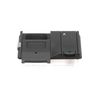
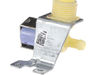
This detergent dispenser is designed for use in dishwashers and serves as a secure compartment for holding and releasing detergent during the wash cycle. The dispenser opens at the appropriate time to...
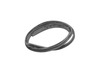
Stop leaks and keep your dishwasher running smoothly with this tub gasket replacement. It forms a tight seal between the door and tub, so water stays inside during every wash cycle. Made from strong, ...
This dishwasher latch strike is a manufacturer-approved replacement part for your appliance. The latch strike is an important component in your dishwasher door assembly, and adds an extra layer of sec...
$16.05
In Stock
Order now and your part arrives by Apr 9
Questions And Answers for GDT665SSN5SS
Ask our experts a question about this model and we'll get back to you as soon as possible!
2 questions answered by our experts.
Sort by:
< Prev
1
Next >
Search filter:
Clear Filter
Your search term must have 3 or more characters.
Keep searches simple. Use keywords, e.g. "leaking", "pump", "broken" or "fit".
Sorry, we couldn't find any existing answers that matched.Try using some different or simpler keywords, or submit your new question by using the "Ask a Question" button above!
Brian
December 19, 2024
Dishwasher alarms for "FTD" pressure sensor not getting enough flow. Removed an in- line water filter, hard lined water line to machine still getting FTD alarm. Cleared out drain, filters no sign of obstructions.
For model number GDT665SSN5SS
Hello Brian, thank you for getting in touch. According to our research, the error code FTD means failure to drain. As you have already cleaned the drain line and checked the drain filter, we would recommend checking the drain pump, part number PS12730507, to solve the problem. A malfunctioning drain pump can most probably cause this issue. Glad to be of assistance!
The Dishwasher will start and run for a minute or so then stop with a fault code of ftd. When the door is opened the inside is dry so no water was used. The very first time this happened the fault code was h2o so i reset the dishwasher snd now every time it stops eith fsult code ftd. What could cause this?
For model number GDT665SSN5SS
Hello Billy, thank you for contacting us. The error code FTD means failure to drain. As you mentioned that the inside of the dishwasher is dry and no water was used, we would recommend checking the control board, part number PS16742715, to solve the problem. We hope this helps.
1. Turn off breaker supplying power to dishwasher in electrical panel 2. Open dishwasher door 3. Unscrew the screws that secure the dishwasher to the counter. 4. Tip dishwasher forward. Identify the non-functioning door latch. It looks exactly like the replacement. Unclip the wire harness from the door latch. 5.
... Read more On the inside of the dishwasher, there are 2 screws directly under the door latch. Unscrew them and carefully set aside. 6. Remove old door latch. 7. Set new door latch in place. Holding securely, replace screws removed in step 5. Toward the end they get a little tougher to screw in. 8. Plug wire harness into new door latch. 9. Re-align dishwasher and re-secure to counter in previous position. 10. Test latch to make sure it closes properly. 11. Turn on breaker in electrical panel. The dishwasher should now function properly.
I found it online! There were step by step instructions that were easy to understand. I have never had to do anything like this in my life, only recently had to start doing everything around the house myself due to husband's illness. The repairman came out, charged me $100 to determine what the dishwasher needed & left me with the p
... Read moreart number. He was going to charge me $389 to install the part and they were over charging for the part. The repairman suggested I just get a new dishwasher. I ordered the part from the website at 1/2 the price that the other place charges and found it on line. With the step by step instructions and the online page, I successfully installed it MYSELF. Saved me a ton of $$. I LOVE the website Thank You!!!!
1. Pull out dishwasher (not all the way) 2. Open the door. 3. Remove the white rope holding the door hinge (both sides) 4. Remove the door by pulling up when the door is open about 4-8 inches. 5. Lay the door on the floor ( put something under the door so not to scratch the front. 6. Remove the small bolt at the bottom of the door (both
... Read moresides). 7. Slide the hinge back, up, then out. 8. Where the hinges were are another set of bolts, remove those (both sides) 9. Grab the top part of the door (the part with the buttons) and slide apart. 10. Remove the styrofoam carefully. 11. Disconnect the wiring harness. 12. Remove the 6 screws holding the Despenser tray in place. 13. Put in new Despenser tray and put everything back together.