Your coupon for will be reflected when you check out!
✖
Your coupon for
✖
Hello!
You're visiting the PartSelect site in U.S.
Would you like to shop on the Canadian site?
Stay on this site
Go to Canadian site
✖
Model Number Locations
1Select Category Type
Select Category Type
2Select Product Type
Select Product Type
3Select {MODEL} Type
Select {MODEL} Type
Sample Model Number Tags
Model numbers can be made up of numbers (1005400, for example) or a combination of letters and numbers (LAT1000AAE). The model number will most likely appear on either a paper sticker or a metal plate. Your appliance's model number tag may look similar to the sample model number tags shown here (model number highlighted in yellow):
Model has been saved to My Models. If you're not signed in, your lists are available on this device and will expire within 30 days.
Model has been saved to My Models.
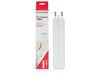
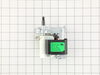
This genuine PureSource Ultra water filter will fit most Frigidaire french door and side by side refrigerators. You will find this filter located in the back, top right of the appliance. It is white i...
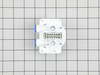
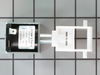
This manufacturer-approved air filter system for refrigerators eliminates odors and any impurities. It does this by neutralizing and removing odor-causing molecules. For best results, it is important ...
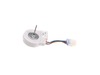
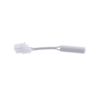
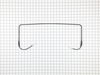
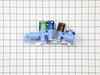
If you find that there is excessive frost in your freezer, or the freezer will not defrost, you may need to replace the defrost thermostat. The defrost thermostat kit comes with the clip, leads, and h...
This screw is used in refrigerators. The screw can be loosened or tightened with a Phillips-head or square-head screwdriver. This screw is used to secure the refrigerator handle to the refrigerator do...
This mullion hinge pin is a genuine OEM replacement part, measuring 1.5 inches by 1.25 inches by 0.85 inches. It is specially designed to secure the mullion in refrigerators, allowing it to pivot and ...
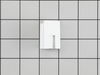
This GREY magnetic door gasket is designed for 36-inch French-door refrigerators and helps maintain a tight seal between the doors and the cabinet. Made from durable white material, it plays a critica...
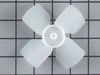
This evaporator fan blade is a genuine OEM part that is sourced directly from the manufacturer. The evaporator fan blade circulates air through the refrigerator to control the amount of cold air goes ...
Sold individually.
This is a genuine part. The handle mounting shoulder screw (no.10 ab) is made for use with many refrigerators. The metal screw helps to fasten the handle assembly to the outer do...
This is an LED light for a variety of refrigerator models. This 3.8W LED light is used to shine and adequately light the contents of your refrigerator when you open its door. If your current light is ...
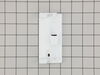
This light gray freezer drawer gasket is designed to create a secure, airtight seal around the freezer drawer, helping to maintain consistent internal temperatures and prevent warm air from entering. ...
This part could be found underneath a fridge, dryer, or freezer. The original foot may be cracked, broken, or perhaps missing altogether. If you notice the appliance is uneven to the floor or wobbling...
Unplugged the refrigerator. Removed the 4 hex head screws on the lower back panel at the back of the freezer. Used a blow dryer to defrost the pipes and area surrounding the thermostat. Unplug the connection from the back of the freezer, unplug the 2 wires, one that goes to the heater, one that comes from power. Unclip the thermostat
... Read morefrom the pipe and note which pipe you unclipped it from. Cut the wires on the old thermostat midway between the plugs and the sensor. Using the supplied butt connectors, strip the wire ends on color matched wires (should be a dark blue or black) and crimp them together. Repeat with the other wire. Discard the white shrink wrapping. I wasn't able to get it small enough with a hair dryer or lighter. Plug the thermostat back into it's respective plugs. Clip the thermostat back onto the pipe you removed it from. Replace the back panel with the four screws. Ensure the bottom of the panel is set inside of the drip tray. Replace any shelving you removed. Plug the refrigerator back into the wall. Your done!
we researched the internet with our symptoms and most sites said it was the thermostat. At $800+ for a new refrigerater, we decided to order the thermostat. Found schematics on the net, the thermostat was located in teh freezer compartment . Unplugged, removed food from freezer, removed the bottom shelf in freezer, and the back panel I
... Read moret was EASY to find. Cut 2 wires, replaced with new thermostat. DONE! The new thermostat came with new connecters.
To access the part you have to remove the back panel of the freezer compartment from the inside of the freezer itself. There are four screws to this panel. I emptied the contents of the freezer, took of 2 shelves and brackets to gain access and removed the cover. Located the part , cut the wires with a wire cutter and left a small tail ..
... Read more..MAKE SURE TO UNPLUG REFRIG OF COURSE ... the part is clipped on the coils , added the new part. matched the color wires and added the connectors , crimped the wires and added a little electrical tape and put the panel and shelves back. THE REFRIG IS WORKING LIKE A CHARM