


F60-1 Skuttle Humidifier - Overview
Sections of the F60-1
[Viewing 1 of 1]
Keep searches simple, eg. "belt" or "pump".

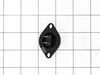
Thermistor
PartSelect #: PS4204984
Manufacturer #: DC32-00007A
This is a thermistor, also known as a dryer thermistor. The thermistor is attached to the blower housing, it will help regulate and oversee the temperature within the dryer. The most common symptom of...
$39.09
In Stock

Vacuum Cleaner Pipe Assembly
PartSelect #: PS5577230
Manufacturer #: DJ97-00936C
$226.49
Special Order
Questions And Answers for F60-1
We're sorry, but our Q&A experts are temporarily unavailable.
Please check back later if you still haven't found the answer you need.
Common Symptoms of the F60-1
[Viewing 3 of 3]Not Heating
Fixed by
these parts
these parts
Show All
Too hot
Fixed by
these parts
these parts
Show All
Won’t Start
Fixed by
these parts
these parts
Show All

Keep searches simple. Use keywords, e.g. "leaking", "pump", "broken" or "fit".
Dryer giving a HC code.
A month prior to this repair, I took the dryer apart, cleaned the clogged lint out, and replaced the thermistor with a cheap aftermarket part. It lasted a month. Bought this more expensive OEM thermistor, hopefully of a better quality. Realized that I could have gotten to the thermistor from the back by simply removing the vent pipe an
... Read more
d carefully reaching through the vent pipe hole to take out the thermistor. Did that this time instead of taking everything apart. Also bought an updated lint screen (aftermarket part). It has better mesh although it doesn't fit quite as perfectly as the original. So we'll see if the OEM thermistor lasts longer. The repair time was mostly spent moving the washer and dryer within a fairly small laundry room. The air lifter really helps.
Read less
Parts Used:
-
Tim from Madison, TN
-
Difficulty Level:Really Easy
-
Total Repair Time:1- 2 hours
-
Tools:Screw drivers
4 of 5 people
found this instruction helpful.
Was this instruction helpful to you?
Thank you for voting!
Gas dryer was not heating adequately
I originally called a repair person to come out but that was a total waste of time and money. He removed the front of the dryer claimed there was a dryer sheet causing the problem and put it back together.
Never again!
I watched a youtube video for step by step instructions on how to take the dryer apart.
I took the fron ... Read more t door of the dryer off, removed the filter cover and the dryer drum & belt. Removing this was simple and allowed me to see everything I was working on. With the new part in hand, I removed one wire at a time from the non working heat sensor and connected it to the new part. That way I was sure I had the right connections.
I then removed the thermostat making sure to put the new one back in place exactly as the old one.
I then put the drum back in place with the belt securely fastened. I put the cover back on the lint filter and placed the dryer door back on securing it in place. The dryer is now working perfectly. It takes longer to take the dryer apart than to replace the old parts.
Read less
Parts Used:
-
pamela from CORP CHRISTI, TX
-
Difficulty Level:Really Easy
-
Total Repair Time:30 - 60 mins
-
Tools:Screw drivers
4 of 8 people
found this instruction helpful.
Was this instruction helpful to you?
Thank you for voting!
The dryer shut itself off and displayed error code TO
Took off the back of the dryer and replaced the thermistor. A $7 part that would have been a couple hundred dollars if we had to call a repairman.
Parts Used:
-
Leslie from Frederick, MD
-
Difficulty Level:Easy
-
Total Repair Time:30 - 60 mins
-
Tools:Screw drivers
1 of 4 people
found this instruction helpful.
Was this instruction helpful to you?
Thank you for voting!