


ELFG7437AG Dryer - Overview
Models starting with ELFG7437AG
Click on the best match to narrow your results.
Keep searches simple, eg. "belt" or "pump".

M Series Ignition Coil Kit
PartSelect #: PS470049
Manufacturer #: 5303931775
This kit contains two coils, one is a two-wire secondary coil and the other is a three-wire booster coil. Both coils in the ignition coil kit should be used together in the clothes dryer. Some of the ...
$26.82
In Stock

Screw
PartSelect #: PS417463
Manufacturer #: 131302800
This is a replacement screw for your washer or dryer. The screw is approximately half an inch in length and is a Phillips-head screw. It screws in from the outside of the drum, into the vane/baffle. T...
$23.60
In Stock

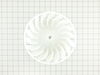
Belt
PartSelect #: PS2349294
Manufacturer #: 134719300
This dryer belt is one of the most important parts in a dryer and is what allows the dryer drum to spin/rotate. If the dryer belt is damaged or broken, the drum will not spin or will have difficulty i...
$56.33
In Stock

Flame Sensor
PartSelect #: PS459818
Manufacturer #: 5303281135
This part senses the flame for heat allowing the gas valve to open. The most common issue that might arise that would indicate the flame sensor needs to be replaced is your dryer is not giving off eno...
$43.18
In Stock


High Temperature Adhesive
PartSelect #: PS474458
Manufacturer #: 5308027429
This high temperature adhesive is used for installing felt and rubber seals on dryers. The tube contains 1 ounce of product. This adhesive is made to withstand extremely hot temperatures. Before apply...
$52.67
In Stock

Drum Roller
PartSelect #: PS12741852
Manufacturer #: 5304523152
This is a genuine replacement drum roller for a dryer. This part includes a roller which has an axle and two tri-rings. The dryer drum roller holds the drum in place while it rotates on the dryer supp...
$36.85
In Stock

Lint Filter Assembly
PartSelect #: PS16620745
Manufacturer #: 5304529766
This lint filter assembly is a genuine replacement part designed for use in Frigidaire electric and gas dryers, including standalone units and laundry towers. Engineered to trap lint and debris from e...
$79.73
Special Order

Thermal Fuse
PartSelect #: PS4704883
Manufacturer #: 134711401
This dryer thermal fuse is a critical safety component designed to protect the appliance from overheating. It automatically shuts off power to the motor or heating system if excessive temperatures are...
$37.91
In Stock

Thermal Fuse
PartSelect #: PS7783961
Manufacturer #: 137539200
This thermal fuse is a safety component designed to protect the appliance by interrupting electrical flow if excessive temperatures are detected. It helps prevent overheating and potential damage to i...
$32.63
In Stock

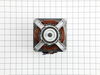
MOTOR
PartSelect #: PS16620747
Manufacturer #: 5304529782
This drive motor includes the pulley for the dryer drum belt. The motor has reverse threads for the blower wheel. Please disconnect the power before starting your repair. This is a genuine OEM part.
$181.40
In Stock

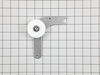
Idler Arm Spring
PartSelect #: PS418263
Manufacturer #: 131601000
Keep your cooking experience as smooth as always with our authentic OEM Whirlpool Cooktop. This replacement part is the perfect solution to getting your stove back in top shape, ensuring your meals ar...
$53.20
In Stock
Common Symptoms of models starting with ELFG7437AG
[Viewing 5 of 5]Noisy
Fixed by
these parts
these parts

Show All
Drum Not Spinning
Fixed by
these parts
these parts
Show All
Not Heating
Fixed by
these parts
these parts


Show All
Marks left on clothes
Fixed by
these parts
these parts

Show All
Won’t Start
Fixed by
these parts
these parts

Show All
Keep searches simple. Use keywords, e.g. "leaking", "pump", "broken" or "fit".
Dryer would heat initially then cool down
The top of the dryer was easily removed by prying the front up with a screwdriver then tipping it back and off of the mounting brackets. Then the front of the dryer was removed by unscrewing a single screw on each side that held the front to the side panels then pulling the front away from the dryer. Once the front was off, the coils we
... Read more
re easily accessible on the bottom left side. A metal bracket held the coils on and was somewhat tough to get the two screws removed on it as they were stuck, but once they were removed the coils easily came out and I was able to replace them in minutes. The whole job took 15-20 minutes and I now have a dryer that heats through the entire drying cycle.
Read less
Parts Used:
-
Brett from Monticello, MN
-
Difficulty Level:Easy
-
Total Repair Time:15 - 30 mins
-
Tools:Screw drivers
99 of 112 people
found this instruction helpful.
Was this instruction helpful to you?
Thank you for voting!
Noisy Dryer
When I described the noise to a YouTube appliance diagnostician, I was directed to check the felt seals front and back of the rotating drum for wear, tears, or foreign objects. As it happens the felt seals looked find and there were foreign objects so, not wanting to disassemble and reassemble the dryer more than I had, I ended up replac
... Read more
ing all the replaceable moving parts that I considered possible culprits: The idler tension spring, the idler tension bracket (which includes a nylon pulley wheel), the drum belt, the five rubber-tipped bearings that support the drum and keep it in place, and the foam seal on the blower housing which seemed a little brittle and old, as well as high-temperature adhesive for the latter. The instructional videos here and on YouTube were extremely helpful (I doubt that I would have attempted this job at all, had I not watched these ahead of time). The most time-consuming aspect was waiting for the arrival of the parts as I didn't order them all at the same time or all from the same place (I ordered from whomever could ship me a given part the fastest. Disassembly took less than an hour. Re-assembly with the new parts in place took about the same but was a little more awkward because this appliance sits in a very narrow closet and it's difficult to ensure that the 4" flexible duct stays in place when sliding the appliance back into the closet. No regrets. Now I know the basics if this dryer needs attention in future and I also know all the parts that I can eliminate as suspects in any future maintenance (the parts that I replaced)
Read less
Parts Used:
-
Philip from Oakland, CA
-
Difficulty Level:A Bit Difficult
-
Total Repair Time:1- 2 hours
-
Tools:Pliers, Screw drivers, Wrench (Adjustable)
56 of 68 people
found this instruction helpful.
Was this instruction helpful to you?
Thank you for voting!
Dryer would heat only on the initial start. Burner would not light again until completely cooled down. The ignitor would energize, but no gas would flow for ignition.
1. Pry Dryer top up and off the clips. (Front of Dryer)
2. Remove 2 phillips screws on the inside of front panel.
3. Lift front panel up and set off to the side
4. Removed 2 phillips screws with short handled phillips driver that hold the gas valve coil bracket in place.
5. Unplugged and removed both coils, install ... Read more ed new coils and bracket. Re installed front panel, screws and top.
Read less
Parts Used:
-
Bruce from Burnsville, MN
-
Difficulty Level:Easy
-
Total Repair Time:15 - 30 mins
-
Tools:Screw drivers
42 of 52 people
found this instruction helpful.
Was this instruction helpful to you?
Thank you for voting!