Your coupon for will be reflected when you check out!
✖
Your coupon for
✖
Hello!
You're visiting the PartSelect site in U.S.
Would you like to shop on the Canadian site?
Stay on this site
Go to Canadian site
✖
Model Number Locations
1Select Category Type
Select Category Type
2Select Product Type
Select Product Type
3Select {MODEL} Type
Select {MODEL} Type
Sample Model Number Tags
Model numbers can be made up of numbers (1005400, for example) or a combination of letters and numbers (LAT1000AAE). The model number will most likely appear on either a paper sticker or a metal plate. Your appliance's model number tag may look similar to the sample model number tags shown here (model number highlighted in yellow):
Model has been saved to My Models. If you're not signed in, your lists are available on this device and will expire within 30 days.
Model has been saved to My Models.
This high limit thermostat is used in a dryer and monitors the temperature to make sure it does not exceed 260 degrees Fahrenheit. When your dryer temperature reaches 260 it will cut it out and only c...
This is a replacement screw for your washer or dryer. The screw is approximately half an inch in length and is a Phillips-head screw. It screws in from the outside of the drum, into the vane/baffle. T...
This dryer belt is one of the most important parts in a dryer and is what allows the dryer drum to spin/rotate. If the dryer belt is damaged or broken, the drum will not spin or will have difficulty i...
This high temperature adhesive is used for installing felt and rubber seals on dryers. The tube contains 1 ounce of product. This adhesive is made to withstand extremely hot temperatures. Before apply...
Discover the quality and reliability of genuine Frigidaire parts with this Thermal Limiter. Specially designed to protect from overheating, this non-resetable thermal fuse shuts off your dryer's heate...
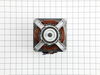
This is a genuine replacement drum roller for a dryer. This part includes a roller which has an axle and two tri-rings. The dryer drum roller holds the drum in place while it rotates on the dryer supp...
This dryer thermal fuse is a critical safety component designed to protect the appliance from overheating. It automatically shuts off power to the motor or heating system if excessive temperatures are...
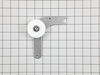
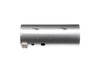
This drive motor includes the pulley for the dryer drum belt. The motor has reverse threads for the blower wheel. Please disconnect the power before starting your repair. This is a genuine OEM part.
This element is strung with a coiled wire made of a nickel and a chrome alloy. This wire receives, but resists, a controlled electric current and as a result, the wire heats up. The heat produced is u...
Keep your cooking experience as smooth as always with our authentic OEM Whirlpool Cooktop. This replacement part is the perfect solution to getting your stove back in top shape, ensuring your meals ar...
Introducing the authentic BLOWER WHEEL by Frigidaire, a reliable solution for your appliance needs. This product is particularly designed for use in some models of Frigidaire, Electrolux, White Westin...
$52.67
In Stock
Order now and your part arrives by May 10
Questions And Answers for EFMC427UIW2
Ask our experts a question about this model and we'll get back to you as soon as possible!
1 question answered by our experts.
Sort by:
< Prev
1
Next >
Search filter:
Clear Filter
Your search term must have 3 or more characters.
Keep searches simple. Use keywords, e.g. "leaking", "pump", "broken" or "fit".
Sorry, we couldn't find any existing answers that matched.Try using some different or simpler keywords, or submit your new question by using the "Ask a Question" button above!
Roussel
January 26, 2025
i have a error code hd on my electrolux dryer ,and i try to find the main board
For model number EFMC427UIW2
Hi Roussel,
Thank you for your question. The EHD error code indicates an issue with the electronic control board, part number PS12728917. This located behind the control panel. This error code will appear if there is an issue with the electronic control board, from power fluctuations, or from faulty wiring. Make sure that the dryer is firmly plugged into the electrical outlet and that there are no electrical issues with the outlet itself. Do not plug the dryer into an extension cord. Also inspect the wiring in the dryer for any issues. Check the electronic control board for any signs of damage, wear, scorching, or burn marks. If it shows any of these signs you will need to replace the electronic control board. We hope this helps!
When I described the noise to a YouTube appliance diagnostician, I was directed to check the felt seals front and back of the rotating drum for wear, tears, or foreign objects. As it happens the felt seals looked find and there were foreign objects so, not wanting to disassemble and reassemble the dryer more than I had, I ended up replac
... Read moreing all the replaceable moving parts that I considered possible culprits: The idler tension spring, the idler tension bracket (which includes a nylon pulley wheel), the drum belt, the five rubber-tipped bearings that support the drum and keep it in place, and the foam seal on the blower housing which seemed a little brittle and old, as well as high-temperature adhesive for the latter. The instructional videos here and on YouTube were extremely helpful (I doubt that I would have attempted this job at all, had I not watched these ahead of time). The most time-consuming aspect was waiting for the arrival of the parts as I didn't order them all at the same time or all from the same place (I ordered from whomever could ship me a given part the fastest. Disassembly took less than an hour. Re-assembly with the new parts in place took about the same but was a little more awkward because this appliance sits in a very narrow closet and it's difficult to ensure that the 4" flexible duct stays in place when sliding the appliance back into the closet. No regrets. Now I know the basics if this dryer needs attention in future and I also know all the parts that I can eliminate as suspects in any future maintenance (the parts that I replaced)
I watched and re-watched a YouTube video where these parts were recommended for a retro fit of the Electrolux 617 dryer. The original parts for this dryer allow too much lint to get past the lint screen and into the fan blades. To install these new parts you just need to be careful to pull the moisture sensor leads off of the old grill as
... Read moresembly and put them on to the correct prongs on the new grill assembly. (You will not use the leads that the new parts come with.) You may want to take a picture of how the leads were on the old assembly before you pull them off. You also need two, two-inch #10 screws that are readily available at hardware stores. I bought the "sheet metal" type screws. The YouTube video can be found by entering the words "Electrolux Dryer Lint Fix & Retrofit" into Google or YouTube search bar. If you follow it to the letter all will be well, but be careful to line up the holes for the screws. Having someone else holding a flashlight would be ideal, but it's not absolutely necessary.
So does this work? Yes, the parts fit just fine and they improve the situation a great deal but they don't completely solve it if you have a dog that has those little short sharp hairs and the dog sleeps in your bed, sits on your lap and leaves dog hair all over stuff that will be washed and put into the dryer. Those hairs will still get past the new clam shell filter but the good news is, you don't have to pull the dryer apart to clean the fan blades after you have installed these new parts. You can take the hose from your vacuum cleaner and just stick it in the fan blade compartment (after removing clamshell lint screen) and you will be able to capture most of what got past the screen. How is this different than before? The kind of lint that makes it past the new parts is much lighter and finer than what got past the old screen so the vacuum can easily pull it out.
PS I love Parts Select. This is the second thing I've ordered from them and I've been so impressed with how fast the parts arrived and how nicely they were packed. It's a first class organization in my opinion.
I removed the front, top and back panels of the dryer, installed belt around drum and through the pulley system so the belt was snug, replaced all screws and panels, and done.