Your coupon for will be reflected when you check out!
✖
Your coupon for
✖
Hello!
You're visiting the PartSelect site in U.S.
Would you like to shop on the Canadian site?
Stay on this site
Go to Canadian site
✖
Model Number Locations
1Select Category Type
Select Category Type
2Select Product Type
Select Product Type
3Select {MODEL} Type
Select {MODEL} Type
Sample Model Number Tags
Model numbers can be made up of numbers (1005400, for example) or a combination of letters and numbers (LAT1000AAE). The model number will most likely appear on either a paper sticker or a metal plate. Your appliance's model number tag may look similar to the sample model number tags shown here (model number highlighted in yellow):
Model has been saved to My Models. If you're not signed in, your lists are available on this device and will expire within 30 days.
Model has been saved to My Models.
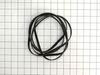
The drum belt attaches to the motor pulley and causes the drum to spin as the motor is rotating. The drum belt is made of black rubber. This is an easy repair and should only take a few minutes. This ...
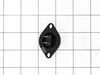
This is a thermistor, also known as a dryer thermistor. The thermistor is attached to the blower housing, it will help regulate and oversee the temperature within the dryer. The most common symptom of...
This idler pulley assembly is sourced from the original manufacturer for use in dryers. The assembly includes the pulley wheel and bracket. It is found near the motor where it provides tension to the ...
The Samsung Dryer Filter Cover offers a superior solution for maintaining the efficiency of your dryer. Uniquely designed, this high-quality cover fits with precision on your Samsung dryer to guard th...
Enhance your Samsung dryer's performance with this top-tier Heater Igniter. Designed to light the gas burner to execute the drying cycle efficiently, this piece represents a remarkable mix of durabili...
Dryer would not start but electronics were working.
Pulled top of dryer off; noticed the belt was loose but not broken. Went in through the back (1 screw and removed the exhaust pipe/plate); noticed the wheel was broken and thus the belt had fallen off.
Ordered replacement wheel/arm. One screw to remove ol
... Read mored one, one screw to install new one...tentioned the belt. Dryer was good as new.
After viewing many instructions on how to replace a broken drum drive belt on UTUBE and the video you sent me the project was completed with no problems and with ease.
However, I did discover large amounts of lint caked to the bottom of the lint screen housing just beyond the filter screen. There was minimal lint on the lint
... Read moreexhaust fan blades and no lint in the exhaust ducts.
I didn't recall seeing any video instructions drawing attention to potential lint issues, it just made good sense to clean the entire system while it was apart . At first I saw no major lint problem.
However, after removing the lint screen and placing a vacuum cleaner wand to the bottom of the lint screen housing (the bottom is not easy to see) my vacuum cleaner hose became clogged three times. I realized there was a major lint issue isolated to this area.
Many of the on line complaints focused on parts not properly fitting their dryer. they had to modify the parts in some way to fit or operate or they had to return them for other parts. Just think of the time wasted and the lack of use of their dryer.
I called and talked to a tech. Gave them my model number and the tech located the correct OEM parts for my dryer. I paid the extra money for OEM parts because I wanted my dryer fixed and restored to service in the least amount of time.
Outside the discovery of the not so obvious lint issue, the repair project was easy and the dryer was restored to full service with minimal down time.
Thanks for all your help and fast delivery service.