Your coupon for will be reflected when you check out!
✖
Your coupon for
✖
Hello!
You're visiting the PartSelect site in U.S.
Would you like to shop on the Canadian site?
Stay on this site
Go to Canadian site
✖
Model Number Locations
1Select Category Type
Select Category Type
2Select Product Type
Select Product Type
3Select {MODEL} Type
Select {MODEL} Type
Sample Model Number Tags
Model numbers can be made up of numbers (1005400, for example) or a combination of letters and numbers (LAT1000AAE). The model number will most likely appear on either a paper sticker or a metal plate. Your appliance's model number tag may look similar to the sample model number tags shown here (model number highlighted in yellow):
Model has been saved to My Models. If you're not signed in, your lists are available on this device and will expire within 30 days.
Model has been saved to My Models.
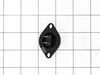
This is a thermistor, also known as a dryer thermistor. The thermistor is attached to the blower housing, it will help regulate and oversee the temperature within the dryer. The most common symptom of...
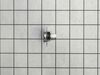
This thermostat is a genuine OEM part and is manufacturer-approved for electric dryers. The thermostat is responsible for monitoring and maintaining the temperature inside the dryer during the drying ...
The Samsung Door Latch Assembly is a premium quality replacement that ensures the secure closing of your dryer door. Crafted using robust metal and plastic, this component is designed to catch and fir...
I ordered twice from this site. the thermistor was the first order, the fuse was the second order. Turns out the thermistor sent was the WRONG one. When I reassemble the dryer, after 20 minutes the thermistor sent burned up to a crispy chard. The ohms on the wrong part was 12ohms. per the dryer diagnostics the thermistor should have been
... Read more=<1 ohm. I put in the original part and it worked. The fuse did the trick. the thermistor, not so much. Lesson to be learned is to not rely on this sites parts compatibility information. Look at the specs for your dryer from the manufacturer.
A month prior to this repair, I took the dryer apart, cleaned the clogged lint out, and replaced the thermistor with a cheap aftermarket part. It lasted a month. Bought this more expensive OEM thermistor, hopefully of a better quality. Realized that I could have gotten to the thermistor from the back by simply removing the vent pipe an
... Read mored carefully reaching through the vent pipe hole to take out the thermistor. Did that this time instead of taking everything apart. Also bought an updated lint screen (aftermarket part). It has better mesh although it doesn't fit quite as perfectly as the original. So we'll see if the OEM thermistor lasts longer. The repair time was mostly spent moving the washer and dryer within a fairly small laundry room. The air lifter really helps.
I originally called a repair person to come out but that was a total waste of time and money. He removed the front of the dryer claimed there was a dryer sheet causing the problem and put it back together. Never again! I watched a youtube video for step by step instructions on how to take the dryer apart. I took the fron
... Read moret door of the dryer off, removed the filter cover and the dryer drum & belt. Removing this was simple and allowed me to see everything I was working on. With the new part in hand, I removed one wire at a time from the non working heat sensor and connected it to the new part. That way I was sure I had the right connections. I then removed the thermostat making sure to put the new one back in place exactly as the old one. I then put the drum back in place with the belt securely fastened. I put the cover back on the lint filter and placed the dryer door back on securing it in place. The dryer is now working perfectly. It takes longer to take the dryer apart than to replace the old parts.