Your coupon for will be reflected when you check out!
✖
Your coupon for
✖
Hello!
You're visiting the PartSelect site in U.S.
Would you like to shop on the Canadian site?
Stay on this site
Go to Canadian site
✖
Model Number Locations
1Select Category Type
Select Category Type
2Select Product Type
Select Product Type
3Select {MODEL} Type
Select {MODEL} Type
Sample Model Number Tags
Model numbers can be made up of numbers (1005400, for example) or a combination of letters and numbers (LAT1000AAE). The model number will most likely appear on either a paper sticker or a metal plate. Your appliance's model number tag may look similar to the sample model number tags shown here (model number highlighted in yellow):
Model has been saved to My Models. If you're not signed in, your lists are available on this device and will expire within 30 days.
Model has been saved to My Models.
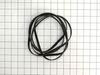
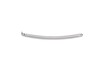
The drum belt attaches to the motor pulley and causes the drum to spin as the motor is rotating. The drum belt is made of black rubber. This is an easy repair and should only take a few minutes. This ...
This is a thermistor, also known as a dryer thermistor. The thermistor is attached to the blower housing, it will help regulate and oversee the temperature within the dryer. The most common symptom of...
This idler pulley assembly is sourced from the original manufacturer for use in dryers. The assembly includes the pulley wheel and bracket. It is found near the motor where it provides tension to the ...
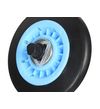
The drum support roller and axle, which includes the roller shaft and mounting clips, is used in dryers. This part holds the drum as it rotates on the support wheels. When the roller begins to wear ou...
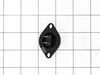
This thermostat is a genuine OEM part and is manufacturer-approved for electric dryers. The thermostat is responsible for monitoring and maintaining the temperature inside the dryer during the drying ...
This moisture sensor plate is specifically designed to fit with your Samsung dryer. It is made of stainless steel and measures approximately 5 inches long. It is designed to detect the amount of moist...
The leveling leg on your dryer attaches to the bottom of the dryer base. The function of the leg is to keep your dryer level while it operates. This part is approximately 3 inches in length, 2 inches ...
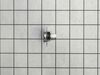
Introducing the Samsung Dryer Door Switch, a genuine, high-quality accessory for your Samsung dryer. This top-notch replacement part, also known as a door jamb switch, swiftly rectifies your broken or...
The Samsung Dryer Filter Cover offers a superior solution for maintaining the efficiency of your dryer. Uniquely designed, this high-quality cover fits with precision on your Samsung dryer to guard th...
YouTube, YouTube, YouTube. I YouTubed many videos on how to take a dryer apart to reach the drum support roller and axle. After watching numerous videos, I settled on one that had my exact model of dryer. For my dryer, previous inputs said I needed two rollers to for my model. That is not the case. My model actually has 4 rollers, 2 in th
... Read moree front and two in the back. I ordered 2 initially but only needed 1 thankfully since only one roller was bad. Keep it simple stupid is how I got it done. Dryer's are pretty simple machines mechanically. Don't trash your noisy dryer. We bought ours in 2014 and it only recently started giving us issues. This is after 2 moves and being run daily for a family of 6. I'm glad I found partselect.com. They saved me a ton of money.
Watched a video on utube, how to repair my 16 month old steam dryer. The hardest part was laying on my belly holding the spring loaded tensioner and slipping the belt on around the blower housing. Only cost me $23. Winning!