Your coupon for will be reflected when you check out!
✖
Your coupon for
✖
Hello!
You're visiting the PartSelect site in U.S.
Would you like to shop on the Canadian site?
Stay on this site
Go to Canadian site
✖
Model Number Locations
1Select Category Type
Select Category Type
2Select Product Type
Select Product Type
3Select {MODEL} Type
Select {MODEL} Type
Sample Model Number Tags
Model numbers can be made up of numbers (1005400, for example) or a combination of letters and numbers (LAT1000AAE). The model number will most likely appear on either a paper sticker or a metal plate. Your appliance's model number tag may look similar to the sample model number tags shown here (model number highlighted in yellow):
Model has been saved to My Models. If you're not signed in, your lists are available on this device and will expire within 30 days.
Model has been saved to My Models.
The rack track stop on your dishwasher is designed to stop the dish rack at the appropriate place when opening and closing the rack. If your dishwasher is not cleaning your dishes properly, the rack s...
This manufacturer-certified heating element is used to create heat during the dry cycle and increase water temperature during portions of the wash cycle when certain options are selected. If your dish...
The mounting bracket is sold individually, without screws. This part secures the upper side of the dishwasher to the underside of the counter or cabinet to prevent the dishwasher from moving, shaking,...
This dishwasher door gasket and strike kit is an essential component for maintaining a watertight seal around the dishwasher door and ensuring proper latch operation. The gasket prevents water leakage...
This is a chopper assembly or drain food chopper, and it is designed for your dishwasher. The chopper chops up/minces the food particles in your dishwasher to prevent them from clogging the pump. You ...
This drain pump is used in dishwashers to remove water from the dishwasher tub. If the impeller in the dishwasher is damaged or the motor has been shorted out and will not drain, it is possible the bo...
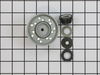
This is an upper dishrack roller designed for use with dishwashers. This dishrack roller allows you to insert and pull out the upper dishrack of your dishwasher easily and conveniently. If this roller...
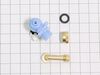
The rubber washer is a part which is specific to dishwashers and should not be substituted by a similar part. It works with the heating element to seal the receptacle opening where the heating element...
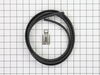
This hose clamp is used in a wide variety of household appliances. Most often it is found in washers, dishwashers, refrigerators, freezers, dehumidifiers, garbage disposals, or air conditioners. This ...
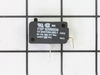
This part acts as as safety mechanism that keeps the dryer from overheating. Once the dryer temperature reaches a certain point, this part will shut down power to the heating element.
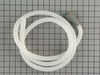
This is a seal, but you may also know it as a door gasket and it is for your dishwasher. The seal forms a watertight barrier between the door and the dishwasher tub, deterring water from escaping duri...
Caviat: The actual repair is less than 15 minutes, but I spent a lot of time playing with it before I figured out it was that easy and fast. You don't need to remove the dishwasher from the counter to do this. And it will probably help to look at the new part closely so you can understand where the retainer clip is to press it and release
... Read more the old pump.
First remove the water from the dishwasher pan that would not drain with a wet/dry vac. Otherwise the water will all drain on the floor when you remove the pump. Then remove the two screws on the kickplate on the front of the unit below the door. Remove the kickplate/maintainence access cover. The drain pump is on the right about 8 inches in. Using two hands you grasp the drain pump with your right hand and use the left hand to push the retaining clip down. Then the drain pump will rotate 1/4 turn counterclockwise and can be removed without pulling the dishwasher out. There is likely to be some water leak out that was traped in the pump housing that you can not reach with the vac. Disconnect the wire. Connect the wire to the new pump, put it in place and 1/4 turn clockwise to install it. Replace the kickplate and you're done.
1) Remove top and bottom dish baskets from the dishwasher, this will give you room to work. To remove top basket there are clips at the end of the slide rails. 2) Remove lower spray arm by unscrewing plastic screw, it should only be hand tight. 3) In order to remove the strainer cover, you will need to remove the plastic tube th
... Read moreat takes water to the middle and top spray arms. Unclip this tube from the top and middle clips and then work it out of the strainer assembly tube. Now you should be able to remove the tube at the bottom of the dishwasher by unscrewing it 1/4 turn. 4) Remove the strainer cover by unscrewing the 4 Torqs screws. 5) You will now see two smaller torqs screws that hold the hold the Chopper Assembly cover down. Take these two screws out and remove the two piece cover. 6) Pull out the broken Chopper Assembly, make sure you get all the pieces! 7) Install the new Chopper Assembly. Make sure that you install the Assembly with the small part of the screen towards the bottom of the housing. Also make sure you compress the spring as you install the part. I used a small pair of neddle nose pliers to compress the spring behind the screen in order to install the chopper assembly. 8) Put everything back together and make sure it works!


 Diagram and Parts List for Whirlpool Dishwasher")