Your coupon for will be reflected when you check out!
✖
Your coupon for
✖
Hello!
You're visiting the PartSelect site in U.S.
Would you like to shop on the Canadian site?
Stay on this site
Go to Canadian site
✖
Model Number Locations
1Select Category Type
Select Category Type
2Select Product Type
Select Product Type
3Select {MODEL} Type
Select {MODEL} Type
Sample Model Number Tags
Model numbers can be made up of numbers (1005400, for example) or a combination of letters and numbers (LAT1000AAE). The model number will most likely appear on either a paper sticker or a metal plate. Your appliance's model number tag may look similar to the sample model number tags shown here (model number highlighted in yellow):
Model has been saved to My Models. If you're not signed in, your lists are available on this device and will expire within 30 days.
Model has been saved to My Models.
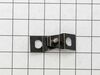
This rear drum bearing kit includes a shaft, ground strap, bearing, seven screws, and installation instructions. The bearing plate comes with a slot in it for the ground strap. This part helps keep yo...
The adjustable leveling screws on the bottom of your dryer can be screwed in or out to lower or raise the leg level. If one of the leveling screws is stripped, damaged, or missing, you may not be able...
Introducing the GE Idler Pulley Wheel, a crucial component for your dryer. This item is crafted from highly durable plastic, ensuring long lasting durability. The idler pulley wheel is responsible for...
Experience top-notch performance with GE's Drum Drive Belt. Specifically designed for dryers, this essential part attaches to the motor pulley, ensuring your dryer drum spins smoothly and efficiently ...
First, I loosened the the top control panel and then loosened the top flat roof panel which allowed me access to the inside of the dryer. Then, I removed the front panel which allowed access to the drum. I was amazed at the amount of lint that was inside the dryer itself. Most of my time was spent in the disassembly and cleaning of the in
... Read moreternal cavity around the drum. I reached below the drum and removed the belt from the pulley wheels and then unscrewed the drum (from the inside) from the back of the dryer and bearing kit. I removed the diffuser and cleaned it thoroughly. Then I replaced the entire drum bearing kit - the old one was almost completely dissentigrated. I probably should have applied some kind of non-flammable lubricant to the new bearing kit - the instructions did not include this step but after about 3 loads a slight squeak (different). I put everything back together - applying the new drum kit will require 2 sets of hands (my 9-year old daughter did great at this). I re-assembled the dryer and it works great, again except for the slight squeak that's still there. I may disassemble it again and apply some lubricant but I do not know what kind to get; I need to check that out.
Remove the two screws holding the top down. Disconnect two wires from door switch. Remove the two hex screws holding the front on. Remove the 4 screws holding the access panel on the back and disengage idler pulley to loosen the belt. Remove the drum. Label the wi
... Read moreres then remove the heating element. Check orientation of ground strap before disassembling rear bearing. Remove four screws holding rear bearing to back of heating element. Install rear bearing and ground strap on to heating element. Reinstall heating element. Reconnect wires.
Most Important : Get help putting parts back on drum! I didn't and that's why it took over 2 hours. I will describe how I did it.
Unscrew bearing from inside of drum. Wrap screwdriver with tape to a little larger than the screw hole. Use small screwdriver to line up the drum, shim and deflector. Don't forget the brass shim. It wasn't on the parts diagram. Start two screws don't tighten them yet. Remove Screwdriver and start third screw. Tighten all three down. Put belt on drum. Install drum and belt. Reverse disassembly. When putting the front on make sure drum rests in the felt.
I rated this a bit difficult because I did it myself. With help this is a fairly easy repair.
I followed the directions that were listed on this site by other Do It Yourself individuals...by the way I'm a lady and more mechanically inclined than my husband, but he was a great help in lifting the drum up and out. (I unplugged the dryer before starting repairs) 1. I removed the two screws located at the top of the dryer insi
... Read morede the door. 2. Top of dryer cabinet lifted up after screws were removed. 3. Located and removed front panel retension screws and removed front panel and set aside 4. slipped belt off motor by reducing tension on idler pully 5. Removed screws inside drum that secured drum to bearing assembly 6. Husband and I lifted drum up and out of cabinet (this went very smoothly and took less than 15 minutes time. 7. Followed supplied bearing drum instructions and removed old bearing and installed new assembly. 8. Thoroughly cleaned out internal cabinet, blower, and motor areas 9. Reset the idler pully into proper position. 10. Tipped dryer on 'back' to reseat the drum With A NEW DRYER BELT (taped temporarily around the drum) into the bearing shaft (I may not be using the proper terms) 11. tipped dryer upright and while Hubby balanced the drum, the front panel was resecured to the rest of the cabinet. 12. Removed temporarily applied tape that held the drum belt in the general position, then using the rear access panel, I slipped the belt over the motor into the proper posisiton. 13. Top cabinet was reapplied and screwed into place. 14 Plugged in and tested the dryer...NO SQUEAKS and it works beautifully and quietly!!
The job is not terribly difficult, but I am only 5 feet tall and the drum is bulky to work with and balance. Reaching into the cabinet to slip the belt onto the motor stretched my arm to the limit. I found the cabinet reassembly and realignment of the screw holes quite annoying. But the total job proved satisfying upon completion.