Your coupon for will be reflected when you check out!
✖
Your coupon for
✖
Hello!
You're visiting the PartSelect site in U.S.
Would you like to shop on the Canadian site?
Stay on this site
Go to Canadian site
✖
Model Number Locations
1Select Category Type
Select Category Type
2Select Product Type
Select Product Type
3Select {MODEL} Type
Select {MODEL} Type
Sample Model Number Tags
Model numbers can be made up of numbers (1005400, for example) or a combination of letters and numbers (LAT1000AAE). The model number will most likely appear on either a paper sticker or a metal plate. Your appliance's model number tag may look similar to the sample model number tags shown here (model number highlighted in yellow):
Model has been saved to My Models. If you're not signed in, your lists are available on this device and will expire within 30 days.
Model has been saved to My Models.
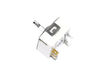
This surface burner switch, also known as an infinite switch, controls and regulates the heat output of the burners on a stovetop. The user simply adjusts the knob on the user interface panel, which i...
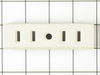
Introduce your appliance to the reliable and high-quality Whirlpool Air Grille. Crafted with precision, this air grill is a premium add-on, ideal for enhancing air circulation in your appliances. This...
1. Killed power and removed the regulator's knob, noted the position of the old control. 2. Took off the cover for the center vent and loosened the two screw holding the housing in place--the screws didn't have to come out completely as it is a U-shaped friction hold. 3. Unscrewed the two screws holding the old control switch in
... Read more place--lifted the housing enough to get at the old switch and carefully pulled it loose--it was a front burner so the control switch was about as far back as it could be but still wasn't that hard to get at. 4. Turned the new switch to orient the wire connectors, then, using a needle-nose pliers, removed each friction connector, one at a time, and fitted them on the new switch (note: one of the wires fitted best if it went under as opposed to around the base of the new switch). 5. Replaced the control back through the housing and screwed it in place, making sure the orientation of the control matched the way it looked originally. 6. Slide the housing back over the two screws and tightened, replace vent. 7. Replaced the knob and turned on the power.
(The above took me about twice as long to write as it did to make the repair and I write professionally but am not a professional electrician.)
Also, I bought a second control switch because, given the age of the unit, I'm sure another one will go. The second one will assure that it won't happen :-).
Simple Repair! Turn off Power Remove four screws under panel. Remove old burner knob. Drop Burner Panel from range Remove 5 wire connectors from old burner control with pliers Remove 2 screws that held burner control to range panel Install new burner control Rplace two screws to burner
... Read more control Replace 5 wire connectors to new burner control Replace 4 screw under panel Replace knob to new burner control Turn on electricity Made wife happy!
Our Jenn-Air cook top is 25 years old. One can no longer order parts for this old of model. We ordered new SS burners as well as new Burner cartridge terminal blocks for a new and current model. They work perfectly. Took 10 minutes. $ 350 dollars verses $ 2600 for a new JennAir range plus instillation. Unit looks and works great. Pla
... Read moren to order new switches next.