Your coupon for will be reflected when you check out!
✖
Your coupon for
✖
Hello!
You're visiting the PartSelect site in U.S.
Would you like to shop on the Canadian site?
Stay on this site
Go to Canadian site
✖
Model Number Locations
1Select Category Type
Select Category Type
2Select Product Type
Select Product Type
3Select {MODEL} Type
Select {MODEL} Type
Sample Model Number Tags
Model numbers can be made up of numbers (1005400, for example) or a combination of letters and numbers (LAT1000AAE). The model number will most likely appear on either a paper sticker or a metal plate. Your appliance's model number tag may look similar to the sample model number tags shown here (model number highlighted in yellow):
Model has been saved to My Models. If you're not signed in, your lists are available on this device and will expire within 30 days.
Model has been saved to My Models.
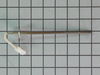
This genuine OEM oven probe is also known as an oven temperature sensor or range probe. This part is manufactured for a range, stove, or oven to detect the temperature within the oven cavity. The prob...
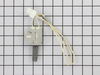
The oven burner igniter simply ignites the gas so it can heat the oven burner. The igniter does this by drawing electrical currents through the oven safety valve to open it. If the element shortens ou...
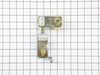
The anti-tip bracket kit comes with one metal bracket and two installation screws, and is sourced directly from the genuine manufacturer. It prevents the freestanding oven, range, or stove from tippin...
This orifice is a replacement fuel-delivery component designed to regulate gas flow to a burner. It plays a critical role in maintaining proper flame size and efficiency and is commonly replaced when ...
This part is sold individually. The leveling leg is black in color and measures approximately 2 inches in length. It is made of plastic. The leveling leg is found underneath your range and may crack o...
This oven bottom panel is a genuine OEM replacement designed to protect the bake element in gas ranges from spills, drips, and debris. Positioned above the bake burner, it acts as a barrier that helps...
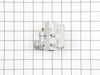
This spark module provides the electrical spark needed to ignite surface burners on a gas range or cooktop, helping ensure safe and reliable burner operation. It is commonly replaced when burners will...
Ask our experts a question about this model and we'll get back to you as soon as possible!
2 questions answered by our experts.
Sort by:
< Prev
1
Next >
Search filter:
Clear Filter
Your search term must have 3 or more characters.
Keep searches simple. Use keywords, e.g. "leaking", "pump", "broken" or "fit".
Sorry, we couldn't find any existing answers that matched.Try using some different or simpler keywords, or submit your new question by using the "Ask a Question" button above!
Yoshio
March 2, 2023
2 ignitions are not working. Using BBQ lighter is used to get burner going. Gas is coming out but the assemblies might be worn out or insulators are not good any more. How easy to remove and replace 2 assembly or anyone repair this near me.
For model number CEW30GF6GSK
Hello Yoshio, thank you for your question. We have found some instructions for installing the ignitor assemblies. They may not be of the same model, but they will help you with the installation. You may follow the following steps:
1. Take off the grates and burners and carefully lift them and set them aside.
2. Use a quarter-inch nut driver to remove the screws that hold the igniter and orifice assemblies to the range top.
3. Use a putty knife to release the clips, they are about four inches or so from each corner, so all you have to do is press, and then you can twist the putty knife to release them.
4. Once you have both of them released, you can lift the front of the cooktop from the range and set it aside.
5. There are four assemblies underneath there, and they are all changed out the same way.
6. Loosen up the half-inch nut that holds the ignitor to the gas valve. Once you have it loosened up, you just turn it by hand and then lift the assembly so that you can disconnect the igniter.
7. The igniter has a little button on it, so you have to push it for the wire to come off. Now, pull the igniter and orifice assembly out of the range.
8. Put the new igniter in the orifice assembly and first connect the wire to the igniter, then line up the gas line and put the nut on the valve and tighten it down with a wrench.
9. Now put the range-top back. Carefully line it up and lower it into position so that the orifice assemblies come out through the opening. Snap it in place and then put the screws in.
10. Now you can put the caps on the burners.
11. Put the grates back on, and once you have all the grates back on, you can turn the gas back on to check for leaks, and then you are ready to use it.
We hope this helps, good luck with this repair!
Did this question help you?
Thank you for voting!
Yoshio
March 12, 2023
How to replace top burner assemblies #5 and #9.
Disassembling top plate and replacing burner assembly (including lighter and orifice).
Thank you
For model number CEW30GF6GSK
Hello Yoshio, thank you for reaching out. Both burner tubes, part numbers PS2332558 and PS2332661, can be replaced in the same way. Unplug the appliance and close the gas supply valve. Remove burner grates, and burner caps and unscrew the screws underneath the burner. Release the two spring clips under the range top using a putty knife and remove the top of the range. Remove the wire from the electrode and use a wrench to remove the burner tube from the valve and orifice holder assembly. Now you can easily replace the left front burner assembly, part number PS2368577, and the left rear burner assembly, part number PS2368587. We hope this solves your problem!
I called a repair place. They charged $54 to diagnose, (said it needed a new latch motor) then wanted $220 to complete the repair. I checked online prices and did it myself for about 15 minutes work and the latch motor itself ($44?).
Was necessary to uplug the range, pull it away from the wall and remove the back panel sheet m
... Read moreetal, then 3 screws that mount the motor. Replace motor, reattach sheet metal. Plug in. Done. Ready to bake cookies.
took off back cover and unplugged old unit and installed new unit. oven probe was not the issue. probally control panel malfunction of readings. will continue using oven temperatue gauge inside to get settings for temperture as temp is important for baking.