Your coupon for will be reflected when you check out!
✖
Your coupon for
✖
Hello!
You're visiting the PartSelect site in U.S.
Would you like to shop on the Canadian site?
Stay on this site
Go to Canadian site
✖
Model Number Locations
1Select Category Type
Select Category Type
2Select Product Type
Select Product Type
3Select {MODEL} Type
Select {MODEL} Type
Sample Model Number Tags
Model numbers can be made up of numbers (1005400, for example) or a combination of letters and numbers (LAT1000AAE). The model number will most likely appear on either a paper sticker or a metal plate. Your appliance's model number tag may look similar to the sample model number tags shown here (model number highlighted in yellow):
Model has been saved to My Models. If you're not signed in, your lists are available on this device and will expire within 30 days.
Model has been saved to My Models.
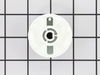
The selector knob is what you use to start the dryer. This replacement knob comes with a retaining clip. This is a very easy repair, the only tool you may need is a pair of needle nose pliers. Remove ...
This rear drum bearing kit includes a shaft, ground strap, bearing, seven screws, and installation instructions. The bearing plate comes with a slot in it for the ground strap. This part helps keep yo...
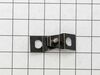
This door latch is designed for your dryer, and is mounted to the dryer frame. The door latch holds the door of your dryer closed while the machine is operating. If your dryer door is not catching on ...
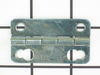
TThe door strike for your dryer is mounted on the dryer frame that the door shuts onto. It fits into the door catch on the door and keeps the door closed. If the door strike is damaged or missing, the...
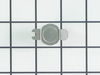
This part is the replacement high-limit thermostat or safety thermostat for your dryer. The high-limit thermostat is found on the upper right-hand side of the heater housing, and it cuts off power to ...
This fastening nut secures components firmly in place, helping maintain proper alignment and safe operation. It is commonly used as a replacement when original hardware is stripped, lost, or damaged.
Introducing the GE Idler Pulley Wheel, a crucial component for your dryer. This item is crafted from highly durable plastic, ensuring long lasting durability. The idler pulley wheel is responsible for...
Experience top-notch performance with GE's Drum Drive Belt. Specifically designed for dryers, this essential part attaches to the motor pulley, ensuring your dryer drum spins smoothly and efficiently ...
This is considered a high limit thermostat. Rating - L210 This thermostat acts as a safety mechanism that keeps the dryer from overheating. Once the dryer temperature reaches a certain point, this pie...
$127.45
In Stock
Order now and your part arrives by Jul 3
Questions And Answers for CDM2000RW439
Be the first to ask our experts a question about this model!
✖
Ask a Question
Ask our experts a question on this model and we'll respond as soon as we can.
Slid off the old START knob, then pushed on the new START knob.
I created and printed a label on my computer for use with the time selector dial, which must be set at or beyond 10 minutes, before turning the START knob.
I made a label that says "Minimum" with a red arrow that points past the 10 minute setting on the
... Read moretime selector dial.
My teenage daughter was not setting the time selector dial, to a point past 10 minutes. When she turned the START knob, the dryer would not come on, because the time selector dial was not set past the 10 minute setting.
My daughter had continually twisted the START knob until it broke. I am hoping she will be able to see the large printed label I put on the dryer near the time selector, saying "Minimum" with a large red arrow pointing past 10 minutes.
I am very pleased that I was quickly able to find the exact matching START knob for my dryer and the exact same color, from PartSelect.Com
First of all, unplug the dryer. I removed the two screws on the front of the cabinet to remove the top. I then took out the screws to remove the dial panel. Release the belt for the drum through the access hole in the rear of the dryer. Remove the front cover and pull the drum assembly out.
Remove the element disc from the
... Read more rear of the housing, take note of the the wireing placement. Replace disc and reverse order of disassembly.
This job was easy for me as I am a tinkerer by nature. The hardest part of the whole job was waiting on the part, which by the way was ordered on a Sunday evening and I had the replacement in my hands and back in the dryer running by 1:00 PM on the following Tuesday!
I book marked this website and WILL refer it to others who simply need a repair, not a costly new appliance!