Your coupon for will be reflected when you check out!
✖
Your coupon for
✖
Hello!
You're visiting the PartSelect site in U.S.
Would you like to shop on the Canadian site?
Stay on this site
Go to Canadian site
✖
Model Number Locations
1Select Category Type
Select Category Type
2Select Product Type
Select Product Type
3Select {MODEL} Type
Select {MODEL} Type
Sample Model Number Tags
Model numbers can be made up of numbers (1005400, for example) or a combination of letters and numbers (LAT1000AAE). The model number will most likely appear on either a paper sticker or a metal plate. Your appliance's model number tag may look similar to the sample model number tags shown here (model number highlighted in yellow):
Model has been saved to My Models. If you're not signed in, your lists are available on this device and will expire within 30 days.
Model has been saved to My Models.
This door latch, used in dishwashers, is located at the top of the door and locks the door shut when the dishwasher is working. If the door will not close or is damaged, changing the latch could be th...
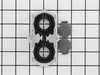
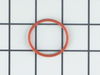
This hose clamp is used in a wide variety of household appliances. Most often it is found in washers, dishwashers, refrigerators, freezers, dehumidifiers, garbage disposals, or air conditioners. This ...
This genuine inner door foam insulation strip, sometimes known as bottom seal foam, is used to create a waterproof seal that helps prevent leaking from the door area of the dishwasher. The existing in...
This part is essential in your dishes getting clean during the wash cycle. If there is any debris or a tear in the filter, it can cause extra buildup and, therefore, causing dirty dishes.
This touch-up paint can be used on a wide variety of household appliances. It is most often used on washers, dryer, refrigerators, dishwashers, ranges, freezers, trash compactors, or microwaves. It is...
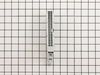
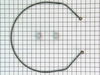
This is a part for your dishwasher. The door cable link helps to keep the door steady and give support to the weight of the door when it is being opened or closed. If you notice the door latch has fai...
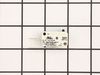
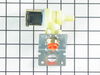
This is the replacement water valve for your dishwasher. The water inlet valve connects to the water source and solenoid wires, and ensures the tub has the right amount of water entering it. If your d...
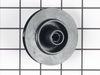
This spray arm is located on the lower half of your dishwasher. Water is forced through this spray arm by the unit's pump and motor assembly. The force of the water propels the spray arms, spraying wa...
No Longer Available
Questions And Answers for CDB1500AWB1
Be the first to ask our experts a question about this model!
✖
Ask a Question
Ask our experts a question on this model and we'll respond as soon as we can.
Most of the time was spent pulling out the dishwasher from under the counter, as a new tile floor had been installed after the DW was installed.
Great pictures of components on this website confirmed what part to order.
Shut off water feed to DW and disconnect power to DW.
Unplug wire connector to old
... Read morevalve (solenoid) and disconnect water inlet hose. Observe that valve is attached to sheet metal bracket.
Remove bracket, with valve attached. Don't remove valve from bracket. New valve comes with sheet metal bracket.
Remove female threaded adaptor (brass) from back of old valve and screw on to new valve using Teflon tape. That is the only piece you need to reuse.
Attached the new bracket (with valve attached) to DW. Attach water inlet hose. Attach plug to new valve.
Turn on water to DW. Check for leaks. Retighten hose connection if required. Run dishwasher. Keep lower panel off for a couple of days to be certain no leaks develop.
I ordered and replaced both the door gasket (easy) and inner door seal (difficult) to try and correct a leak during operation. The door gasket was easily replaced. However, the inner door seal was a bit more trouble. After removing the inner door I found that the old inner seal needed to be removed and surfaces thoroughly cleaned of old
... Read more build-up of dishwasher soap residue, in order to allow the sticky back tape side of door seal to properly stick to the door. There also was a plastic cover over the wire bundle that needed to be cleaned. The inner door seal was the exact length, so proper positioning of the sticky back was very important. Upon reassemly the leak still existed and I was unable to correct the leak. Further inspection indicated that the basic tub/body of the dishwasher might be slightly distorted due to age and may not create seal with door seal as originally designed. I guess I need to find a new dishwasher, at this point. A word to the wise: Check to see if the tub/body is still in good condition.
I had to remove the 4 screws holding the toe panel. Then I had to take out the one screw holding the floater switch housing in place. It snapped open to release the floater and that just lifted out. I put the new float in and snapped the new housing on. I put the screw back in to hold the housing in place attached the two wires to the swi
... Read moretch and put the toe panel back on. It was all very easy to do and my first home repair went very well. thank you.


 Diagram and Parts List for Magic Chef Dishwasher")