Your coupon for will be reflected when you check out!
✖
Your coupon for
✖
Hello!
You're visiting the PartSelect site in U.S.
Would you like to shop on the Canadian site?
Stay on this site
Go to Canadian site
✖
Model Number Locations
1Select Category Type
Select Category Type
2Select Product Type
Select Product Type
3Select {MODEL} Type
Select {MODEL} Type
Sample Model Number Tags
Model numbers can be made up of numbers (1005400, for example) or a combination of letters and numbers (LAT1000AAE). The model number will most likely appear on either a paper sticker or a metal plate. Your appliance's model number tag may look similar to the sample model number tags shown here (model number highlighted in yellow):
Model has been saved to My Models. If you're not signed in, your lists are available on this device and will expire within 30 days.
Model has been saved to My Models.
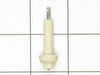
This pressure regulator is three inches long. It is made of metal, but has a blue plastic plug on each end. This regulator sits below a gas range's control panel.
If you have a burner that begins to constantly flick without lighting, and/or flicks while you are lighting another burner, it is likely time to order a new ignitor. Once received, we first lifted the burner support rack, then the burner cap, then unscrewed the nut holding the metal bracket that holds the ignitor in place (years ago we h
... Read moread to "soak" the nut with a loosening spray prior to being able to unscrew it, so since then we do not tighten the nuts too tightly so that each nut is easy to unscrew by hand or with pliers if necessary). The previous steps allow one to lift the burner ignitor up and out of its resting hole. It will be connected to the electric wiring via a plastic connector. All one has to do is pull the wiring away from the ignitor and then push it up into the new ignitor. The plastic connector protects you from touching the live ends of the wiring. Voila! The burner lighted successfully.
started with turning off gas and unplugging electric then removed right side of stove top that exposed burners removed plastic igniter switch from top of burner valve and in very tight area used 1/4" combo wrench to turn hex screw on underside of burner valve once broke loose the rest was easy just patients and a little determination remo
... Read moreved and everything in reverse to install works fine
I actually didn't do the repair. I called a service tech, but found it cheaper and faster to order the part myself. It arrived in 2 days. The tech removed the top part of the cook top with a philips screwdriver after that it was easy as unscrewing the valve and replacing it with the new one and tightening it with a wrench. He put the
... Read moretop back on, tightened the screws and that was it.


 – Part Number: 74007136")