Your coupon for will be reflected when you check out!
✖
Your coupon for
✖
Hello!
You're visiting the PartSelect site in U.S.
Would you like to shop on the Canadian site?
Stay on this site
Go to Canadian site
✖
Model Number Locations
1Select Category Type
Select Category Type
2Select Product Type
Select Product Type
3Select {MODEL} Type
Select {MODEL} Type
Sample Model Number Tags
Model numbers can be made up of numbers (1005400, for example) or a combination of letters and numbers (LAT1000AAE). The model number will most likely appear on either a paper sticker or a metal plate. Your appliance's model number tag may look similar to the sample model number tags shown here (model number highlighted in yellow):
Model has been saved to My Models. If you're not signed in, your lists are available on this device and will expire within 30 days.
Model has been saved to My Models.
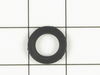
This inlet hose washer, also known as a high pressure inlet hose washer, is used in washing machines, refrigerators, freezers, and dishwashers. The function of this part is to create a watertight seal...
This foot pad is just over an inch in diameter. It is all black in color and is made entirely of rubber. This pad is used for the levelling legs of many washing machines.
Ask our experts a question about this model and we'll get back to you as soon as possible!
2 questions answered by our experts.
Sort by:
< Prev
1
Next >
Search filter:
Clear Filter
Your search term must have 3 or more characters.
Keep searches simple. Use keywords, e.g. "leaking", "pump", "broken" or "fit".
Sorry, we couldn't find any existing answers that matched.Try using some different or simpler keywords, or submit your new question by using the "Ask a Question" button above!
Val
December 24, 2024
Where and how do I clean washer filter.?
For model number AWN43RSN115TW01
Hi Val, thank you for reaching out. The washer filter is located at the end of the fill hoses. Rinse the filter screens under running water to remove any debris or buildup. With a soft brush, you can gently scrub away any stubborn particles. We hope this information helps!
Was this helpful?
Thank you for voting!
Donna
February 4, 2026
Latch on top of right front won't click so cycle won't advance. I can move it so it doesn't appear stuck, but when I close the lid, it won't activate.
For model number AWN43RSN115TW01
Hi Donna, thank you for the question. Since it does not activate, we would suggest replacing the lid lock assembly, part number PS19522457. We hope this sorts out your problem!
Biggest trick is getting the agitator off. It seems like it is bolted on. I used a piece of braided cotton cord to run under both sides of the agitator and just pulled real hard. It WILL pop off.
Next the old seal will also seem to be attached. The edge is firm but not bolted. A small prybar will help.
Easy repa
... Read moreir to do, but it did not fix my problem. I decided to get a new washer rather than go through further disassembly.
Remove front cover. Install springs. The springs are very tight. You might need another person to push and rotate the tub while you pull on the spring to get it installed in the holes. If you need to replace the springs that are in the back of the unit, you will need to disassemble more of the washer.
Disassembled washer as per directions with seal kit. Removed inner tub. Cut both tub shaft bearing in half; punched out from outter tub. Installed new bearings using .5 inch threaded rod, washer and bolts. Installed new seal on inner tub shaft. Installed inner tube. Re-assembled washer.