Your coupon for will be reflected when you check out!
✖
Your coupon for
✖
Hello!
You're visiting the PartSelect site in U.S.
Would you like to shop on the Canadian site?
Stay on this site
Go to Canadian site
✖
Model Number Locations
1Select Category Type
Select Category Type
2Select Product Type
Select Product Type
3Select {MODEL} Type
Select {MODEL} Type
Sample Model Number Tags
Model numbers can be made up of numbers (1005400, for example) or a combination of letters and numbers (LAT1000AAE). The model number will most likely appear on either a paper sticker or a metal plate. Your appliance's model number tag may look similar to the sample model number tags shown here (model number highlighted in yellow):
Model has been saved to My Models. If you're not signed in, your lists are available on this device and will expire within 30 days.
Model has been saved to My Models.
This is a leveling leg for your oven, range, or stove. The leveling legs on your oven allow your appliance to sit perfectly flat. The new one may be longer in length than your original, but will work...
This is a multi-use and multi-appliance screw. It can be used on a microwave, refrigerator, range/oven, air conditioner, dehumidifier, washer, or dryer. The measurements of this screw are 8 x 1/2 inch...
This is a replacement screw and washer for your oven/range. It is a Phillips-head screw approximately half an inch long, and the washer is approximately 1 inch in diameter. The screw attaches the oven...
This lower oven bake element is a genuine replacement component designed to deliver consistent heat from the bottom of the oven cavity. Engineered for select models from Whirlpool, KitchenAid, Maytag,...
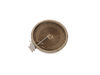
This is a radiant surface element with limiter, and it works in conjunction with your range. The function of this part is to give heat to the surface directly above it, on cooking area stove top.This ...
This part is for oven ranges, it connects individual wires and protects the device from electrical surges, voltages, and current. With this part, the house power is connected to the range wire harness...
This touch-up paint can be used on a wide variety of household appliances. It is most often used on washers, dryer, refrigerators, dishwashers, ranges, freezers, trash compactors, or microwaves. It is...
This interior oven door glass is the innermost heat-resistant panel that faces into the oven cavity, helping to contain heat while allowing visibility during cooking. Measuring approximately 20 5/8 in...
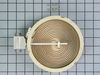
This is the replacement large surface element for your cooktop or range. It is approximately 10-inches in diameter and is 1200/2500 watts. The large surface element is installed under the cooktop and ...
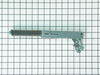
This door hinge can be used for the left or right side. As per the manufacturer if the hinges have never been replaced on the appliance, they suggest to replace the door hinge receptacle kit.
The light cover lens in your oven is designed to protect the light bulb. If your light cover lens is damaged, you will need to replace it. This part is made of clear glass and is roughly 3 inches in d...
Does your appliance need a quick fix? Our GE Controller Assembly is here to help. This genuine GE part is the heartbeat of your appliance, keeping everything running smoothly and efficiently. It's spe...
$46.34
In Stock
Order now and your part arrives by Mar 30
Questions And Answers for AER5845QAF17
Be the first to ask our experts a question about this model!
✖
Ask a Question
Ask our experts a question on this model and we'll respond as soon as we can.
Turned the breaker off, I removed 2 screws securing the range top to the range, opened the top and secured it in the up position, Removed the 2 screws securing the element ,one at a time I swapped the quick connectors from the old element to the new and repeated the process in reverse. I save over $100.00 in labor, plus most companies get
... Read more you for a trip charge. It was easy!!
First and MOST IMPORTANTLY, I located the breaker switch for my oven and turned it off. I verified this by noticing that the electric clock on the oven display was no longer powered.
After removing all the oven racks, I removed the two screws at the bottom of the back end of the oven holding the metal "floor" in place.
... Read more/> Removing the "floor" cover exposed the old heating element and I was able to quickly identify the corrosion of the old heating element which caused it break.
I unscrewed the two screws attaching the heating element to the bottom of the oven, then there was another screw attaching the back of the heating element to the back wall of the oven.
I had to pull the element towards me with a decent amount of force. This is the "quick and dirty" way of getting the job done, because I didn't want to have to find a way to pull my entire oven out from the wall of my kitchen in order to gain access to the back panel. Eventually with enough pulling, the two wires came through the holes with the gator clips still attached to the element (good! it would not have been fun if one of those came off too soon). Incidentally, a bit of fiberglass insulation also came through the holes. It didn't seem to be a big deal, I just discarded the fluff.
I detached the gator clips from the old heating element and removed it. It had a fair amount of black carbon residue (I assume) so you might want to wear gloves for this part or at least have a paper towel handy to clean your hands up.
Just follow the same directions in reverse the get the new element in. Hook up the gator clips, shove them through the two holes in the back of the oven, remount all the screws, remount the oven "flooring" and screw it back in. Before replacing the flooring, you may want to try turning on your oven to ensure it gives a nice pretty orange glow. Of course don't forget to let it cool down before proceeding, if you do that!
Don't think you have to be an expert to do this one. I was able to diagnose and fix this problem without any prior oven repair situations under my belt.


 – Part Number: W11665456")


")