Your coupon for will be reflected when you check out!
✖
Your coupon for
✖
Hello!
You're visiting the PartSelect site in U.S.
Would you like to shop on the Canadian site?
Stay on this site
Go to Canadian site
✖
Model Number Locations
1Select Category Type
Select Category Type
2Select Product Type
Select Product Type
3Select {MODEL} Type
Select {MODEL} Type
Sample Model Number Tags
Model numbers can be made up of numbers (1005400, for example) or a combination of letters and numbers (LAT1000AAE). The model number will most likely appear on either a paper sticker or a metal plate. Your appliance's model number tag may look similar to the sample model number tags shown here (model number highlighted in yellow):
Model has been saved to My Models. If you're not signed in, your lists are available on this device and will expire within 30 days.
Model has been saved to My Models.
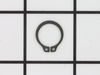
The metal retaining ring, which is under an inch long, holds the rear wheels on the axels of the dryer. The main reason why it would need to replaced is if the retaining ring has sprung out of place o...
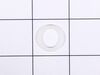
This inlet hose washer, also known as a high pressure inlet hose washer, is used in washing machines, refrigerators, freezers, and dishwashers. The function of this part is to create a watertight seal...
remove agitator then remove center bolt from hub, match bolt with longer bolt so that gear puller will work. install bolt and gear puller and twist top of gear puller until hub is removed. remove old seal ,use sand cloth or emery cloth to remove all deposits from shoulder. make it shinny, use some dawn dishwashing soap to line the inside
... Read moreof the new seal at the bottom and slide into place.take a piece of 2" PVC about 4" long and slide over the top of the seal and tap with a rubber hammer until seal is seated firmly on shoulder. look to see that there are no gaps with a inspection mirror or a make-up mirror.If their are no gaps ,install the hub and tap on the new hub with the rubber hammer. the hub will not seat all the way down so use the old bolt to pull it down, now take out the old bolt and install the new one, this is because the new one has lock tite on it ,your done!
Remove five screws holding the door hinge to the dryer frame. Remove the plastic cover over the screw holes on the opposite side. Remove the hinge from the door by removing two phillips head screws from the door edge and two phillips head screws from inside the door. Mount the hinge on the opposite side of the door. Attach to door to
... Read morethe opposite side with the five screws you removed previously. Remove and replace the the hinge cover and handle cover by popping out the plastic trim piece on the bottom and loosening the top trim pieces. Hook the replacement covers to the top trim pieces and pop the bottom piece back in. Replace the handle by removing two screws and put the new piece in. Tighten two screws and you're done
I used your great video for pointers as to what to do. I took off the front, raised the top, vacuumed the whole thing up, that took quite a while. Took out the drum. Did more cleaning. Then took off the old retaining rings with retaining ring pliers, took off the old drum rollers and support. Replaced with new roller supports, washer, rol
... Read moreler, washer and retaining rings. Then I replaced the belt. Tested it and turned the wrong way and it came off. Replaced and tested it again and I don't know why but it came off. Replaced the belt again, tested fine. Then I replaced the felt pads and glides, they were worn. I ended up asking my husband to help hold the drum so I could get the front back on. Replaced front and door. Tried the dryer. Works great AND very, very little noise. Note: when taking the wiring off the light and the door switch, I took photo's of those places with my cell phone and had them to look at to make sure the wiring was correct.