Models > 91141089991

91141089991 Kenmore Wall Oven - Overview

Sections of the 91141089991

[Viewing 5 of 5]

Manuals & Care Guides for 91141089991

Click to download
Keep searches simple, eg. "belt" or "pump".
Oven Rack – Part Number: WB48T10095
Oven Rack
★★★★★
★★★★★
(17)
PartSelect #: PS6447646
Manufacturer #: WB48T10095
The oven rack is sold individually. It is chrome in color and measures approximately 24 inches wide by 17-1/2 inches deep. The rack is used to hold cookware in the oven and slides back and forth for e...
$67.42
  In Stock
Order within the next 9 hrs and your part ships today!
Single Heating Element Support Clip – Part Number: WB2X9719
Single Heating Element Support Clip
★★★★★
★★★★★
(7)
PartSelect #: PS243701
Manufacturer #: WB2X9719
The metallic clip, or also known as a broil element support, is for a oven element on a range. This part holds the broil element in place on top of the oven. If your support clip is broken then this r...
$16.68
  In Stock
Order within the next 9 hrs and your part ships today!
Bake Element - 3400W – Part Number: WB44T10018
Bake Element - 3400W
★★★★★
★★★★★
(17)
PartSelect #: PS249293
Manufacturer #: WB44T10018
This bake element is found on the bottom of the oven.
$102.69
  In Stock
Order within the next 9 hrs and your part ships today!
Oven Bulb Lens Cover - Glass – Part Number: WB25T10002
Oven Bulb Lens Cover - Glass
★★★★★
★★★★★
(8)
PartSelect #: PS237483
Manufacturer #: WB25T10002
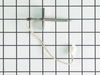
This part is the replacement oven bulb lens cover. It is made of glass and is approximately 3 inches in diameter. The lens cover is rigid and protects the oven light bulb from being damaged. The main ...
$11.51
  In Stock
Order within the next 9 hrs and your part ships today!
Oven Light Housing – Part Number: WB08T10002
Oven Light Housing
★★★★★
★★★★★
(11)
PartSelect #: PS230438
Manufacturer #: WB08T10002
The light housing is also known as a lamp holder and is a part for the oven in your range. The function of this piece is to hold the bulb that will light up the inside of your oven. As per the manufac...
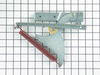
$28.94
  In Stock
Order within the next 9 hrs and your part ships today!
Ignitor Mounting Screw – Part Number: WB1X1293
Ignitor Mounting Screw
★★★★★
★★★★★
(2)
PartSelect #: PS234519
Manufacturer #: WB1X1293
Sold Individually.
$9.64
  In Stock
Order within the next 9 hrs and your part ships today!
Screw – Part Number: WH2X930
Screw
★★★★★
★★★★★
(1)
PartSelect #: PS271689
Manufacturer #: WH2X930
This screw is sold individually.
$12.22
  In Stock
Order within the next 9 hrs and your part ships today!
Screw – Part Number: WB1M1
Screw
★★★★★
★★★★★
(1)
PartSelect #: PS234320
Manufacturer #: WB1M1
Sold Individually.
$7.76
  In Stock
Order within the next 9 hrs and your part ships today!
Door Pad – Part Number: WB01T10026
Door Pad
PartSelect #: PS222173
Manufacturer #: WB01T10026
This is the door pad only. The trim is sold separately.
$9.42
  In Stock
Order within the next 9 hrs and your part ships today!
Screw – Part Number: WB1X1130
Screw
★★★★★
★★★★★
(2)
PartSelect #: PS234427
Manufacturer #: WB1X1130
Sold Individually.
$8.30
  On Order
Temperature Sensor Kit – Part Number: WB23X5340
Temperature Sensor Kit
★★★★★
★★★★★
(8)
PartSelect #: PS236490
Manufacturer #: WB23X5340
This kit includes the sensor as well as the connectors. NOTE This sensor is 2" long.
$208.65
  In Stock
Order within the next 9 hrs and your part ships today!
Screw – Part Number: WB1K5157
Screw
★★★★★
★★★★★
(1)
PartSelect #: PS234226
Manufacturer #: WB1K5157
This screw is black in color and sold individually.
$8.77
  In Stock
Order within the next 9 hrs and your part ships today!

Questions And Answers for 91141089991

We're sorry, but our Q&A experts are temporarily unavailable.
Please check back later if you still haven't found the answer you need.

Common Symptoms of the 91141089991

[Viewing 6 of 6]
Little to no heat when baking
Fixed by
these parts
Fixing Fixing Fixing
Show All
Element will not heat
Fixed by
these parts
Fixing Fixing
Show All
Oven not heating evenly
Fixed by
these parts
Fixing Fixing
Show All
Door won’t close
Fixed by
these parts
Fixing Fixing
Show All
Oven is too hot
Fixed by
these parts
Fixing
Show All
Little to no heat when broiling
Fixed by
these parts
Fixing
Show All
Keep searches simple. Use keywords, e.g. "leaking", "pump", "broken" or "fit".
Broken element
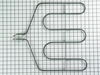
First, disconnect the power from the electrical box, not just turn off that oven. specially if you have a double oven. Just turn one off is not enough.

I removed the two screws that hold the element in place. I then pulled the element out slowly about 2 inches to expose the connectors, and then disconnected the two wires by holding the wire (female) connector by one plier and pull the element (male) connector out with another plier. Then, insert the new element connectors, and push the wire back into wall then fasten the element with 2 screws.
Parts Used:
Bake Element - 3400W
  • Yungti from Tomball, TX
  • Difficulty Level:
    Easy
  • Total Repair Time:
    15 - 30 mins
  • Tools:
    Nutdriver, Pliers
51 of 54 people found this instruction helpful.
Was this instruction helpful to you?
Thank you for voting!
Replace failed fan in control box
After turning off the breaker to cut power to the oven, I opened the oven door and, using the PartSelect exploded diagram as a guide, I removed 3 screws from the underside of the control panel - I was then able to slide the panel up and out to remove it. Leaving all of the control wires (especially the ribbon) connected to control panel, I saw the fan assembly mounted to the rear of the control box.

I noted the position of the two attached wires - black on top (or left), white on bottom (or right). Using a nutdriver with an extension bar, I unscrewed 4 screws holding the assembly in place. I removed the old fan and installed the new fan in its place. It was necessary to bend the new fan's legs out a bit to get them to line up with the holes. I reconnected the wires as mentioned above, then reinstalled the control panel.

I tested the oven by turning the breaker back on and letting the oven heat up to 450 degrees. The fan turned on as expected. After the oven cooled off, I reinstalled the 3 screws to secure the control panel.
Parts Used:
Upper Cooling Fan Motor with Blade
  • David from Richardson, TX
  • Difficulty Level:
    Really Easy
  • Total Repair Time:
    Less than 15 mins
  • Tools:
    Nutdriver, Socket set
30 of 32 people found this instruction helpful.
Was this instruction helpful to you?
Thank you for voting!
Oven sensor was not holding temperature range.
Per the instructions included with part.
Parts Used:
Temperature Sensor Kit
  • CHARLA from NEW BRAUNFELS, TX
  • Difficulty Level:
    Really Easy
  • Total Repair Time:
    Less than 15 mins
  • Tools:
    Nutdriver
44 of 75 people found this instruction helpful.
Was this instruction helpful to you?
Thank you for voting!