Your coupon for will be reflected when you check out!
✖
Your coupon for
✖
Hello!
You're visiting the PartSelect site in U.S.
Would you like to shop on the Canadian site?
Stay on this site
Go to Canadian site
✖
Model Number Locations
1Select Category Type
Select Category Type
2Select Product Type
Select Product Type
3Select {MODEL} Type
Select {MODEL} Type
Sample Model Number Tags
Model numbers can be made up of numbers (1005400, for example) or a combination of letters and numbers (LAT1000AAE). The model number will most likely appear on either a paper sticker or a metal plate. Your appliance's model number tag may look similar to the sample model number tags shown here (model number highlighted in yellow):
Model has been saved to My Models. If you're not signed in, your lists are available on this device and will expire within 30 days.
Model has been saved to My Models.
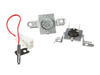
The sensor controls the temperature in your dryer and will turn off once your clothes have reached the desired dryness level. If you notice that your dryer is not giving off enough heat to dry the clo...
This dryer thermistor temperature sensor helps monitor and regulate the temperature inside a dryer. This part includes the wire harness. If your dryer overheats, does not produce enough heat, or takes...
This dryer thermistor temperature sensor helps monitor and regulate the temperature inside a dryer. This part includes the wire harness. If your dryer overheats, does not produce enough heat, or takes...
This spiral-style gas burner igniter is designed for use in select gas dryers and plays a crucial role in generating the heat needed to dry clothes. Operating at 120 volts, the igniter glows red hot d...
This genuine OEM conversion kit allows your dryer to be converted from using natural gas to liquid propane. It caters to homes that rely on propane for their energy needs. This kit comes with an orifi...
This genuine OEM felt gasket provides a cushioned seal between the inner tub of your electric dryer and the rear panel. It prevents your clothes from getting snagged and helps in heat retention. You w...
Don't let your fresh fruits and veggies go to waste! The GE Crisper Drawer is here to help. Also known as a PAN ASM, this nifty drawer can expertly manage humidity levels, providing the ideal storage ...
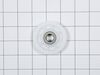
This genuine LG product is an Idle Pulley meticulously designed for LG electric dryers. It plays a crucial role in maintaining the correct tension on the drive belt, enabling it to spin the drum effec...
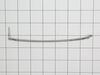
Designed exclusively for your LG dryer, the Drum Baffle - Lifter is a premium, OEM (Original Equipment Manufacturer) component guaranteed for an exact fit and superior performance. This drum baffle li...
Crafted with precision, this genuine LG door hinge is a high-quality and durable solution for your LG dryer door. This essential part, straight from the original equipment manufacturer, boasts an impr...
This is a genuine LG Electronics Dryer Conversion Kit that helps in changing your appliance from Liquid Propane to Natural Gas. It is essential for controlling the flow of gas to the burner assembly i...
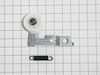
Discover the Motor Pulley Assembly for LG dryers, designed to efficiently maintain the correct tension of the drive belt to spin the drum. This high-quality item is crafted by LG, ensuring you of its ...
I noticed the flame would start, then quit after about 15 seconds. I checked the flame detector, and found the lenze cracked. I replaced it, and it's as good as gold.
It looked like a hard job to take the drum out to get at the part. But the top was off with 3 screws, the front about 6 I think. Then the front frame, only 4 s
... Read morecrews. I think setting the belt tentioner was the hardest thing to do.
Done in 45 minutes, both the job, then the next load of laundry.
The first thing I did was locate a copy of the Service Manual (not the User / Owner Manual). After looking at that and looking online I learned that there is no sensor for the Flow Sense feature itself. The Flow Sense doesn't detect a blockage. It detects excessive heat and the manufacturer has simply concluded that too much heat is most
... Read morelikely caused by a blocked duct and then it activates the Flow Sense safety feature: cutting off the heat source. Since I knew it was a heat problem I figured I'd get inside and check the two thermostats and the igniter. Igniter was fine, one thermostat was fine, the other one - the High Limit Thermostat - was giving inconsistent readings. I replaced it. Here's how: First I took the dryer apart. This is a little time consuming. There are a lot of parts that need to come out. I recommend that you put the screws in small baggies with a note as to where you took them out of so that you know where they go when you put it back together. You need to remove part of the back, the top and the front. I removed the electrical box because that is what is shown in the manual but I'm not convinced that I needed to. See if you can get the rest of the dryer apart without removing it but if you have to remove it it's not that big of a deal. It's a little tricky to detach the wire harnesses is all. And extra steps, of course. I did not remove the drum. Instead I just reached inside with the front off and pulled the wires off the thermostats to test them for resistance with a multimeter. It was kind of a pain and a little awkward but I did not want to mess with the drum tensioner. Once I figured out that the High Limit Thermostat was the likely culprit I removed it - which required a very short Phillips head screw driver and some patience since I could not actually see one of the screws. But all good. Just remember which wire goes on which terminal. Make a note for yourself: gray back / red front - something like that. Then I ordered the part and installed the new one and rebuilt the dryer in reverse from what I did.
Now, here's the thing: I actually did two things: aside from changing the thermostat I also thoroughly cleaned out the dryer. Somehow a lot of lint built up in there - no idea how since it all appeared to leave the dryer through the vent. but there must be some small gap somewhere. I cleaned everything including the flame detector. When I put it all back together it worked but I'm not 100% sure that the thermostat was bad. It's at least possible that all the lint and dirt was messing with the way the thermostats behaved. So what I would recommend, if you have this problem, is to clean it out first and then put it back together enough to run it and see of the heat comes on. It will take maybe 30-60 seconds for the heat to come on while the igniter lights. If not, go ahead and replace whichever thermostats or other parts you think are broken.
I did not do the repair I hired the propane company to do it . It was too difficult for me.they removed top & front of dryer .removed & replaced gas orfice reinstall all parts that were removed. Install and test dryer IT cost me $91.59 for labor & $24.65 for the part & shipping.If the dryer had a side access near the gas valve it
... Read more could have saved me the cost of labor. I could have done it myself.