Your coupon for will be reflected when you check out!
✖
Your coupon for
✖
Hello!
You're visiting the PartSelect site in U.S.
Would you like to shop on the Canadian site?
Stay on this site
Go to Canadian site
✖
Model Number Locations
1Select Category Type
Select Category Type
2Select Product Type
Select Product Type
3Select {MODEL} Type
Select {MODEL} Type
Sample Model Number Tags
Model numbers can be made up of numbers (1005400, for example) or a combination of letters and numbers (LAT1000AAE). The model number will most likely appear on either a paper sticker or a metal plate. Your appliance's model number tag may look similar to the sample model number tags shown here (model number highlighted in yellow):
Model has been saved to My Models. If you're not signed in, your lists are available on this device and will expire within 30 days.
Model has been saved to My Models.
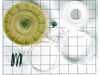
This kit is used for replacing the agitator directional cogs (Agitator Dogs, Agitator Repair Kit, Washer Agitator Dogs, Agitator Dog Ears). The agitator is what creates the thrusting motion in your wa...
This splutch cam kit is a genuine replacement assembly designed for select Whirlpool, Maytag, and affiliated brand washing machines. It plays a critical role in the wash and spin cycles by engaging th...
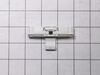
This washer lid switch is a critical safety component designed to halt the spinning motion of the tub when the lid is opened. Its primary function is to prevent accidental contact with moving parts du...
This genuine OEM drive belt is designed to transfer power from the motor to the drum in select Whirlpool, Maytag, Kenmore, and other compatible washing machines. Operating at 115 volts and 60 Hz, the ...
This touch-up paint can be used on a wide variety of household appliances. It is most often used on washers, dryer, refrigerators, dishwashers, ranges, freezers, trash compactors, or microwaves. It is...
This part is the replacement lid latch or latch assembly for your top-load washer. The lid latch holds your washer door closed, and allows the washer to run its cycle. If the lid latch is damaged, you...
The hose clamp is used to hold the water hose in place which will prevent the hose from leaking water. Sometimes the clamp may lose its ability to latch on, causing a leaking washer. For the installat...
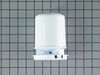
This washing machine cleaner includes three time-release tablets designed to remove odor-causing residues, grime, and buildup from high-efficiency and top-load washing machines. The tablets work by cl...
First pry off the cap of the agitator. Then using a socket remove the bolt that holds the plastic cup in place. Remove this cup by prying it loose from the two tabs that hold it in place. Once this cup is removed you can get to the broken cogs. Slip the new cogs into the underside of the cup, and slide the cup back down in the a
... Read moregitator housing using the slots on the side for a guide. (You may want to remove the entire agitator and assemble everything upside down, then flip it all back over to mount, so the cogs don't fall out). Tighten the bolt, snap the cap back in place on top of the agitator and your'e done. Easy repair.
pull off softner dispenser, pop off agitator cap by inserting straight screw driver into small slot, remove bolt inside agitator with socket wrench and long extension, pull agitator straight up off shaft, place agitator on floor, with feet holding bottom half pull top half apart from bottom half by pulling straight up, note direction of o
... Read moreld cogs remove and replace with new, reassemble
The instructions that came with the part were worthless. Essentially, unplug, put in new part, plug it back in. I spent a considerable amount of time on the internet and finally found a video showing how to open the top. Unlike other models, it is held down by clamps in the back rather than clips in the front. Once finding this inform
... Read moreation the installation was simple. Remove the clamps and the back of the console, slide the top forward and lift, remove and replace the lock and reassemble. You don't even have to remove the hoses.


 Diagram and Parts List for Whirlpool Washer")