Your coupon for will be reflected when you check out!
✖
Your coupon for
✖
Hello!
You're visiting the PartSelect site in U.S.
Would you like to shop on the Canadian site?
Stay on this site
Go to Canadian site
✖
Model Number Locations
1Select Category Type
Select Category Type
2Select Product Type
Select Product Type
3Select {MODEL} Type
Select {MODEL} Type
Sample Model Number Tags
Model numbers can be made up of numbers (1005400, for example) or a combination of letters and numbers (LAT1000AAE). The model number will most likely appear on either a paper sticker or a metal plate. Your appliance's model number tag may look similar to the sample model number tags shown here (model number highlighted in yellow):
Model has been saved to My Models. If you're not signed in, your lists are available on this device and will expire within 30 days.
Model has been saved to My Models.
This hose clamp is used in a wide variety of household appliances. Most often it is found in washers, dishwashers, refrigerators, freezers, dehumidifiers, garbage disposals, or air conditioners. This ...
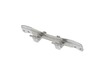
This is a door hinge, which allows for your washer door to properly shut during the washing cycle, and open after it is finished. If your door hinge is bent or broken and not allowing the door to shut...
This touch-up paint can be used on a wide variety of household appliances. It is most often used on washers, dryer, refrigerators, dishwashers, ranges, freezers, trash compactors, or microwaves. It is...
This washing machine cleaner includes three time-release tablets designed to remove odor-causing residues, grime, and buildup from high-efficiency and top-load washing machines. The tablets work by cl...
This is a dryer door hinge cap, also known as a bushing, which is a durable plastic cap that is installed on the door hinge and is used to allow your dryer door to operate smoothly when opening and cl...
This washer door boot seal, also known as a door bellow, is a genuine replacement component designed for select front-load models from Whirlpool, Maytag, Amana, KitchenAid, and other affiliated brands...
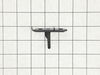
The leveling leg locking nut is an OEM replacement fastener for use in dryers and washers. It has a head diameter of 3/8 inches and a thread pitch of 16 threads per inch. The nut secures the leveling ...
Appliance spray paint is a great way to cover up any chips and scratches that have appeared on your appliances. Instead of replacing the part entirely, this is an easy fix. This is also a great way to...
Ensure your Whirlpool washing machine functions at its best with our genuine OEM door strike. This essential component is designed to seamlessly fit with specific Whirlpool models. It efficiently acti...
Note: This part has been updated by the manufacturer. It may appear different but will still function the same as the original. The hose clamp is about 2 inches in diameter and made of stainless steel...
This Affresh Washing Machine Cleaner deep cleans to help remove the odor-causing residues and grime that daily loads leave behind. The time-release tablets are EPA Safer Choice certified, septic-safe ...
This product comes in a bottle with a brush like Liquid Paper. It goes on incredibly easy. A second coat might be needed. I wanted to prevent rust from setting in so I covered the scratches and dings. The paint is a little brighter since my washer is 10 years old but it still looks great.
Using the Torx Screwdriver, we removed the door from the unit. Then we removed all of the screws on the inside of the washer door. After that we flipped it over and opened it up exposing the inside. We couldn't separate them entirely because there was a screw under the latch piece that we couldn't figure out how to get to. However with a
... Read morell the screws out on the inside of the door, we did have enough room to open it up and access the place cover that holds the hinges in. Once we accessed that we removed the roller tips from the old unit and placed them on the new one. Then we reversed the process. With a couple screws in we realized we had put the hinge in reversed from what it needed to be, so we reopened it and switched it around. Then completed replacing all the screws and reattached it to the washer. It opens and closes perfectly and we saved a couple hundred dollars for sure, as the quote to come out had been a $150 trip charge.
We unplugged everything. Then we removed the screws from the back of the washer. Then we slid off the top of the washer. Next, we removed the bottom drawer of the washer. We then proceeded to remove all of the screws and took off the entire face of the washer until the bellow was completely exposed. We did have to detach the hose and door
... Read more clamp. We removed two metal clamps that held the seal in place. Once those were off we removed the entire old seal, replaced it with the new one, clamped it down, and reversed the steps to put everything back together. It was fairly simple.


 Diagram and Parts List for Maytag Washer")