Your coupon for will be reflected when you check out!
✖
Your coupon for
✖
Hello!
You're visiting the PartSelect site in U.S.
Would you like to shop on the Canadian site?
Stay on this site
Go to Canadian site
✖
Model Number Locations
1Select Category Type
Select Category Type
2Select Product Type
Select Product Type
3Select {MODEL} Type
Select {MODEL} Type
Sample Model Number Tags
Model numbers can be made up of numbers (1005400, for example) or a combination of letters and numbers (LAT1000AAE). The model number will most likely appear on either a paper sticker or a metal plate. Your appliance's model number tag may look similar to the sample model number tags shown here (model number highlighted in yellow):
Model has been saved to My Models. If you're not signed in, your lists are available on this device and will expire within 30 days.
Model has been saved to My Models.
If your air conditioner isn't working as it used to, our LG DC Motor Assembly could be the solution you've been looking for. This part is not just any replacement part, it's an original equipment manu...
This ice bin is for refrigerators.
Ice bin stores ice cubes in the freezer section of the refrigerator.
Follow the instructions in the owner's manual when installing this part.
This LG Basket Assembly Door is an essential accessory for your refrigerator. Attaching to the inside of your appliance door, it's an efficient way to store bottles and jars. Primarily white with a to...
This water tubing clip holds the water fill tube in place in your refrigerator. The water fill tube attaches and supplies water to the ice maker/water dispenser in your fridge-freezer. If the tubing i...
Enhance the performance of your LG refrigerator with the genuine OEM Defrost Sensor Assembly. This product plays an essential role in maintaining the correct temperature within your refrigerator, as i...
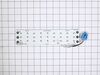
This light board is located behind the light lens and has LED lights that illuminate the interior of the refrigerator compartment when the door is opened.
$150.95
In Stock
Order now and your part arrives by Jul 2
Questions And Answers for 79571082015
Be the first to ask our experts a question about this model!
✖
Ask a Question
Ask our experts a question on this model and we'll respond as soon as we can.
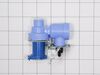
Turned of water to refrigerator and unplugged refrigerator. Removed the water line from refrigerator. Removed back panel. Removed mounting screw from the water valve, Unhooked wire harness from valve and removed the water line on back of valve. Reconnected wiring harness to new valve, reconnected water line on back of valve. Replaced the
... Read more back panel to refrigerator and put the water line back on the new valve. Turned on water valve and checked for leaks. It's now dispensing water and ice.
0) Look on the internet for a DIY/or pro-shop Video 1) Pull the refrigerator away from the wall, unplug the power cable 2) Shut off the water at the wall valve 3) Disconnect the water line at the inlet valve on the refrigerator (lower corner, right side), this is a threaded pipe fitting requiring a small open end wrench
... Read more />4) Remove the lower rear panel 5) Remove the water inlet and distribution valve assembly, there is one sheet-metal screw holding the assembly to the back edge of the refrigerator. 6) Carefully pull the assembly out of the back of the refrigerator, leave the distribution water lines attached, note the orientation 7) Disconnect the electrical connectors, note the orientation/types 8) Disconnect the water line from the inlet valve, remove the retaining clip, then pull out the line. Note - a small metal star shaped tube fitting may come out with the valve, this is fine and will not be used again. 9) Remove the inlet valve from the assembly (there are two small sheet-metal screws that are very tight, the correct/precise size, good quality Philips head screw driver is necessary or use a small set of vice-grips to grab the head of the screw) 10) Attach the new valve to the valve assembly, connect the electrical connectors, note - at the plastic refrigerator water line that connects to the inlet valve, trim/cut a small section off the end of the water line before connecting it to the valve. This will provide a fresh interface for the connection. Push the line in firmly and then install the retaining clip. 11) Perform a quick functional check before putting everything back together - Attach the water line from the wall, turn on the water, attach the electrical connectors, plug in the refrigerator power cable and test for operation and leaks. 12) Assuming no leaks/operational issues, unplug the refrigerator power cable again, turn off the water at the wall, disconnect the water line at the inlet valve and reinstall the valve assembly and rear panel. Reconnect the water line and plug in the power cable and you should be good to go.!