Your coupon for will be reflected when you check out!
✖
Your coupon for
✖
Hello!
You're visiting the PartSelect site in U.S.
Would you like to shop on the Canadian site?
Stay on this site
Go to Canadian site
✖
Model Number Locations
1Select Category Type
Select Category Type
2Select Product Type
Select Product Type
3Select {MODEL} Type
Select {MODEL} Type
Sample Model Number Tags
Model numbers can be made up of numbers (1005400, for example) or a combination of letters and numbers (LAT1000AAE). The model number will most likely appear on either a paper sticker or a metal plate. Your appliance's model number tag may look similar to the sample model number tags shown here (model number highlighted in yellow):
Model has been saved to My Models. If you're not signed in, your lists are available on this device and will expire within 30 days.
Model has been saved to My Models.
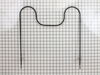
This is a 2800 watt, 240-volt Whirlpool oven bake element that is sourced directly from the original manufacturer for stoves, ovens, cooktops, or range ovens. This part should be replaced if the eleme...
Does your appliance need a quick fix? Our GE Controller Assembly is here to help. This genuine GE part is the heartbeat of your appliance, keeping everything running smoothly and efficiently. It's spe...
This Whirlpool surface element, known as ELMNT-SURF, is specifically designed for the smoothtop range. This 8" element comes with a built-in overheat limit switch, ensuring that it delivers heat safel...
This selector switch allows users to choose operating modes or cycles by directing electrical power to the appropriate components. Designed for smooth rotation and dependable contact, it is commonly r...
put the new element in the oven pushed wire onto connector on element held it up to match holes and put the screws back in, very easy to change. I really like the fast way I receive a part from you.
Unscrewed 2 screws holding terminal ends of the element in place. Eased the element out, until the two AC power wires were exposed. Pulled off the connectors from the element terminals (pretty tight fit - needed pliers to remove one of them).
Slipped the connectors onto the new element terminals, and eased the element back int
... Read moreo the oven wall. Secured the element with the two screws removed previously, and that was pretty much all there was to it. Closed the circuit breakers, and the element tested OK.
Overall, a no-sweat job. One thing, though: I squeezed the oven connectors tight before pushing them back onto the new element. They had loosened up somewhat after pulling them off. A tight connection here seems pretty important, as arcing and corrosion could occur over time if they're too loose.
Before you touch anything unplug the range or trip the breaker. Pull the racks out of the oven, it gives more room to work. Remove the two screws that hold the element and pull the element out about 2-3". Disconnect the old element. Before you install the new element check the wire and the connectors for age and heat damage. If the connec
... Read moretors are loose replace them (2 connectors @ $1.97 is better than a short in the oven). If the insulation on the wire is degraded (brittle, flaking, brown) consider changing out the wiring. This means opening up the back of the oven and that is another chapter. In most cases you can just re-connect to the replacement element and attach it back to the oven with the two screws. I ran the oven to 400 degrees to just check that everything was OK. Spent a couple extra minutes to check everything out and save yourself pain later.