Your coupon for will be reflected when you check out!
✖
Your coupon for
✖
Hello!
You're visiting the PartSelect site in U.S.
Would you like to shop on the Canadian site?
Stay on this site
Go to Canadian site
✖
Model Number Locations
1Select Category Type
Select Category Type
2Select Product Type
Select Product Type
3Select {MODEL} Type
Select {MODEL} Type
Sample Model Number Tags
Model numbers can be made up of numbers (1005400, for example) or a combination of letters and numbers (LAT1000AAE). The model number will most likely appear on either a paper sticker or a metal plate. Your appliance's model number tag may look similar to the sample model number tags shown here (model number highlighted in yellow):
Model has been saved to My Models. If you're not signed in, your lists are available on this device and will expire within 30 days.
Model has been saved to My Models.
The rack track stop on your dishwasher is designed to stop the dish rack at the appropriate place when opening and closing the rack. If your dishwasher is not cleaning your dishes properly, the rack s...
This part is a door balance link kit, also sometimes known as door cable or door spring cable kit, that helps support the door as it opens and closes by connecting to the dishwasher door hinges. The k...
This is a replacement upper dish rack wheel with mount for your dishwasher. The mount supports the dish rack, and the wheel allows the rack to slide out easily. To replace this part, remove the rack s...
The mounting bracket is sold individually, without screws. This part secures the upper side of the dishwasher to the underside of the counter or cabinet to prevent the dishwasher from moving, shaking,...
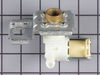
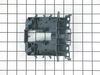
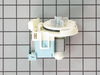
This is a chopper assembly or drain food chopper, and it is designed for your dishwasher. The chopper chops up/minces the food particles in your dishwasher to prevent them from clogging the pump. You ...
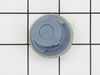
The rinse aid cap (sometimes referred to as the dispenser cap), covers the rinse aid dispenser on the dishwasher door. If your dishwasher will not dispense detergent, or it is leaking detergent, there...
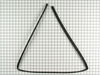
This is a door seal, but you may also know it as a door gasket and it is a part for your dishwasher. It provides a leak proof seal between the tub and the door of your appliance. You will need to repl...
The rubber washer is a part which is specific to dishwashers and should not be substituted by a similar part. It works with the heating element to seal the receptacle opening where the heating element...
The tine row on your dishwasher rack divides the rack into columns to keep your kitchen items in place during the washing cycle. If you notice that one or more of the tines on your current tine row is...
Pulled dishwasher from under counter, attached link to spring, hooked spring back into frame/chassis, threaded link through pulleys, attached other end of link onto door, reinstalled dishwasher under counter. All's well. Note-I purchased an extra link anticipating that the other one will fail. They're cheap enough.
1) Remove top and bottom dish baskets from the dishwasher, this will give you room to work. To remove top basket there are clips at the end of the slide rails. 2) Remove lower spray arm by unscrewing plastic screw, it should only be hand tight. 3) In order to remove the strainer cover, you will need to remove the plastic tube th
... Read moreat takes water to the middle and top spray arms. Unclip this tube from the top and middle clips and then work it out of the strainer assembly tube. Now you should be able to remove the tube at the bottom of the dishwasher by unscrewing it 1/4 turn. 4) Remove the strainer cover by unscrewing the 4 Torqs screws. 5) You will now see two smaller torqs screws that hold the hold the Chopper Assembly cover down. Take these two screws out and remove the two piece cover. 6) Pull out the broken Chopper Assembly, make sure you get all the pieces! 7) Install the new Chopper Assembly. Make sure that you install the Assembly with the small part of the screen towards the bottom of the housing. Also make sure you compress the spring as you install the part. I used a small pair of neddle nose pliers to compress the spring behind the screen in order to install the chopper assembly. 8) Put everything back together and make sure it works!
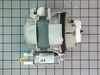
Rather than remove the pump assembly - as an earlier post had done - I pulled the entire dishwasher out and laid it down on the floor. This allowed easy, direct access to the motor (that was the hard, messy part). From this point it was easy. Unplug the wiring, remove the retaining bolt, rotate the motor off the mounting brackets and pull
... Read more it out. Then put the new one in. That was the easy part (about 15 minutes). The entire job took 2-and-a-half hours, most of which was taken in disconnecting, cleaning up and reconnecting the dishwasher. It's much quieter now.