Your coupon for will be reflected when you check out!
✖
Your coupon for
✖
Hello!
You're visiting the PartSelect site in U.S.
Would you like to shop on the Canadian site?
Stay on this site
Go to Canadian site
✖
Model Number Locations
1Select Category Type
Select Category Type
2Select Product Type
Select Product Type
3Select {MODEL} Type
Select {MODEL} Type
Sample Model Number Tags
Model numbers can be made up of numbers (1005400, for example) or a combination of letters and numbers (LAT1000AAE). The model number will most likely appear on either a paper sticker or a metal plate. Your appliance's model number tag may look similar to the sample model number tags shown here (model number highlighted in yellow):
Model has been saved to My Models. If you're not signed in, your lists are available on this device and will expire within 30 days.
Model has been saved to My Models.
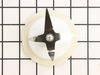
This is a replacement dome and blade assembly for your blender. This part connects to the bottom of the blender, and contains the blade. When the blender is running, the blade will rotate to chop any ...
This coupling connects rotating components to transfer power smoothly and efficiently during operation. Proper coupling alignment reduces vibration and mechanical stress. Replacing a worn coupling res...
First I disconnected the washer and used a shop vac to suck out remaining water throught the effluent tube. I then pulled the washer out from the wall and opened up the panel in the back where I saw a penney in the baffeled catch basin and, a wad of lint wrapped around what looked like three 7" wires. I opened up the top with the putty
... Read moreknife and flipped it bacl. I then proceded to remove the top sections of the tub (soap/bleach dispenser, etc) then I removed the dome using a stubby screwdriver to 'pop' the internal catches. The next thing to come out was the perforated baffel. I could see the blockage through the drain holes in the bottom of the tub. I made a hook out of a coat hanger to extract the wad and 'wires'. Also, a pair of needle nose plires were used to pull the wires through the tub holes. Rhe unit was then re-assembled and has worked fine since. The 'wires', it turned out, were identified by my wife as the wires from some of her underwire bras! They will get handwashed henceforth!