Your coupon for will be reflected when you check out!
✖
Your coupon for
✖
Hello!
You're visiting the PartSelect site in U.S.
Would you like to shop on the Canadian site?
Stay on this site
Go to Canadian site
✖
Model Number Locations
1Select Category Type
Select Category Type
2Select Product Type
Select Product Type
3Select {MODEL} Type
Select {MODEL} Type
Sample Model Number Tags
Model numbers can be made up of numbers (1005400, for example) or a combination of letters and numbers (LAT1000AAE). The model number will most likely appear on either a paper sticker or a metal plate. Your appliance's model number tag may look similar to the sample model number tags shown here (model number highlighted in yellow):
Model has been saved to My Models. If you're not signed in, your lists are available on this device and will expire within 30 days.
Model has been saved to My Models.
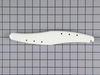
Water is forced through this spray arm by the unit's pump and motor assembly. The force of the water propels the spray arms, spraying water and detergent onto the dishes on the dishrack. This spray ar...
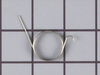
Enhance the performance of your dishwasher with this genuine GE Detergent Cup Door Spring. Specially designed, this Soap Cup Spring plays a crucial role in automatically opening the dispenser cover wh...
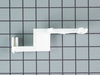
This is a water hose clamp kit for a variety of appliances including dishwashers and washers. This is a genuine replacement part. The kit includes two hose clamps. The smaller of the two is 1 inch in ...
Turn off power at breaker box. Remove lower covers and 2 screws into counter top. Verify sufficient length on water and electrical connection to allow sliding dishwasher out approx. 2/3. I disconnected the electrical at the j box on the dishwasher. If you must disconnect the water line, shut off supply, usually located under nea
... Read morerby sink, and provide a rag or sponge for small amounts of water left in supply line. Carefully pull back the insulation to expose two screws on top where water line runs into the center. Pull the top tray part way out and reach in to hold the spray arm while removing the screws. The spray arm will easily drop out. Hold the new spray arm in place making sure the raised screw posts push into the holes, then reinstall the two screws. Done. Pull insulation back into place, retape if necessary. Reconnect electrical and water if necessary. Slide unit back in, checking alinement. Rescrew to counter top and reinstall lower covers. Task complete. 15 mins if prepared. 30 mins if both elect. & water are disconnected and you are somewhat hesitant.
Pulled unit out of cabinet took two top screws out of spinner spray arm and put back together.Old sprayer was plugged up not letting wash go through.Thanks for helping me fix and not replace unit.Saved at least 400.