Your coupon for will be reflected when you check out!
✖
Your coupon for
✖
Hello!
You're visiting the PartSelect site in U.S.
Would you like to shop on the Canadian site?
Stay on this site
Go to Canadian site
✖
Model Number Locations
1Select Category Type
Select Category Type
2Select Product Type
Select Product Type
3Select {MODEL} Type
Select {MODEL} Type
Sample Model Number Tags
Model numbers can be made up of numbers (1005400, for example) or a combination of letters and numbers (LAT1000AAE). The model number will most likely appear on either a paper sticker or a metal plate. Your appliance's model number tag may look similar to the sample model number tags shown here (model number highlighted in yellow):
Model has been saved to My Models. If you're not signed in, your lists are available on this device and will expire within 30 days.
Model has been saved to My Models.
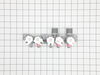
This is an authentic LG water inlet valve for a top-load washer. It is designed to control the flow of water into the washer. If your washer is filling slowly, making loud noises, overflowing, or stop...
This is a pulsator assembly, also known as an agitator, for your washing machine. This pulsator sits at the bottom of your washer and is what is used as the main driving force to wash your clothes. If...
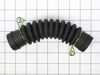
This is a drain hose assembly for top-load models of LG washing machines. This hose specifically is used to allow water to drain from the tub to the drain pump of the washer. This hose is made of plas...
This drain hose is a genuine OEM replacement part supplied by LG for use in their washing machines. It is a light gray pipe with a diameter of 1.25 inches. The drain hose is connected to the drain pum...
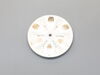
This water-level pressure switch in your wash monitors and regulates the water levels throughout the fill, wash, and rinse cycles. You will usually find it inside the control panel or near the tub. It...
This genuine LG STATOR ASSEMBLY is designed to perfectly fit your washer and ensure it operates at optimal efficiency. This washer drive motor comes with a sensor and plays a crucial role in rotating ...
Enhance the lifetime of your LG washing machine with the genuine Original Equipment Manufacturer (OEM) Motor Assembly Clutch. This crucial component aids in shifting the drive system between spin and ...
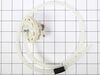
This lid switch assembly is a replacement safety component that detects lid position during operation. It is commonly replaced when the appliance will not start or fails to stop when the lid is opened.
I diagnosed by running a full wash. I watched it and when the water should have stopped it kept running. I unplugged the washer from the power and the water kept running. This told me the inlet valve was the issue and not an electronic issue. I stopped the water by closing the water valve manually. Replacing the inlet valve was very easy
... Read more. Hardest part is moving the washer out of the laundry room. The videos online show very simple steps. Maybe 8 screws to remove and a couple of hoses and five electronic connectors. Take a photo of connectors before removing them to ensure you reconnect properly.
The problem was the valve suppling water to the bleach dispenser was not closing completely. This also caused some water leaking towards the front of the washer. Replacing the entire valve assembly was very easy. Unplug the washer, turn off the water, remove the 2 screws that attach the control panel, disconnect the water supp
... Read morelies, unplug the 5 solenoids, remove the hose clamps from the 2 hoses, remove the 3 screws that attach the valve assembly and remove it. Reassemble in reverse order, I did find that applying some water based personal lubricant to the 3 high pressure seals made assembly much easier.