Your coupon for will be reflected when you check out!
✖
Your coupon for
✖
Hello!
You're visiting the PartSelect site in U.S.
Would you like to shop on the Canadian site?
Stay on this site
Go to Canadian site
✖
Model Number Locations
1Select Category Type
Select Category Type
2Select Product Type
Select Product Type
3Select {MODEL} Type
Select {MODEL} Type
Sample Model Number Tags
Model numbers can be made up of numbers (1005400, for example) or a combination of letters and numbers (LAT1000AAE). The model number will most likely appear on either a paper sticker or a metal plate. Your appliance's model number tag may look similar to the sample model number tags shown here (model number highlighted in yellow):
Model has been saved to My Models. If you're not signed in, your lists are available on this device and will expire within 30 days.
Model has been saved to My Models.
This retainer bar (Refrigerator Door Shelf Bin, Refrigerator Door Shelf, Door Shelf Bin, Refrigerator Door Bin) holds items on the refrigerator door shelf. The plastic retainer can become brittle with...
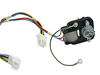
This Defrost Timer works like a clock by switching on the defrost heater circuit after a predetermined amount of compressor run time. This allows the defrost circuit to clear the evaporator of ice or ...
Upgrade your refrigerator's performance with this genuine OEM gasket-door ref. 21 in white from Frigidaire. Designed to prevent warm air from invading your fridge, this door gasket guarantees a seamle...
This OEM 40 watt appliance light bulb is used for some ranges, refrigerators, freezers, and microwaves. Simply locate the existing bulb, unscrew it from its socket, and replace with new light bulb. If...
The run capacitor helps the compressor kick on and off while maintaining a constant temperature in your fridge and freezer. You may need to replace your run capacitor if your refrigerator or freezer s...
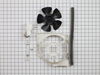
The evaporator fan motor (Motor Evaporator Fan, Evaporator Fan Motor Kit, Evaporator Fan Motor, Refrigerator Evaporator Fan Motor) circulates air through the food compartment for efficient cooling in ...
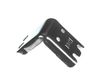
This defrost thermostat is also known as a refrigerator defrost bi-metal thermostat kit. The function of the defrost bi-metal thermostat is to prevent overheating during the defrost cycle in your refr...
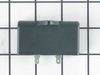
This screw is used in refrigerators. The screw can be loosened or tightened with a Phillips-head or square-head screwdriver. This screw is used to secure the refrigerator handle to the refrigerator do...
This crisper pan cover is designed to help maintain optimal humidity levels within your refrigerator’s crisper drawer, keeping fruits and vegetables fresher for longer. It includes both the frame and ...
This is a replacement door bin for your refrigerator. The door bin fits into your refrigerator door and is used to store food and other items. It is made of white plastic and is approximately 13 inche...
This is the replacement meat pan for your refrigerator. It is made of clear plastic and is approximately 18 inches long and 13 inches wide. The meat pan slides into the bottom of the refrigerator shel...
No instructions included, so it took a little bit of staring at the new part to figure out how it works. The barbed ridge on the gasket fits into a slot on the door. The flat face of the gasket has an internal magnetic strip that helps keep the seal tight against the steel face of the refrigerator. Installation requires no tools. This is
... Read morethe basic process: 1) Unbox the new gasket and get it ready to install so you don't have to leave the fridge open too long. 2) Open the door and grab the old gasket at one of the corners and pull away. This will unseat the barbed ridge I mentioned above. Work your way around the door until the whole gasket is free. 3) Set aside the old gasket 4) Grab a moistened paper towel and wipe down the (now exposed) sealing surface of the fridge and door. 5) Align the new gasket in the door and start pushing the barb into place. I found that the new gasket seemed slightly oversize compared to the original, so it took a little tweaking. What worked for me was to get all the corners seated, then work my way around the door making sure the gasket is fully seated. 6) Once you have the new gasket installed, close the door to make sure everything fits OK. 7) Open the door again and run your finger along the inside edge of the gasket seal. What you want to do is fold the edge of the gasket down so it lays flat against the outer wall of the door. 8) Shut the door and look from the sides and top to try to spot any gaps. You should be able to poke the gasket from the side and get the magnet strips to click into place. It seems like after a day or so the gasket 'relaxed' and I didn't have to worry about this anymore. 9) Dispose of the old gasket. I was able to pull the gasket into four pieces (separating at the corners) so it would fit in my city trash can...
This was the second part I tried. The defrost timer was first, but that did not fix it. To do this I had to remove the ice maker and the back plate of the freezer. Then I defrosted the coil and cut the wires. stripped them back and installed the new thermostat. re-assembled and tested. has been working great ever since.
I unplugged the refrigerator, then opened the door and removed four screws holding the plastic electrical panel to the interior top of the main refrigerator compartment and noticed the cold control was corroded badly, apparently from moisture in the panel. I ordered a new one from partselect.com. When it arrived the next day, I then pul
... Read moreled off the control knob, unclipped the cold control, unplugged the three wires to the control, then removed the styrofoam insulation blocks holding the thermocouple wire and then removed the thermocouple wire to complete the removal. I then reversed the process to install the new thermostat and control. That is repositioned the thermocouple wire, put the insulation blocks back to hold the wire, then replugged the three electrical wires, clipped the control back and pushed the control knob back on and finally screwed the panel back to the top of the main compartment and plugged the refrigerator electrical cord back in to provide current to the refrigerator. It immediately started up and ran fine. Total time - about 8 minutes.